Ga door naar hoofdinhoud

Samsung Admire Camera Replacement

Wat je nodig hebt

  1. Samsung Admire Camera Replacement, Back Cover: stap 1, afbeelding 1 van 1
    • Use your fingernail or the plastic opening tool under the slit to pull the back cover off.

  2. Samsung Admire Camera Replacement, Remove the Battery: stap 2, afbeelding 1 van 1
    • Making sure your hands are dry, insert your fingernail beneath the battery and remove it.

  3. Samsung Admire Camera Replacement, Remove the screws: stap 3, afbeelding 1 van 3 Samsung Admire Camera Replacement, Remove the screws: stap 3, afbeelding 2 van 3 Samsung Admire Camera Replacement, Remove the screws: stap 3, afbeelding 3 van 3
    Gereedschap gebruikt in deze stap:
    Magnetic Project Mat
    $19.95
    Koop
    • Use a Phillips #00 Precision Screwdriver to remove the six screws in the back of the phone.

    • Place the screws on a magnetic mat to prevent losing them.

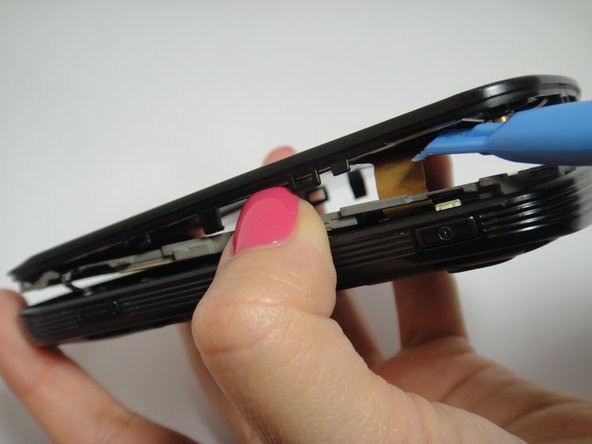
  4. Samsung Admire Camera Replacement, Inside back Cover: stap 4, afbeelding 1 van 3 Samsung Admire Camera Replacement, Inside back Cover: stap 4, afbeelding 2 van 3 Samsung Admire Camera Replacement, Inside back Cover: stap 4, afbeelding 3 van 3
    • Place the Plastic Opening tool on the outside rim of the back cover.

    • Carefully circle around the rim to open the inside back cover completely.

    • Disconnect the ribbon cables and remove the back cover.

  5. Samsung Admire Camera Replacement, Motherboard: stap 5, afbeelding 1 van 3 Samsung Admire Camera Replacement, Motherboard: stap 5, afbeelding 2 van 3 Samsung Admire Camera Replacement, Motherboard: stap 5, afbeelding 3 van 3
    • Carefully disconnect the volume button, the microphone connector, and the screen connector from the motherboard.

    • Pull back the side clips and lift the motherboard slowly.

  6. Samsung Admire Camera Replacement, Camera: stap 6, afbeelding 1 van 2 Samsung Admire Camera Replacement, Camera: stap 6, afbeelding 2 van 2
    • Use the plastic opening tool to disconnect the camera from the phone.

    • Connect the new camera into the motherboard.

Conclusie

To reassemble your device, follow these instructions in reverse order.

11 andere personen hebben deze handleiding voltooid.

Thao Uyen Do

Lid sinds: 01/20/15

896 Reputatie

4 handleidingen geschreven

Team

USF Tampa, Team 7-5, Remmell Winter 2015 Lid van USF Tampa, Team 7-5, Remmell Winter 2015

USFT-REMMELL-W15S7G5

4 Leden

4 handleidingen geschreven

0 opmerkingen

Voeg opmerking toe

Weergavestatistieken:

Afgelopen 24 uren: 3

Afgelopen 7 dagen: 9

Afgelopen 30 dagen: 36

Altijd: 1,538