Ga door naar hoofdinhoud

SOMNOcomfort and SOMNObalance Ventilator Fan Replacement

Medische apparatuur
Noch iFixit, noch deze reparatiehandleiding worden onderschreven door of zijn gelieerd aan de fabrikant van de desbetreffende medische apparatuur.

Wat je nodig hebt

  1. SOMNOcomfort and SOMNObalance Ventilator Fan Replacement, How to Open and Close Housing (SOMNOcomfort and SOMNObalance Ventilator): stap 1, afbeelding 1 van 1
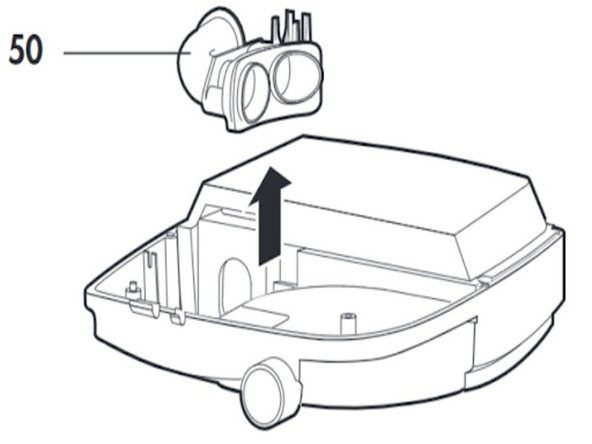
    • Remove the covering cap. (pg. 23)

  2. SOMNOcomfort and SOMNObalance Ventilator Fan Replacement: stap 2, afbeelding 1 van 1
    • Place the unit upside down on a non-slip surface and remove the six screws. (pg. 23)

  3. SOMNOcomfort and SOMNObalance Ventilator Fan Replacement: stap 3, afbeelding 1 van 1
    • Remove the lower part of the housing with a swiveling motion away to the side. Note the SOMNOcomfort series uses a shorter circuit board than the balance series ventilator. (pg. 23)

  4. SOMNOcomfort and SOMNObalance Ventilator Fan Replacement: stap 4, afbeelding 1 van 3 SOMNOcomfort and SOMNObalance Ventilator Fan Replacement: stap 4, afbeelding 2 van 3 SOMNOcomfort and SOMNObalance Ventilator Fan Replacement: stap 4, afbeelding 3 van 3
    • Remove the connector (X1) from the circuit board.

    • Pull the connecting cable (64) from its mount.

    • Now set aside the lower part of the housing. (pg. 23)

  5. SOMNOcomfort and SOMNObalance Ventilator Fan Replacement: stap 5, afbeelding 1 van 2 SOMNOcomfort and SOMNObalance Ventilator Fan Replacement: stap 5, afbeelding 2 van 2
    • Next, how to close the compartment and reverse the process.

    • Hold the lower part of the housing to the upper part at an angle

    • Attach the connector (X1) to the main circuit board. When doing so the connector’s nub has to point towards the lock. (pg. 24)

  6. SOMNOcomfort and SOMNObalance Ventilator Fan Replacement: stap 6, afbeelding 1 van 2 SOMNOcomfort and SOMNObalance Ventilator Fan Replacement: stap 6, afbeelding 2 van 2
    • Properly align the main circuit board inside the unit.

    • Attach the connecting cable (64) to its mount (pg. 24)

  7. SOMNOcomfort and SOMNObalance Ventilator Fan Replacement: stap 7, afbeelding 1 van 1
    • Place the lower part of the housing on the upper part (47). Please make sure the main circuit board (44) is aligned properly, and that the connecting cable (64) is not being squeezed anywhere. (pg. 24)

  8. SOMNOcomfort and SOMNObalance Ventilator Fan Replacement: stap 8, afbeelding 1 van 1
    • Now reattach the upper part of the housing by tightening the six screws. (pg. 24)

  9. SOMNOcomfort and SOMNObalance Ventilator Fan Replacement: stap 9, afbeelding 1 van 1
    • Insert the covering cap. (pg. 24)

  10. SOMNOcomfort and SOMNObalance Ventilator Fan Replacement, Fan: stap 10, afbeelding 1 van 1
    • Remove baffle box.

  11. SOMNOcomfort and SOMNObalance Ventilator Fan Replacement: stap 11, afbeelding 1 van 2 SOMNOcomfort and SOMNObalance Ventilator Fan Replacement: stap 11, afbeelding 2 van 2
    • Remove the decoupling tube(50) from the box.

  12. SOMNOcomfort and SOMNObalance Ventilator Fan Replacement: stap 12, afbeelding 1 van 1
    • Remove the box(53) in an upwards motion. Leave the Foam bottom (59) attached.

  13. SOMNOcomfort and SOMNObalance Ventilator Fan Replacement: stap 13, afbeelding 1 van 1
    • Remove the four screws (69) in the cover of the baffle box (60).

    • Remove the foam cover (58) and the cover of the baffle box (60).

  14. SOMNOcomfort and SOMNObalance Ventilator Fan Replacement: stap 14, afbeelding 1 van 1
    • Remove the foam bottom and separate the two parts of the baffle box.

  15. SOMNOcomfort and SOMNObalance Ventilator Fan Replacement: stap 15, afbeelding 1 van 1
    • Pull the decoupling tube(55) out of the motor frame’s borehole7.

  16. SOMNOcomfort and SOMNObalance Ventilator Fan Replacement: stap 16, afbeelding 1 van 1
    • Loosen the motor mount(54). Cut the mount using scissors or scalpel.

    • Remove the Fan.

  17. SOMNOcomfort and SOMNObalance Ventilator Fan Replacement: stap 17, afbeelding 1 van 1
    • Place three new motor mounts(54) into the box.

  18. SOMNOcomfort and SOMNObalance Ventilator Fan Replacement: stap 18, afbeelding 1 van 1
    • Insert the fan into the motor frame and attach it using the motor mounts(54). Pull the motor mounts through the boreholes of the fan to reach the surrounding notch.

  19. SOMNOcomfort and SOMNObalance Ventilator Fan Replacement: stap 19, afbeelding 1 van 1
    • Apply a small amount of 70% Isopropanol solution on the decoupling tube’s(55) circumference and attach it to the box. The tube’s notch must completely lock into the bore hole rim.

  20. SOMNOcomfort and SOMNObalance Ventilator Fan Replacement: stap 20, afbeelding 1 van 1
    • Reconnect the two parts of the box. Pay attention to the proper alignment of the foam part (61) and the correct cable lead. The cable must be placed in the appropriate cut-out.

  21. SOMNOcomfort and SOMNObalance Ventilator Fan Replacement: stap 21, afbeelding 1 van 1
    • Place the cover on the box and insert the screws.

  22. SOMNOcomfort and SOMNObalance Ventilator Fan Replacement: stap 22, afbeelding 1 van 1
    • Insert Baffle Box. Place foam 58on the box, soft side up. You must be able to see the screw heads of the box through the holes in the foam

  23. SOMNOcomfort and SOMNObalance Ventilator Fan Replacement: stap 23, afbeelding 1 van 1
    • Insert box(53) and foam (58) into the housing(47). Make sure the foam is spread out evenly.

  24. SOMNOcomfort and SOMNObalance Ventilator Fan Replacement: stap 24, afbeelding 1 van 1
    • Pull the protective backing off the adhesive tape and stick on foam(59). Use the crosses as a positioning aid.

  25. SOMNOcomfort and SOMNObalance Ventilator Fan Replacement: stap 25, afbeelding 1 van 1
    • Apply a small amount of 70% Isopropanol solution on the decoupling tube’s (50) circumference and attach it to the box. The tube’s notch must completely lock into the bore hole rim.

Conclusie

To reassemble your device, follow these instructions in reverse order.

Diya Jamwal

Lid sinds: 11/07/18

553 Reputatie

3 handleidingen geschreven

Team

Cal Poly, Team S1-G3, Zimmerman Spring 2020 Lid van Cal Poly, Team S1-G3, Zimmerman Spring 2020

CPSU-ZIMMERMAN-S20S1G3

5 Leden

10 handleidingen geschreven

0 opmerkingen

Voeg opmerking toe

Weergavestatistieken:

Afgelopen 24 uren: 0

Afgelopen 7 dagen: 2

Afgelopen 30 dagen: 2

Altijd: 121