Ga door naar hoofdinhoud

Ryobi RJ1861V Motor Replacement

Wat je nodig hebt

  1. Ryobi RJ1861V Motor Replacement, Saw Bar Assembly: stap 1, afbeelding 1 van 1
    • Use a Torx T5 screwdriver to remove the single 8 mm screw securing the shoe.

  2. Ryobi RJ1861V Motor Replacement: stap 2, afbeelding 1 van 2 Ryobi RJ1861V Motor Replacement: stap 2, afbeelding 2 van 2
    • Remove the rubber sleeve.

    • You may have to use some force as it has a tight fit.

  3. Ryobi RJ1861V Motor Replacement: stap 3, afbeelding 1 van 1
    • Use a Torx T5 screwdriver to remove the six screws on the underside of the device.

  4. Ryobi RJ1861V Motor Replacement: stap 4, afbeelding 1 van 1
    • Use a Torx T5 screwdriver to remove the four screws on the top of the gear case.

    • There are two screws on each side of the device.

  5. Ryobi RJ1861V Motor Replacement: stap 5, afbeelding 1 van 1
    • Remove the backside panel.

  6. Ryobi RJ1861V Motor Replacement: stap 6, afbeelding 1 van 1
    • Unscrew the four T5 Torx screws that hold the assembly bar in place.

  7. Ryobi RJ1861V Motor Replacement: stap 7, afbeelding 1 van 1
    • Lift the assembly bar up and out of the chassis.

  8. Ryobi RJ1861V Motor Replacement, Assembly Bar Bearing: stap 8, afbeelding 1 van 1
    • Begin with the top of the device facing up.

  9. Ryobi RJ1861V Motor Replacement: stap 9, afbeelding 1 van 1
    • Insert needle nose pliers to remove the retaining pin at the top of the bearing.

  10. Ryobi RJ1861V Motor Replacement: stap 10, afbeelding 1 van 1
    • Once the retaining pin has been removed, pull off the damaged bearing and insert a new one.

  11. Ryobi RJ1861V Motor Replacement, Motor: stap 11, afbeelding 1 van 1
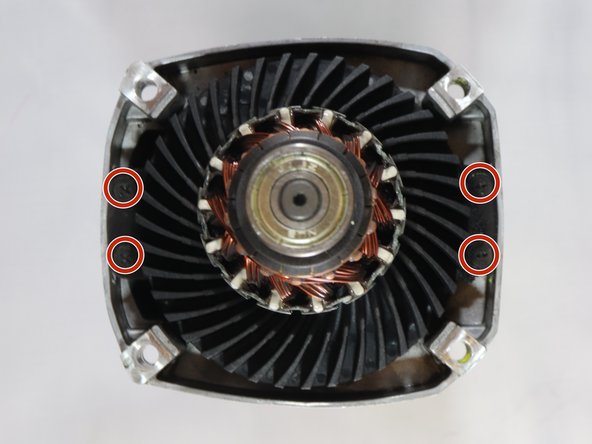
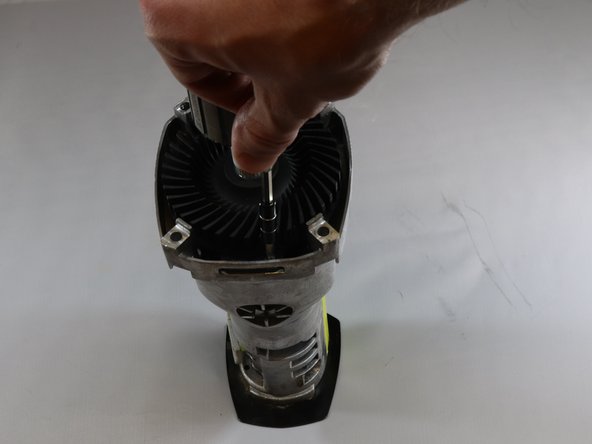
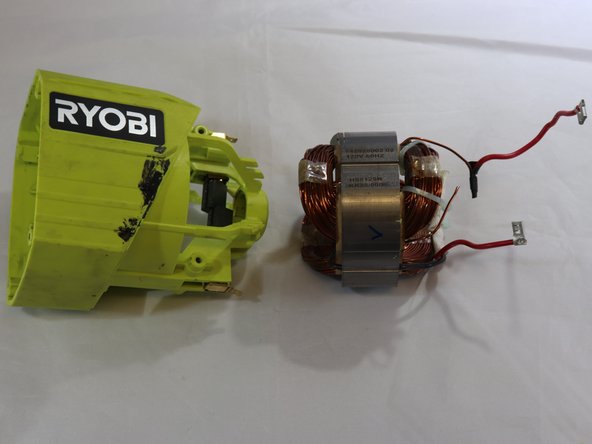
    • The motor is divided into two sections, one attached to the gear case and one attached to the handle.

    • This arrow indicates the section attached to the gear case.

    • This arrow indicates the section attached to the handle.

  12. Ryobi RJ1861V Motor Replacement: stap 12, afbeelding 1 van 3 Ryobi RJ1861V Motor Replacement: stap 12, afbeelding 2 van 3 Ryobi RJ1861V Motor Replacement: stap 12, afbeelding 3 van 3
    • Use a Torx T5 screwdriver to remove the four screws attaching the motor to the gear case.

  13. Ryobi RJ1861V Motor Replacement: stap 13, afbeelding 1 van 1
    • Use a Torx T5 screwdriver to remove the two screws inside the motor housing of the handle.

  14. Ryobi RJ1861V Motor Replacement: stap 14, afbeelding 1 van 2 Ryobi RJ1861V Motor Replacement: stap 14, afbeelding 2 van 2
    • Remove the four screws on the back of the housing with a Torx T5 screwdriver.

    • Flip the housing over and pull the motor up and out of the housing.

Conclusie

To reassemble your device, follow these instructions in reverse order.

Één andere persoon heeft deze handleiding voltooid.

Adrian Williams

Lid sinds: 04/08/19

183 Reputatie

1 Handleiding geschreven

0 opmerkingen

Voeg opmerking toe

Weergavestatistieken:

Afgelopen 24 uren: 0

Afgelopen 7 dagen: 0

Afgelopen 30 dagen: 4

Altijd: 219