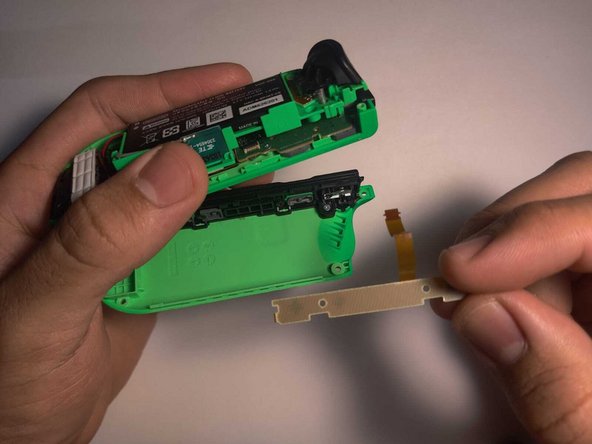
Ga door naar hoofdinhoud

Nintendo Switch Right Joy-Con SL/SR Button Board Replacement

Wat je nodig hebt

  1. Nintendo Switch Right Joy-Con SL/SR Button Board Replacement, SL/SR Button Board: stap 1, afbeelding 1 van 3 Nintendo Switch Right Joy-Con SL/SR Button Board Replacement, SL/SR Button Board: stap 1, afbeelding 2 van 3 Nintendo Switch Right Joy-Con SL/SR Button Board Replacement, SL/SR Button Board: stap 1, afbeelding 3 van 3
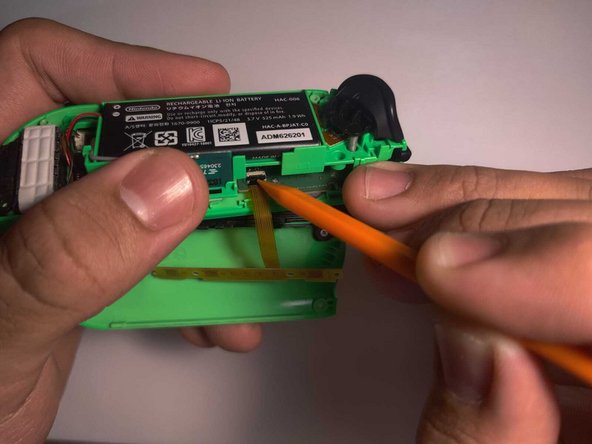
    • Remove the four 6 mm screws visible on the back of the Joy-Con using the Tri-point Y00 screwdriver.

    • During the entire procedure, place the small screws somewhere you won't lose them and keep them organized.

  2. Nintendo Switch Right Joy-Con SL/SR Button Board Replacement: stap 2, afbeelding 1 van 3 Nintendo Switch Right Joy-Con SL/SR Button Board Replacement: stap 2, afbeelding 2 van 3 Nintendo Switch Right Joy-Con SL/SR Button Board Replacement: stap 2, afbeelding 3 van 3
    • Open the Joy-Con by inserting the opening pick tool into the bottom corner and sliding it upwards.

    • When opening, be careful not to 'yank' the two halves of the Joy-Con far apart, as they are still attached by cables.

    • The ribbon cables are fragile. Forceful pulling may lead to device damage.

  3. Nintendo Switch Right Joy-Con SL/SR Button Board Replacement: stap 3, afbeelding 1 van 3 Nintendo Switch Right Joy-Con SL/SR Button Board Replacement: stap 3, afbeelding 2 van 3 Nintendo Switch Right Joy-Con SL/SR Button Board Replacement: stap 3, afbeelding 3 van 3
    • Remove the two 3 mm screws on the charging rail using the Phillips #00 screwdriver.

    • The part that needs to be replaced is the button board directly under these two screws.

  4. Nintendo Switch Right Joy-Con SL/SR Button Board Replacement: stap 4, afbeelding 1 van 3 Nintendo Switch Right Joy-Con SL/SR Button Board Replacement: stap 4, afbeelding 2 van 3 Nintendo Switch Right Joy-Con SL/SR Button Board Replacement: stap 4, afbeelding 3 van 3
    • Remove the three 3 mm screw on the battery compartment using the Phillips #00 screwdriver.

    • With the battery compartment loosened, the locking tab holding the cable in place will be easy to access.

  5. Nintendo Switch Right Joy-Con SL/SR Button Board Replacement: stap 5, afbeelding 1 van 3 Nintendo Switch Right Joy-Con SL/SR Button Board Replacement: stap 5, afbeelding 2 van 3 Nintendo Switch Right Joy-Con SL/SR Button Board Replacement: stap 5, afbeelding 3 van 3
    • Use the plastic spudger tool to lift the tab lock holding the bent button board cable. Lightly lift the battery compartment to have more space while doing so.

    • Once the tab is unlocked, remove the bent cable.

  6. Nintendo Switch Right Joy-Con SL/SR Button Board Replacement: stap 6, afbeelding 1 van 3 Nintendo Switch Right Joy-Con SL/SR Button Board Replacement: stap 6, afbeelding 2 van 3 Nintendo Switch Right Joy-Con SL/SR Button Board Replacement: stap 6, afbeelding 3 van 3
    • Insert the new replacement button board cable into the tab.

    • Use the spudger to re-lock the tab to hold the new part in its place.

  7. Nintendo Switch Right Joy-Con SL/SR Button Board Replacement: stap 7, afbeelding 1 van 3 Nintendo Switch Right Joy-Con SL/SR Button Board Replacement: stap 7, afbeelding 2 van 3 Nintendo Switch Right Joy-Con SL/SR Button Board Replacement: stap 7, afbeelding 3 van 3
    • To avoid having the same problem in the future, make sure the new cable is bent under the battery compartment after reassembly.

    • Lightly lift the battery compartment to make it easier to bend the new button board cable under it.

    • The space between the battery and the back shell of the Joy-Con is very tight, which caused the original cable to bend and malfunction. Inserting the new cable under the battery will give it more space.

Conclusie

To reassemble your device, follow these instructions in reverse order, starting from Step 4.

43 andere personen hebben deze handleiding voltooid.

11 opmerkingen

Valuable step-by-step guide plus pictorial samples. Keep writing your good stuff, Javier!

Rudi Lim - Antwoord

Nice guide. To loosen the battery compartment on my controller I had to remove te battery first. I couldn't see te top 2 screws in step 4. The battery was sticked to the bracket with some tape but removes easily. Underneath the battery were two screws.

Edit: maybe its different because I had to change the button board on the left JoyCon.

Stefan Haarman - Antwoord

Yes! This Guide above shows the right Joycon. As for the left one there are two screws below the battery as you said!

Paul Stachowiak -

Very helpful step-by-step guide. Thank you.

Had to change the Button Board on the left Joy-con. The screws were also located under the battery in my case. Attention: there 4 screws under the battery, two of which diagonal to each other that hold the battery compartment in place. No need to unscrew all 4.

Tone - Antwoord

I’ve replaced the board, but SL and SR still not working, also two lights not working. What to do?

Mike - Antwoord

Voeg opmerking toe

Weergavestatistieken:

Afgelopen 24 uren: 77

Afgelopen 7 dagen: 761

Afgelopen 30 dagen: 4,059

Altijd: 65,445