Ga door naar hoofdinhoud

Retina MacBook 2016 Dual Microphone Assembly Replacement

Wat je nodig hebt

  1. Retina MacBook 2016 Dual Microphone Assembly Replacement, Unfasten the lower case: stap 1, afbeelding 1 van 1
    Gereedschap gebruikt in deze stap:
    Magnetic Project Mat
    $19.95
    Koop
    • Before proceeding, unplug and power down your MacBook. Close the display and lay it on a soft surface, top-side down.

    • Remove the following eight screws securing the lower case:

    • Two 1.8 mm P5 Pentalobe screws

    • Four 2.9 mm P5 Pentalobe screws

    • Two 6.1 mm P5 Pentalobe screws

    • Note the orientation of the screws as you remove them—they need to be reinstalled at a slight angle.

    • Throughout this repair, keep track of each screw and make sure it goes back exactly where it came from to avoid damaging your device.

  2. Retina MacBook 2016 Dual Microphone Assembly Replacement: stap 2, afbeelding 1 van 3 Retina MacBook 2016 Dual Microphone Assembly Replacement: stap 2, afbeelding 2 van 3 Retina MacBook 2016 Dual Microphone Assembly Replacement: stap 2, afbeelding 3 van 3
    • Wedge your fingers between the upper case and the lower case, starting from the rear of the MacBook between the hinges.

    • Lift the lower case only slightly to avoid damaging the cables that connect the lower case to the upper case.

    • Keeping a firm grip, lift steadily until the lower case separates slightly from the upper case.

    • You may experience a lot of resistance when lifting the lower case. If necessary, slide an opening pick or other ESD-safe pry tool down the side edges of the lower case to pop the two hidden retaining clips free.

    • During reassembly, to re-engage the clips, press firmly near both side edges of the lower case (near where the pick is inserted in the third image) until you hear the clips snap into place.

  3. Retina MacBook 2016 Dual Microphone Assembly Replacement: stap 3, afbeelding 1 van 1
    • While holding the lower case in place, carefully flip the MacBook over so the Apple logo faces up.

  4. Retina MacBook 2016 Dual Microphone Assembly Replacement: stap 4, afbeelding 1 van 2 Retina MacBook 2016 Dual Microphone Assembly Replacement: stap 4, afbeelding 2 van 2
    • Lift the upper case and display together from the front edge and raise it to about a 45˚ angle.

    • It may be helpful to prop the MacBook open in this position for the next step.

  5. Retina MacBook 2016 Dual Microphone Assembly Replacement: stap 5, afbeelding 1 van 3 Retina MacBook 2016 Dual Microphone Assembly Replacement: stap 5, afbeelding 2 van 3 Retina MacBook 2016 Dual Microphone Assembly Replacement: stap 5, afbeelding 3 van 3
    • Use the flat end of a spudger to press and hold the small gold 'battery disconnect' button.

    • If the power LED is lit up, continue holding the button until the LED goes dark, and then release. This may take up to 10 seconds.

    • If the LED does not light, release the button after 5-10 seconds. Press and hold it again for 5-10 seconds, and release. Finally, press and hold it a third time for 5-10 seconds, and release.

    • This step ensures the MacBook is fully powered down and safe to work on.

  6. Retina MacBook 2016 Dual Microphone Assembly Replacement: stap 6, afbeelding 1 van 1
    • Close the MacBook and carefully flip it upside-down.

  7. Retina MacBook 2016 Dual Microphone Assembly Replacement: stap 7, afbeelding 1 van 1
    • Lifting from the front edge, open the lower case to an angle of about 45°.

    • Take care not to damage the ribbon cables that still attach the lower case to the MacBook.

  8. Retina MacBook 2016 Dual Microphone Assembly Replacement: stap 8, afbeelding 1 van 2 Retina MacBook 2016 Dual Microphone Assembly Replacement: stap 8, afbeelding 2 van 2
    • Use tweezers to peel back the tape covering the trackpad cable ZIF connector.

  9. Retina MacBook 2016 Dual Microphone Assembly Replacement: stap 9, afbeelding 1 van 3 Retina MacBook 2016 Dual Microphone Assembly Replacement: stap 9, afbeelding 2 van 3 Retina MacBook 2016 Dual Microphone Assembly Replacement: stap 9, afbeelding 3 van 3
    • Use a spudger to carefully flip up the retaining flap on the trackpad cable ZIF connector.

  10. Retina MacBook 2016 Dual Microphone Assembly Replacement: stap 10, afbeelding 1 van 2 Retina MacBook 2016 Dual Microphone Assembly Replacement: stap 10, afbeelding 2 van 2
    • Disconnect the trackpad ribbon cable from the trackpad by pulling it gently through its slot in the frame.

  11. Retina MacBook 2016 Dual Microphone Assembly Replacement: stap 11, afbeelding 1 van 3 Retina MacBook 2016 Dual Microphone Assembly Replacement: stap 11, afbeelding 2 van 3 Retina MacBook 2016 Dual Microphone Assembly Replacement: stap 11, afbeelding 3 van 3
    • Carefully close the MacBook and flip it over once again, so that the Apple logo faces up.

    • Lifting from the front edge, raise the upper case/display assembly to about a 90° angle, and prop it up against something sturdy so you don't have to hold it.

    • Add a piece of tape near the track pad to secure the upper case and prevent accidental movement.

    • It's possible to open the MacBook all the way and lay both sides down flat, but this may damage the flex cables and is not recommended.

  12. Retina MacBook 2016 Dual Microphone Assembly Replacement: stap 12, afbeelding 1 van 1
    • Remove the single 2.9 mm T5 Torx screw securing the battery connector to the logic board.

  13. Retina MacBook 2016 Dual Microphone Assembly Replacement: stap 13, afbeelding 1 van 2 Retina MacBook 2016 Dual Microphone Assembly Replacement: stap 13, afbeelding 2 van 2
    Gereedschap gebruikt in deze stap:
    Battery Blocker
    $3.99
    Koop
    • As an added precaution, you may physically disconnect the battery by inserting a battery isolation pick between the logic board and the battery connector.

  14. Retina MacBook 2016 Dual Microphone Assembly Replacement, USB-C and Audio Jack Disconnect: stap 14, afbeelding 1 van 1
    • Remove the two screws securing the USB-C port cable bracket:

    • 1.1 mm Phillips #00 screw

    • Some variations of this model may use a Tri-point Y00 screw.

    • 3.5 mm T5 Torx screw

  15. Retina MacBook 2016 Dual Microphone Assembly Replacement: stap 15, afbeelding 1 van 2 Retina MacBook 2016 Dual Microphone Assembly Replacement: stap 15, afbeelding 2 van 2
    • Use the flat end of a spudger to disconnect the USB-C port cable bracket by prying it straight up from the logic board.

    • To reconnect this cable, first line up the metal bracket over the screw holes, then press down on the middle of the bracket. Make sure it's aligned correctly, or you may damage the connector.

  16. Retina MacBook 2016 Dual Microphone Assembly Replacement: stap 16, afbeelding 1 van 2 Retina MacBook 2016 Dual Microphone Assembly Replacement: stap 16, afbeelding 2 van 2
    • Use a spudger to flip open the retaining flap on the audio jack board cable ZIF connector.

  17. Retina MacBook 2016 Dual Microphone Assembly Replacement: stap 17, afbeelding 1 van 2 Retina MacBook 2016 Dual Microphone Assembly Replacement: stap 17, afbeelding 2 van 2
    • Disconnect the audio jack board ribbon cable by pulling it straight back out of the ZIF connector.

    • During reassembly, orient the ribbon cable so the white stripe faces you. Insert the cable until the white line disappears under the socket.

    • At this point it is possible to open the macbook all the way and to lay it flat on a table without causing any damage to the flex cables.

  18. Retina MacBook 2016 Dual Microphone Assembly Replacement, Audio Jack Board: stap 18, afbeelding 1 van 2 Retina MacBook 2016 Dual Microphone Assembly Replacement, Audio Jack Board: stap 18, afbeelding 2 van 2
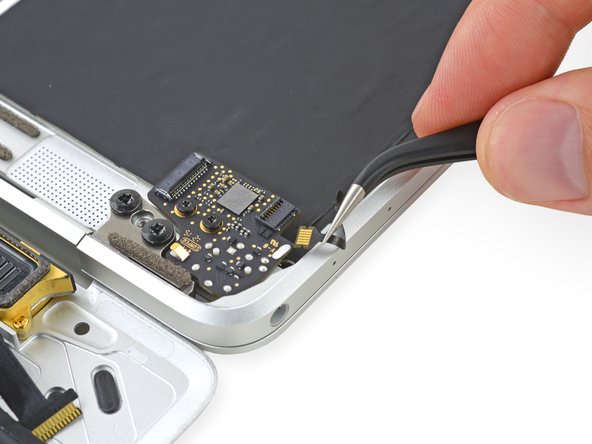
    • Use a spudger to flip open the ZIF connector retaining flap for the dual microphone assembly ribbon cable.

  19. Retina MacBook 2016 Dual Microphone Assembly Replacement: stap 19, afbeelding 1 van 2 Retina MacBook 2016 Dual Microphone Assembly Replacement: stap 19, afbeelding 2 van 2
    • Disconnect the microphone assembly ribbon cable by pulling it straight out of its connector.

  20. Retina MacBook 2016 Dual Microphone Assembly Replacement: stap 20, afbeelding 1 van 1
    • Remove the two 3.2 mm T5 Torx screws securing the audio jack board to the case.

  21. Retina MacBook 2016 Dual Microphone Assembly Replacement: stap 21, afbeelding 1 van 1
    • Remove the audio jack board.

  22. Retina MacBook 2016 Dual Microphone Assembly Replacement, Dual Microphone Assembly: stap 22, afbeelding 1 van 1
    • Prepare an iOpener and apply heat to the upper case directly behind the microphone assembly.

  23. Retina MacBook 2016 Dual Microphone Assembly Replacement: stap 23, afbeelding 1 van 3 Retina MacBook 2016 Dual Microphone Assembly Replacement: stap 23, afbeelding 2 van 3 Retina MacBook 2016 Dual Microphone Assembly Replacement: stap 23, afbeelding 3 van 3
    • Use a fine-tip probe or pick to gently peel the dual microphone assembly away from the case.

  24. Retina MacBook 2016 Dual Microphone Assembly Replacement: stap 24, afbeelding 1 van 1
    • Remove the dual microphone assembly.

Conclusie

To reassemble your device, follow these instructions in reverse order.

Adam O'Camb

Lid sinds: 04/11/15

195.318 Reputatie

416 handleidingen geschreven

0 opmerkingen

Voeg opmerking toe

Weergavestatistieken:

Afgelopen 24 uren: 0

Afgelopen 7 dagen: 0

Afgelopen 30 dagen: 13

Altijd: 1,084