Ga door naar hoofdinhoud

Replacing Oakley Flak 2 Lens and Rubber Kits

Wat je nodig hebt

  1. Replacing Oakley Flak 2 Lens and Rubber Kits, Lens & Rubber Kits: stap 1, afbeelding 1 van 3 Replacing Oakley Flak 2 Lens and Rubber Kits, Lens & Rubber Kits: stap 1, afbeelding 2 van 3 Replacing Oakley Flak 2 Lens and Rubber Kits, Lens & Rubber Kits: stap 1, afbeelding 3 van 3
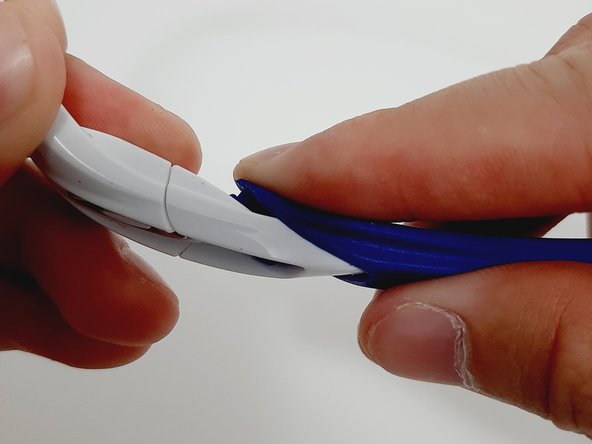
    • Pinch the tweezers and place them against the rubber ear socket.

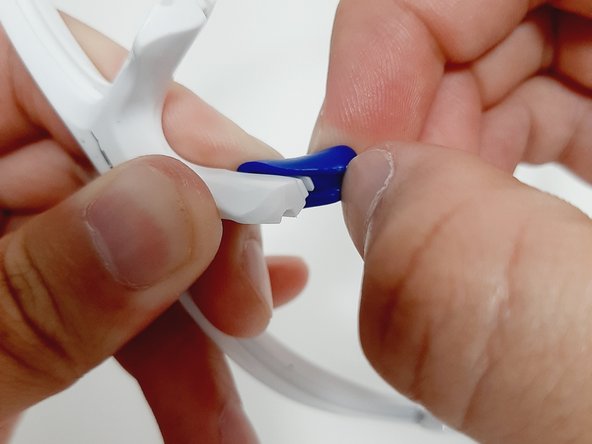
    • Push the tweezers through the hole.

    • Slowly pull out the rubber ear sock.

    • Repeat the previous steps for the other side.

  2. Replacing Oakley Flak 2 Lens and Rubber Kits: stap 2, afbeelding 1 van 2 Replacing Oakley Flak 2 Lens and Rubber Kits: stap 2, afbeelding 2 van 2
    • Pull up on the bottom of the rubber nose pad.

    • Push the rubber nose pad up to remove it.

    • Repeat the steps for the other side.

  3. Replacing Oakley Flak 2 Lens and Rubber Kits: stap 3, afbeelding 1 van 2 Replacing Oakley Flak 2 Lens and Rubber Kits: stap 3, afbeelding 2 van 2
    • From the bridge of the glasses, push the bottom outer corner of the lens up.

    • Use the groove to slide the dislodged side of the lens down and out.

    • Repeat the steps for the other side.

  4. Replacing Oakley Flak 2 Lens and Rubber Kits: stap 4, afbeelding 1 van 3 Replacing Oakley Flak 2 Lens and Rubber Kits: stap 4, afbeelding 2 van 3 Replacing Oakley Flak 2 Lens and Rubber Kits: stap 4, afbeelding 3 van 3
    • Make sure to match the correct ear sock to the correct temple side.

    • Insert the glasses temple in the rubber sock

    • Push/ Pull the rubber sock forward.

    • Push in the rubber tab into the hole near the hinge.

    • Repeat the steps for the other side.

  5. Replacing Oakley Flak 2 Lens and Rubber Kits: stap 5, afbeelding 1 van 3 Replacing Oakley Flak 2 Lens and Rubber Kits: stap 5, afbeelding 2 van 3 Replacing Oakley Flak 2 Lens and Rubber Kits: stap 5, afbeelding 3 van 3
    • Insert the rubber nose pad from the top.

    • Stretch the nose pad at the bottom and insert the bottom tab into nose pad.

    • Repeat the steps for the other side.

  6. Replacing Oakley Flak 2 Lens and Rubber Kits: stap 6, afbeelding 1 van 3 Replacing Oakley Flak 2 Lens and Rubber Kits: stap 6, afbeelding 2 van 3 Replacing Oakley Flak 2 Lens and Rubber Kits: stap 6, afbeelding 3 van 3
    • Insert the lens from the outer top corner.

    • Push the bottom corner of the lens closest to the frame's bridge up. An auditable pop will indicate the lens is inserted.

    • Repeat these steps for the other side.

  7. Replacing Oakley Flak 2 Lens and Rubber Kits: stap 7, afbeelding 1 van 2 Replacing Oakley Flak 2 Lens and Rubber Kits: stap 7, afbeelding 2 van 2
    Gereedschap gebruikt in deze stap:
    Microfiber Cleaning Cloths
    $3.99
    Koop
Conclusie

This guide can allow you to mix and match various rubber kits, and lens to create your own Oakley Flak 2 sunglasses.

2 andere personen hebben deze handleiding voltooid.

Peter Tran

Lid sinds: 07/02/21

193 Reputatie

1 Handleiding geschreven

Team

0 opmerkingen

Voeg opmerking toe

Weergavestatistieken:

Afgelopen 24 uren: 3

Afgelopen 7 dagen: 16

Afgelopen 30 dagen: 67

Altijd: 1,885