Deze versie kan foutieve bewerkingen bevatten. Schakel over naar de recentste gecontroleerde momentopname.
Wat je nodig hebt
-
Deze stap is niet vertaald. Help het te vertalen
-
Unscrew the axle nut with a 19 mm wrench.
-
Unscrew the the axle bolt with a 19 mm socket wrench.
-
Remove the wheel from the wheelchair.
-
-
Deze stap is niet vertaald. Help het te vertalen
-
Insert the 19 mm socket wrench between the rubber tire and the metal frame.
-
Carefully slide the 19 mm socket wrench all the way around the tire. Bend the wrench down to pop the tire out of the bead of the rim.
-
Reach inside the tire and remove the tube from the metal frame.
-
-
Deze stap is niet vertaald. Help het te vertalen
-
Take the inner tube from inside the tire and submerge the tube in water.
-
Squeeze the tube gently looking for bubbles from the tube in the water.
-
-
Deze stap is niet vertaald. Help het te vertalen
-
Dry off the tube.
-
Pull the tube out of the water and mark the location of the hole on the tube so that it can be found again.
-
-
-
Deze stap is niet vertaald. Help het te vertalen
-
Use sand paper to texturize the tire tube.
-
Wipe off any excess rubber that was sanded off the tube.
-
-
Deze stap is niet vertaald. Help het te vertalen
-
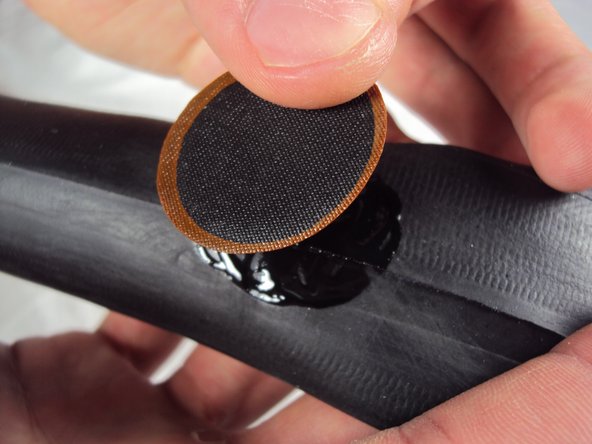
Apply a thin layer of rubber cement over the area that was marked.
-
Let the rubber cement set for 5 minutes.
-
Peel the patch off of the plastic backing.
-
Place patch over the area with the rubber cement and firmly press down until the patch is securely attached.
-
-
Deze stap is niet vertaald. Help het te vertalen
-
Working all around the tire, carefully push the tube back into place inside the tire.
-
-
Deze stap is niet vertaald. Help het te vertalen
-
Inflate the tire to 50 psi. If there is no gauge, inflate the tire until the tire is hard.
-
-
Deze stap is niet vertaald. Help het te vertalen
-
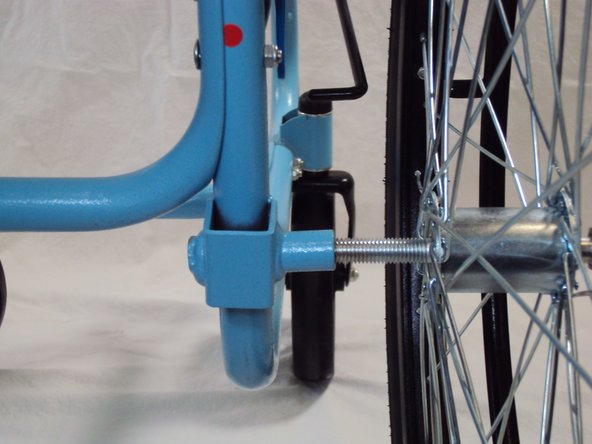
Insert the axle bolt into the center of the rear wheel.
-
Insert the wheel with the axle bolt into the lower back of the frame by screwing in the bolt.
-
-
Deze stap is niet vertaald. Help het te vertalen
-
Secure the nut on the opposite side of the axle bolt and wheel. Tighten with 1/2 in or 19 mm wrench.
-


Annuleren: ik heb deze handleiding niet afgemaakt.
Één andere persoon heeft deze handleiding voltooid.
Team

Cal Poly, Team 14-8, Maness Spring 2013 Lid van Cal Poly, Team 14-8, Maness Spring 2013
CPSU-MANESS-S13S14G8
5 Leden
7 handleidingen geschreven