Ga door naar hoofdinhoud

Repairing Cup Holder for 2008 328i BMW

Wat je nodig hebt

  1. Repairing Cup Holder for 2008 328i BMW, Repairing Cup Holder for 2008 328i BMW: stap 1, afbeelding 1 van 3 Repairing Cup Holder for 2008 328i BMW, Repairing Cup Holder for 2008 328i BMW: stap 1, afbeelding 2 van 3 Repairing Cup Holder for 2008 328i BMW, Repairing Cup Holder for 2008 328i BMW: stap 1, afbeelding 3 van 3
    • Apply putty knife to edge of cover until it pops open

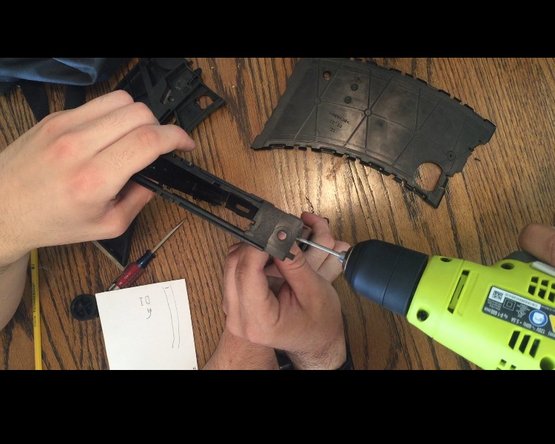
    • Remove screws off of broken cup holder

    • Take cup holder out

  2. Repairing Cup Holder for 2008 328i BMW: stap 2, afbeelding 1 van 3 Repairing Cup Holder for 2008 328i BMW: stap 2, afbeelding 2 van 3 Repairing Cup Holder for 2008 328i BMW: stap 2, afbeelding 3 van 3
    • Remove plastic cover on cup holder by pulling apart where the lips meet

    • Locate spring in device

  3. Repairing Cup Holder for 2008 328i BMW: stap 3, afbeelding 1 van 2 Repairing Cup Holder for 2008 328i BMW: stap 3, afbeelding 2 van 2
    • Fully take apart the cup holder to get to the inside of the cup holder

    • Locate where spring is placed

  4. Repairing Cup Holder for 2008 328i BMW: stap 4, afbeelding 1 van 3 Repairing Cup Holder for 2008 328i BMW: stap 4, afbeelding 2 van 3 Repairing Cup Holder for 2008 328i BMW: stap 4, afbeelding 3 van 3
    • Locate where the spring connects

    • If hole is not broken then just apply spring into hole

    • If the hole broke, like in this case here, then drill a hole the size of the spring around the same spot of the other hole

    • Caution: Be careful drilling the hole, the plastic is slippery when in contact with drill bit

  5. Repairing Cup Holder for 2008 328i BMW: stap 5, afbeelding 1 van 3 Repairing Cup Holder for 2008 328i BMW: stap 5, afbeelding 2 van 3 Repairing Cup Holder for 2008 328i BMW: stap 5, afbeelding 3 van 3
    • Test to make sure spring is properly working

    • Reassemble the cup holder

  6. Repairing Cup Holder for 2008 328i BMW: stap 6, afbeelding 1 van 3 Repairing Cup Holder for 2008 328i BMW: stap 6, afbeelding 2 van 3 Repairing Cup Holder for 2008 328i BMW: stap 6, afbeelding 3 van 3
    • Put cup holder back in place

    • Screw in screws

  7. Repairing Cup Holder for 2008 328i BMW: stap 7, afbeelding 1 van 1
    • Check to make sure cup holder works

    • Start to put on cover by lining up holes

  8. Repairing Cup Holder for 2008 328i BMW: stap 8, afbeelding 1 van 3 Repairing Cup Holder for 2008 328i BMW: stap 8, afbeelding 2 van 3 Repairing Cup Holder for 2008 328i BMW: stap 8, afbeelding 3 van 3
    • Press firmly on cover all around until it is fully on

  9. Repairing Cup Holder for 2008 328i BMW: stap 9, afbeelding 1 van 2 Repairing Cup Holder for 2008 328i BMW: stap 9, afbeelding 2 van 2
    • Enjoy your fixed cup holder!

Conclusie

Follow these steps step by step to get your broken cup holder fixed.

18 andere personen hebben deze handleiding voltooid.

Michael Tapia

Lid sinds: 09/29/15

499 Reputatie

1 Handleiding geschreven

Team

Cal Poly, Team 15-5, Green Fall 2015 Lid van Cal Poly, Team 15-5, Green Fall 2015

CPSU-GREEN-F15S15G5

4 Leden

14 handleidingen geschreven

6 opmerkingen

Easy fix that saved over $60 if I had to purchase a new part and much much more if the the dealer were to have fixed this. Thank you

Keith La Plain - Antwoord

clever idea when plastic holding the spring hook is broken. nice hack of a fix.

Nicholas McKoy - Antwoord

Is there any way to purchase just the spring? In my case the plastic is fine, it’s the shaped metal tip of the spring that sheared off somehow!? I also need the tentioner.

Ryan Cornell - Antwoord

This happened to me as well. I broke off the end of the coil/spring while bending to make a “hook” shape.

I looked for purchasing just the spring, but could not find it. Next up was the entire cupholder apparatus, either used ($~26), URO ($~39), or OEM/genuine BMW ($60-75+). This isn’t cheap and is not actually necessary to buy anything ,though.

Much easier is what I did instead, which was taking advantage of the coil material’s rigid/”easily-snap-off-able” property to make a new (wider) hook. I pulled the snapped end of the coil out a little, then put in a thin screwdriver to kind of hold the coil out extended. Next I used flat nose pliers to hold the end flat, while using long nose pliers to break off a new gap on both sides, effectively making a new “t” end. Then of course I VERY GENTLY bent it around to make a “hook”. I gently clipped the new spring hook into the preexisting plastic hole. It works for new after reinstalling. We’ll see how it holds up!

Benjamin Castellon -

Dealer wanted $180. Flat spring has T on end and locks into corresponding T in plastic. My plastic was broken out on one side. I merely took a bit in my dremel, and made the old T deeper in order to catch the metal end.

Larry Pockras - Antwoord

Dealer wanted $180. Flat spring has T on end and locks into corresponding T in plastic. My plastic was broken out on one side. I merely took a bit in my dremel, and made the old T deeper in order to catch the metal end.

ashfaque jahan - Antwoord

Voeg opmerking toe

Weergavestatistieken:

Afgelopen 24 uren: 2

Afgelopen 7 dagen: 13

Afgelopen 30 dagen: 43

Altijd: 26,680