Deze versie kan foutieve bewerkingen bevatten. Schakel over naar de recentste gecontroleerde momentopname.
Wat je nodig hebt
-
Deze stap is niet vertaald. Help het te vertalen
-
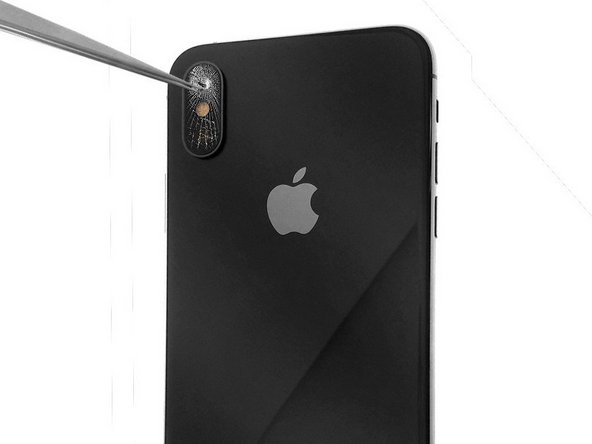
Avant de remplacer la lentille de l'appareil photo arrière de l'iPhone X, retirez les morceaux de verre de l'ancienne lentille cassée.
-
Une fois les débris de la lentille de caméra en verre retirés, nettoyez bien les contours du support.
-
-
-
Deze stap is niet vertaald. Help het te vertalen
-
Pré-encollez la nouvelle lentille de caméra arrière iPhone X avec du sticker double face ou 2 points de colle.
-
Positionnez la lentille de verre dans l'emplacement de son support à l'aide d'une pince droite de précision.
-
-
Deze stap is niet vertaald. Help het te vertalen
-
Procédez à une légère pression pour bien coller la lentille.
-
Vous pouvez tester votre caméra arrière pour vérifier la netteté de vos photos et de vos films.
I actually took my phone apart to take out the camera so I didn't scratch it while I repaired it, after the first time you do it it's fairly easy. The most difficult part is just getting the phone open. I recommend alot of heat if you're using a hair dryer or normally if not and don't be afraid to kind of go at it and not be so extremely gentle. Then after I got the camera out I just broke out the camera glass with a razor blade no heat, it takes a bit of time but it is easy. JUST MAKE SURE that you don't break a little glass piece that covers where the flashlight LED is, it is important so either just push it out from the outside to the inside or leave it be and not break it off. I did use the adhesive but I would never purposely dunk my phone in water anymore because I don't trust my waterproofing like I did with the original apple that they have it certified that way. PS theres plenty of YouTube videos on how to do this.
This is one of the most difficult repairs on the iPhone X that I have ever undertaken. I think it is very disingenuous for the rating to be easy. It took 70 minutes to Cary out and although I am not a professional at these repairs I think that the repair should be revisited and revised with more detailed descriptions. I am a big fan of iFixit and feel let down so no points to the engineer.
iFixit is an “open source” website: everybody can make a guide for anything, so the quality might not always be as high as we hope. but anyone can modify, update and change any guide, or at least submit those things. and there are guides that are made by iFixit staff iself, that aree the one with the higher standard and only the official staff can modify or accept modification for those.
-


Annuleren: ik heb deze handleiding niet afgemaakt.
39 andere personen hebben deze handleiding voltooid.

8 opmerkingen
It was great to see…
Will the device still be waterproof after this repair? (provided the repair is done correctly)
Bonjour,
Pour information : les iPhone ne sont pas étanches ! Même si les publicités laissent penser le contraire, il faut savoir que les iPhone ne sont pas étanches, pour preuve : il suffit de lire les conditions de garantie de chez Apple qui stipulent bien : “La présente Garantie ne s’applique pas : ... aux dommages causés par un accident,... une exposition à un liquide, au feu, à un tremblement de terre ... “
Donc, que ce soit après une réparation ou avant la réparation, votre iPhone n’est pas étanche, les différents joints “d’étanchéité” présents dans l’iPhone le protège principalement des poussières fines et des petites projections de liquide (genre : micro gouttelettes d’eau) .
Mais n’oubliez pas, il n’est pas étanche ;-)
This is the worst repair guide on this website. . Not enough information on this guide to properly do the repair
J'ai changée ma lentille mais a plus 1m ou dans une zone peu éclairer mais photo deviennent floues
The iPhone X Replacement Lens Glass Replacement I purchase from iFixIt included the silver camera bezel with the glass. I did not realize, so now I have an iPhone with exposed cameras. I cannot find a solution as to how to remove the old bezel from the phone or the new one from the glass.
I tried removing the bezel from the new part with a heat gun and pressure from a Q-tip and I broke the glass.