Ga door naar hoofdinhoud

Deze handleiding heeft recentere wijzigingen. Schakel over naar de nieuwste niet-geverifieerde versie.

Removing Delphi MyFi XM2GO Logic Board

Wat je nodig hebt

  1. Removing Delphi MyFi XM2GO Logic Board, Battery Cover: stap 1, afbeelding 1 van 3 Removing Delphi MyFi XM2GO Logic Board, Battery Cover: stap 1, afbeelding 2 van 3 Removing Delphi MyFi XM2GO Logic Board, Battery Cover: stap 1, afbeelding 3 van 3
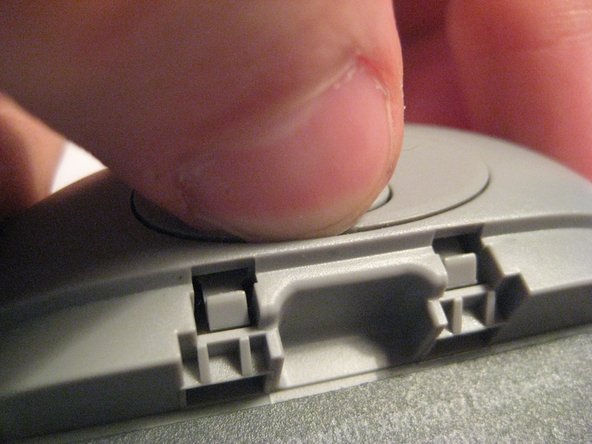
    • Locate the large button on the top of the device.

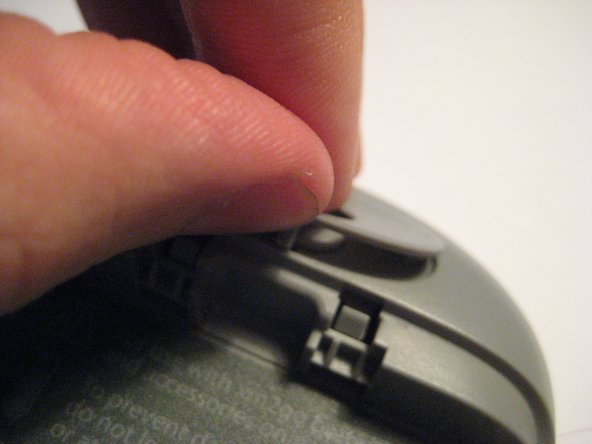
    • Push down on the button and slide the cover away from the button.

    • The battery removal tab may pop up.

  2. Removing Delphi MyFi XM2GO Logic Board, Battery: stap 2, afbeelding 1 van 3 Removing Delphi MyFi XM2GO Logic Board, Battery: stap 2, afbeelding 2 van 3 Removing Delphi MyFi XM2GO Logic Board, Battery: stap 2, afbeelding 3 van 3
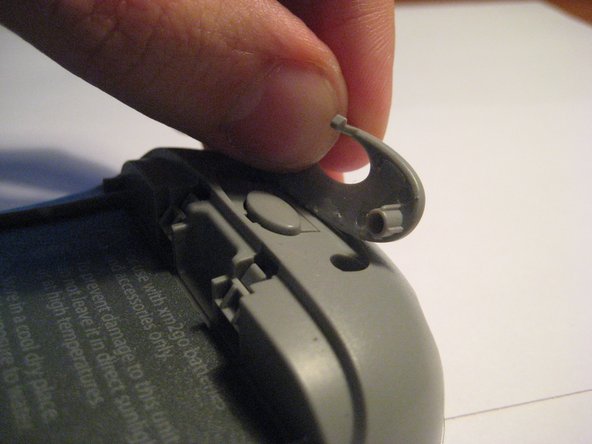
    • Grab the red pull tab and pull down to unlock the latch.

    • Pull the battery out.

  3. Removing Delphi MyFi XM2GO Logic Board, Removing Delphi MyFi XM2GO Logic Board: stap 3, afbeelding 1 van 3 Removing Delphi MyFi XM2GO Logic Board, Removing Delphi MyFi XM2GO Logic Board: stap 3, afbeelding 2 van 3 Removing Delphi MyFi XM2GO Logic Board, Removing Delphi MyFi XM2GO Logic Board: stap 3, afbeelding 3 van 3
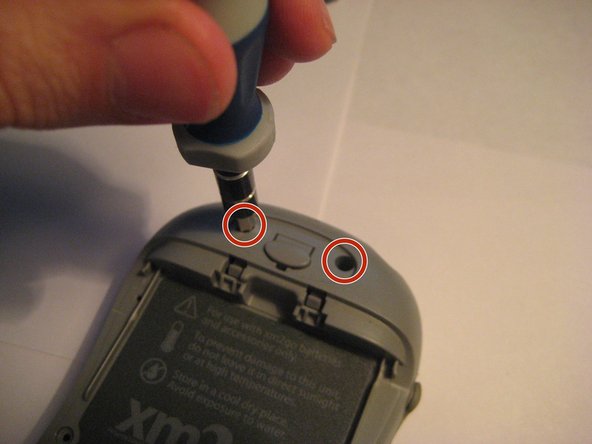
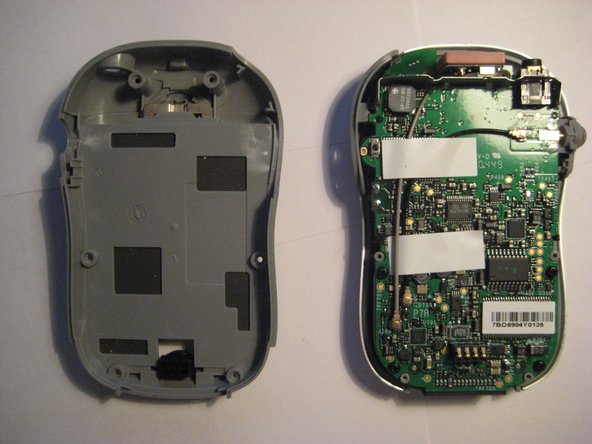
    • locate the four hex screws on the bottom of the device.

    • Use a T6 hex bit from the iFixit precision screwdriver set to remove the four screws.

  4. Removing Delphi MyFi XM2GO Logic Board: stap 4, afbeelding 1 van 3 Removing Delphi MyFi XM2GO Logic Board: stap 4, afbeelding 2 van 3 Removing Delphi MyFi XM2GO Logic Board: stap 4, afbeelding 3 van 3
    • To remove the next two T6 screws, locate the button at the top of the back of the device.

    • Around the button, there is a cover that protects the two screws.

    • To remove the cover insert a flathead screwdriver or thumb nail and lift up until cover is removed.

  5. Removing Delphi MyFi XM2GO Logic Board: stap 5, afbeelding 1 van 3 Removing Delphi MyFi XM2GO Logic Board: stap 5, afbeelding 2 van 3 Removing Delphi MyFi XM2GO Logic Board: stap 5, afbeelding 3 van 3
    • After removing the cover, use the T6 screwdriver and remove the screws.

  6. Removing Delphi MyFi XM2GO Logic Board: stap 6, afbeelding 1 van 3 Removing Delphi MyFi XM2GO Logic Board: stap 6, afbeelding 2 van 3 Removing Delphi MyFi XM2GO Logic Board: stap 6, afbeelding 3 van 3
    • With the 6 screws removed, the back cover can be removed revealing the backside of the motherboard (PCB Logic Board).

    • Pull up on the back cover from the device.

    • Locate the power button.

  7. Removing Delphi MyFi XM2GO Logic Board: stap 7, afbeelding 1 van 3 Removing Delphi MyFi XM2GO Logic Board: stap 7, afbeelding 2 van 3 Removing Delphi MyFi XM2GO Logic Board: stap 7, afbeelding 3 van 3
    • Remove the power button from the left.

    • Locate the antenna extension connector on the right and remove the plastic piece.

  8. Removing Delphi MyFi XM2GO Logic Board: stap 8, afbeelding 1 van 3 Removing Delphi MyFi XM2GO Logic Board: stap 8, afbeelding 2 van 3 Removing Delphi MyFi XM2GO Logic Board: stap 8, afbeelding 3 van 3
    • After removing the screws and two external pieces, the PCB Logic Board can be removed from the front piece.

    • Simply pull up on the PCB Logic Board to remove.

    • CAUTION: Be careful of the LCD screen and keypad as they are only connected via ribbon cables to the board. They will hang down as the PCB Logic Board is removed.

Conclusie

To reassemble your device, follow these instructions in reverse order.

Één andere persoon heeft deze handleiding voltooid.

Scott Byer

Lid sinds: 03/09/12

61 Reputatie

5 handleidingen geschreven

Team

Clemson, Team 1-2, Benson Spring 2012 Lid van Clemson, Team 1-2, Benson Spring 2012

CLEM-BENSON-S12S1G2

3 Leden

9 handleidingen geschreven

0 opmerkingen

Voeg opmerking toe

Weergavestatistieken:

Afgelopen 24 uren: 0

Afgelopen 7 dagen: 0

Afgelopen 30 dagen: 5

Altijd: 2,483