Ga door naar hoofdinhoud

RedMax Trimmer Carburetor Replacement

Wat je nodig hebt

  1. RedMax Trimmer Carburetor Replacement, Carburetor: stap 1, afbeelding 1 van 3 RedMax Trimmer Carburetor Replacement, Carburetor: stap 1, afbeelding 2 van 3 RedMax Trimmer Carburetor Replacement, Carburetor: stap 1, afbeelding 3 van 3
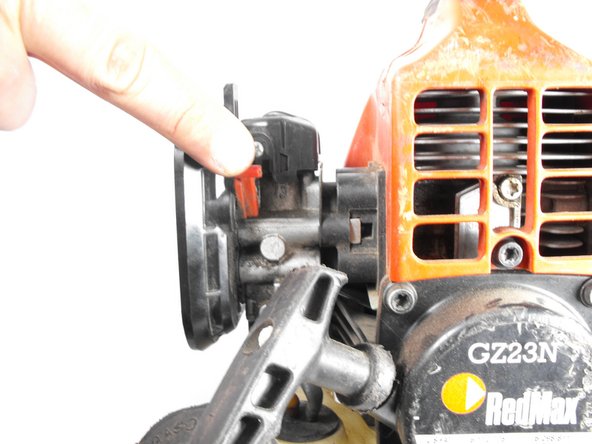
    • Locate the red knob that locks the air filter cover to the air filter housing.

    • Rotate the knob clockwise.

    • Remove the air filter cover, exposing the air filter.

  2. RedMax Trimmer Carburetor Replacement: stap 2, afbeelding 1 van 2 RedMax Trimmer Carburetor Replacement: stap 2, afbeelding 2 van 2
    • Remove the air filter by gently pulling it away from the unit.

  3. RedMax Trimmer Carburetor Replacement: stap 3, afbeelding 1 van 3 RedMax Trimmer Carburetor Replacement: stap 3, afbeelding 2 van 3 RedMax Trimmer Carburetor Replacement: stap 3, afbeelding 3 van 3
    • The red panel hides a second screw. In order to expose it, locate the red choke lever on the right side of the air filter housing.

    • Push the red choke lever down.

  4. RedMax Trimmer Carburetor Replacement: stap 4, afbeelding 1 van 3 RedMax Trimmer Carburetor Replacement: stap 4, afbeelding 2 van 3 RedMax Trimmer Carburetor Replacement: stap 4, afbeelding 3 van 3
    • Be aware that there may still be gasoline in the lines.

    • Disconnect the yellow and black fuel lines from the carburetor assembly by pinching the clamp and sliding it down the tube.

    • Gently pull the yellow and black lines away from the assembly.

  5. RedMax Trimmer Carburetor Replacement: stap 5, afbeelding 1 van 3 RedMax Trimmer Carburetor Replacement: stap 5, afbeelding 2 van 3 RedMax Trimmer Carburetor Replacement: stap 5, afbeelding 3 van 3
    • Using the T27 screwdriver, unscrew the two 55mm screws that hold the air filter housing and carburetor to the trimmer.

    • Separate the carburetor from the trimmer and air filter housing.

  6. RedMax Trimmer Carburetor Replacement: stap 6, afbeelding 1 van 3 RedMax Trimmer Carburetor Replacement: stap 6, afbeelding 2 van 3 RedMax Trimmer Carburetor Replacement: stap 6, afbeelding 3 van 3
    • Unscrew the four 24 mm long screws that hold the carburetor together, using the #1 Phillips head screw driver.

    • Once the screws are removed, the rest of the carburetor should separate easily.

  7. RedMax Trimmer Carburetor Replacement: stap 7, afbeelding 1 van 3 RedMax Trimmer Carburetor Replacement: stap 7, afbeelding 2 van 3 RedMax Trimmer Carburetor Replacement: stap 7, afbeelding 3 van 3
    • Carefully remove the gaskets and carburetor and replace them in the same order that they were removed.

Conclusie

To reassemble your device, follow these instructions in reverse order.

4 andere personen hebben deze handleiding voltooid.

0 opmerkingen

Voeg opmerking toe

Weergavestatistieken:

Afgelopen 24 uren: 1

Afgelopen 7 dagen: 13

Afgelopen 30 dagen: 49

Altijd: 5,217