Deze vertaling geeft mogelijk niet de meest recente updates van de bronhandleiding weer. Help ons met het updaten van de vertaling of bekijk de bronhandleiding.
Inleiding
De Nintendo Switch wordt geleverd met twee Joy-Con controllers. Deze handleiding toont je hoe je de joystick van de rechter Joy-Con vervangt. De procedure voor het repareren van de linker Joy-Con is anders, dus zorg ervoor dat je de juiste handleiding voor de juiste controller gebruikt.
Besef dat deze reparatie niet dezelfde stappen bevat als die van de linker Joy-Con. Als je de linker joystick wilt vervangen, volg dan de andere handleiding.
Wat je nodig hebt
-
-
Verwijder de vier tri-point Y00 schroeven van het achterste paneel van de Joy-Con.
-
-
-
Steek een openingsplectrum onder de onderkant van het achterste paneel (tegenover de R- en ZR-knoppen).
-
Schuif de platte kant van je openingsplectrum langs de zijkant van de Joy-Con omhoog.
-
-
-
Open de Joy-Con zoals je een normaal boek zou openen, met de oplaadrail van je af wijzend.
-
-
-
Gebruik een spudger om de batterijaansluiting uit het contact op het moederbord omhoog te duwen. Dit zal voorkomen dat de Joy-Con aan zal gaan tijdens de reparatie.
The plug is difficult to get a spudger under and leads to a lot of failed attempts where something could be damaged. I found it comes apart easier if you gently pull the wires with tweezers.
Agree. The spudger is too wide for this task. This guide needs to get update with his better approach.
I damaged this connector while trying to remove by pulling on the wires as suggested. The plastic over the wires broke out. I was able to “repair” it by carefully placing the pins in place without shorting, covering the top (only) of the connector with a little super glue. After curing I placed it over the receptacle as closely as possible with tweezers, and gently pressed in with a pencil eraser tip.
I like the narrower spudger idea, but have never seen one.
Hey, I was wondering if you damaged the part that attaches to the motherboard because I’ve done that and I’m not sure how to fix it?
Milli3 -
Hey so when I did this step it turns out I pulled the entire battery connector out not like the wires or the plug in but the entire connector that connects to the motherboard. I was wondering if anyone knew if it was possible for me to fix this or if I’d have to buy yet another set of joycons :(
Milli, unfortunately repairing that connector is a tough fix unless you’ve got some microsoldering equipment. :( That said! You shouldn’t need to buy a whole other set of Joy-Cons. What you can do is find a replacement motherboard online, or even a cheap used Joy-Con from ebay and replace your motherboard with that one! I’m sorry about your bad luck, I hope this helps!
You’re not alone in this. I gave up and found a new genuine single controller for $60 AU
I did the same. I broke battery plug, then whole connector separated from motherboard. I purchased new joycon...
I have fcuked my entire connector and ruined it. Never pull the battery connector and just make your mods with the battery attached!! Mind the wires, finish your job quickly, and forget about powering off your joycon during teardown..
Not at all clear from the photo what it is I am pulling off. Need a larger, zoomed-in image.
Maybe add a third photo, showing what the socket looks like once the connector is removed.
Click any photo in this guide to zoom in. Here’s the connector photo.
Es ist ein Steckkontakt. Sprich: Wenn du es wieder zusammenbaust, musst du das Kabel von oben reindrücken.
Skip this step. It is far too easy to pull off the connector from the motherboard. Ruined the joy of fixing it. There is enough length on the wires to just skip steps 4 (this step), 5, and 6 and jump to 7. It is what it is. I’m mad at myself.
I struggled with this step too and thanks to your tip, skipped out steps 4, 5, 6, 7 and rejoining at 8. It was tricky with the wires and being delicate not to damage any connections, but saved me so much stress in reconnections or permanent damage.
I also skipped out removing the ZR cable too. I guess the less I do, the less that could go wrong.
Keen Hui -
Same than Keen Hui here. The battery connector was jamed. I had difficulties to evaluate the risk of broke the connector vs the risk of letting the battery connected. Seems that i chose right by letting it there.
Just pull up gently and it will come out, a spudger is too wide.
Have to agree that "just disconnect the battery, bro" is just a laughably bad oversimplification of how to remove this battery. A lot of tech gurus/youtubers gloss over this, and as you've seen here and likely across other places, the lack of clarification has caused TONS of people to break their joycon at this step. I ended up seeking help from the switch discord which game me some helpful tips.
Use the pointed end of the spudger, the flat side is too big. Approach the connector from the corner side with the black cable. Pry directly up & towards you (do not let it slide), and again minimize contact with the wire. It won't always remove it it one "pop," but it may dislodge it enough to allow you to get under it better. You can even see this in the Ifixit video on youtube.
Take your time with this.
Skip this step. Seriously. It’s unnecessary and risks damaging the connector entirely. You can just move the battery to the side (once you get to the next step) and it will still be out of your way enough.
I wish I have skipped this part. I broke the battery plug, but hoped I will manage to reconnect. After replacement, trying to reconnect, I successfully removed the connector from motherboard.
I purchased new pair of joycons, I will no longer fiddle with it, it is too fragile.
All other steps were easy. Disconnecting battery was SUPER hard for me.
I’d like more advice about how to reconnect the battery plug.
-
-
-
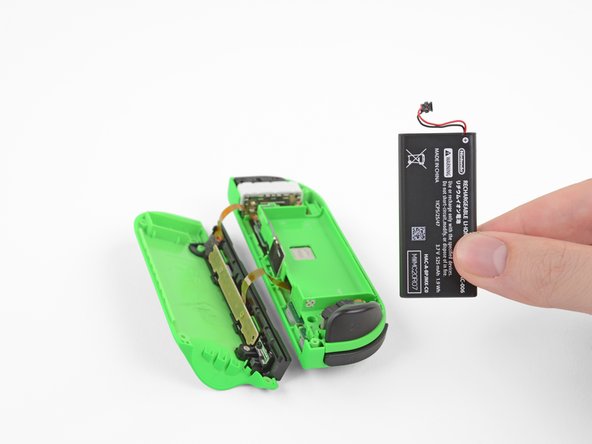
Steek een openingsplectrum tussen de batterij en de behuizing van de Joy-Con. Wrik de batterij, die lichtjes is bevestigd met tape, voorzichtig los.
I ended up doing steps 8 and 9 before pulling out the battery which bought it a fair bit away from the cables the other two are talking about. I’ve found the batteries are very hit-or-miss in how easy they are to get out, so just be cautious if you plan on doing things the way I did, since the rest of the joycon will be sitting loose as you get the battery out, and won’t have much leverage/stability. I’d still recommend getting the battery out (and NOT disconnecting the cables that are red and white) since it gives you a bit more room to work with
-
-
-
-
Begeleid op voorzichtige wijze het bovenste deel van de grijze antennekabel uit de batterijholte.
-
-
-
Wrik de coaxiale aansluiting van de antennekabel, met behulp van de punt van je spudger, los en ontkoppel deze van het moederbord.
-
Verwijder de grijze antennekabel.
The antenna cable is very difficult to reconnect so if possible leave the coaxial connector connected
You can also re-connect the coaxial cable before replacing the midframe
To add to Ethan's comment, reason #2 to leave the antenna connected is that it will greatly assist in reversing step #10.
-
-
-
Verwijder de drie 3.5 mm Phillips #00 schroeven op het midframe.
-
-
-
Draai het midframe voorzichtig om en draai deze weg van het moederbord.
At this stage, the R button pops off very easily. Almost inevitable. And when it does, you’ll probably lose the spring. Better to carefully take it off yourself and make sure the spring stays with it.
Lift the midframe straight up, away from the motherboard, and keep a close eye on the ZR ribbon cable. Try—carefully—rotating the midframe so that the ribbon is not wrapped around the edge, then you can flip the midframe over and out of the way of the rest of the Joy-Con. This will give you a little more room to work without putting stress on the ribbon and without having to disconnect the ZR ribbon as described in the next step. You do not want to disconnect that ribbon unless you absolutely have to. It will suck to plug the connector back in later.
-
-
-
De kabel van de ZR-knop wordt op z'n plek gehouden door een kleine ZIF-aansluiting op het moederbord. Gebruik een pincet of een spudger om de klem van de ZIF-aansluiting omhoog te klappen.
-
Gebruik een pincet om de flexkabel van de ZR-knop rustig uit het contact van de ZIF-aansluiting te trekken. Het midframe is nu losgekoppeld en kan in z'n geheel worden verwijderd.
-
Als je ervoor kiest om de kabel aangesloten te laten, zorg dan dat je extra voorzichtig te werk gaat. Neem je tijd en doe je best om het midframe strak op z'n plek te houden bij het uitvoeren van de laatste stappen, zodat je schade aan de kabel voorkomt.
My children learned to drive, went to college, got married and had children, by the time I got this to reconnect!
I used the tweezers to carefully grab the end and slide it in. Make sure the lock is up because without the ribbon it falls down really easy.
The left joy con is easy peasy compared to this one.
This is the worst step
I think this step should warrant upgrading this from Moderate… I can’t understand why Nintendo decided to put SOO much slack on the left controller and then absolutely no slack on the right…
I wasn’t remotely prepared for how much more difficult this was compared to the left Joy-Con. I ended up ruining the entire unit trying to reinsert the ZR cable into the zif connector.
I found this to be easier than the left joycon, maybe because I did the right joycon first. The cable is very rigid, so I just held the two parts of the joycon together so that the cable was already lined up with the connector. From there, you can make the final adjustment with tweezers, and the cable won’t fight you as much in the process.
Following your instructions, I finished it in less than a minute. I had been struggling with this step for a while. Thank you!
Thank you so much for this description! I was finding it impossible until I did what you said… put the two parts of the joycon together and then get in between with the tweezer allowed me to get the connector in and then shut the ZIF
This is indeed a fantastic approach to handling this task. I'd like to also add that if you left the antenna connected from step #7, you can reseat its cable at this point which will stabilize the midframe from the end opposite the ZR button. You can then pivot the midframe upwards enough to give your tweezers room to get under there and manipulate the cable and ZIF lock.
maybe I’m being an idiot, but why does this have to be removed? I can get to the stick’s screws etc, and remove it and nothing seems to be in the way, thus making this step seem unnecessary. It was a little tricky to unscrew the joystick once the screws started to loosen, but I just propped the joycon up on my finger. There’s a risk to doing it this way, but then there’s a risk doing it either way, and judging from comments above about how awkward this is, maybe leaving it is best.
You’re definitely not being an idiot! It doesn’t technically need to be removed. :) That cable is so fragile though that the risk of leaving it connected with the midframe dangling awkwardly (as we leave it in step 9) seemed greater than the annoyance of disconnecting and reconnecting it. Definitely tricky and risky either way you slice it, though! Either way is a viable option. I’ll add a note to the step!
I think having a clamper that can hold the motherboard and the rest of the body really would help. I didn’t have anything that I could use but I propped it up with two jar lids so that the joystick would not make the whole thing wobble. I grabbed the midframe with one hand and used tweezers in the other hand to guide it in and close it.
Here’s a picture: https://i.imgur.com/fSEIBqE.jpg
My R button came off but I put it in before I screwed the midframe in place.
I hope it helps.
This step should say in CAPITALS at the start that this is not strictly necessary, because the connector between the 2 boards is practically impossible to reconnect
Wouldn’t agree with people here - getting the ribbon back in is pretty finicky (much easier if you do it flipped over along the side, not like they have it in the photo), but I don’t see how you could get the joystick out and a new one in without moving it so much that you break it (then you’ve wasted the money on the kit and have to buy a whole new unit).
I however would agree that you don’t need to disconnect the battery or antenna. I pulled the antenna patch out of the midframe and let it dangle, but left the battery in and connected, and it was fine. Much better than removing them but leaving this fragile thing connected.
The grey plastic zif lock came off and I lost it. I replaced pretty much the entire contents of an iPhone 6, but couldn’t do this step. Don’t detach it if you don’t need to!
Anyone know if I can get another one?!
too late the warning &%%&^^ !
Lmfao… why would you recommend not doing it after instructing to do it? That note needs to come before. Wow
It wasn’t apparent to me from the pictures, but when reassembling, the exposed metal teeth on the ZR ribbon need to be facing DOWN as you re-insert. Be warned that the ZIF socket will accept it wrong way up, without protest.
its very hard to do this with my super small hands
Definitely skip this step, you can replace the joystick while this connector is in place. Will save you time, energy, and in the end, maybe save your joy-con ;-)
I removed this completely and managed to break the gray ZIF connector. I was able to re-insert it (incidentally, it's extremely tiny & very easy to lose) but after getting the cable reinserted and the ZIF connector in place it was all very loose & the cable could fall out if i put any pressure on the cable. Figuring there was nothing to lose at this point, I used a very small amount of hot glue and tiny tweezers to keep pressure on the ZIF and cable and then pulled it out right as the glue started to harden... I have it fully re-assembled now and both ZR and R appear to be working correctly! i.e., if you get in a similar scenario with a bit of luck you might be just fine, granted hot glue is horrible to work with but... yeah at least one success story over here.
I tried editing this step in the guide to have the warning about disconnecting at the beginning of the step instead of at the end (as many have commented) but my change got denied. Let the suffering continue.
Just another comment to echo what folks above are saying: You absolutely positively do not need to disconnect the ZR ribbon to complete a joystick replacement, and the warning about this should be given before the instructions on disconnecting it. There is very little slack in the cable, but it's just enough that you can rotate the midframe holding the ZR button out of the way without putting excessive strain on the anything. Just work slowly and carefully, and you'll be fine.
If you honestly didn't have any problems reconnecting the ZR ribbon, that's great and we're all happy for you, but you're clearly the exception. -
-
-
De kabel van de joystick is ook bevestigd door middel van een ZIF-aansluiting. Gebruik een pincet of een spudger om de klem van de ZIF-aansluiting omhoog te klappen en de kabel voorzichtig los te koppelen.
Recommend putting a small amount of electrical tape or masking tape on the tweezers to protect the ribbon cable during reinstallation.
-
-
-
Verwijder de twee 3.5 mm Phillips #00 schroeven uit de joystick.
Also do your best not to bump the “R” button as it my fall out and you might break off the solid state device it activates. My device broke off as I was unaware of my hand placement while holding the controller. I recommend others learn from my mistake and hold the controller by the long edge only.
-
-
-
Verwijder de joystick op voorzichtige wijze uit de behuizing.
The first time I tried to re-seat the new joystick, I had very slightly disturbed the black gasket (it ended up laying “on top” of the nearby wires, rather than underneath). This caused my joystick to register very slightly off-center after re-assembly. Once I took it apart again, gently slipped the gasket back into the right place, then the joystick registered perfectly centered. FYI!
I had the same experience as Geoffrey. My joystick was not able to be fully deflected downwards until I opened it back up and re-seated the gasket with the spudger. After reseating I’m also perfectly centered. Thanks for the tip!
Thanks! I had literally the same issue and reading your comments saved me doing this twice!!
This is literally my first ever repair and it went really well. Thanks guys. Although I would recommend not removing the zr cable, be gentle and save yourself the hassle of a tricky reconnect.
This was the first repair my son (12yo) did. It would have been much too difficult to me (too small parts). I just helped him opening up the joystick in the end to clean it up internally. After assembly it worked again - no drift downwards any more…
Use the pointy end of your spudger to hold the gasket in place while you pull the joystick out!
Makes it much easier to perform the replacement without worrying about getting the gasket back in place if it pops out.
DO NOT disconnect the battery wires! They are almost impossible to get back in. My connector broke in the process. Now I need a new battery pack!
I skipped the majority of the steps and it was much easier. Don't unplug the battery. Don't disconnect all of the ribbon connectors. Wear rubber gloves and use plastic tools. You can unscrew everything skipping all the disconnect steps. The only ribbon connector you'll need to disconnect is the joystick itself. Much less chance of breaking connectors. I did this for 2 pairs of joycons with no problems and no fuss.
The rubber cap on the joystick is slightly larger than the opening in the black gasket in the controller housing, so it will deform momentarily as you're removing the joystick.
Try to pull the joystick out at an angle, removing the side furthest away from the charging rail first. There is a small break in the black gasket that allows it to move out of the way on that side. The gasket is solid on the side closest to the charging rail, and there are very small wires routed over it that you will need to put back into place if the gasket slips over them while you're removing the joystick.
So again, try to pull the joystick out through the opening at an angle, so that the part of the stick closest to the charging rail comes out last. This will give you the best chance of leaving the gasket placed correctly. -


Om je toestel weer in elkaar te zetten, volg je deze instructies in omgekeerde volgorde.
Breng je e-afval naar een R2 of e-Stewards gecertificeerde recycler.
Ging je reparatie niet zoals gepland? Check dan onze Antwoordencommunity voor hulp bij het oplossen van je probleem.
Om je toestel weer in elkaar te zetten, volg je deze instructies in omgekeerde volgorde.
Breng je e-afval naar een R2 of e-Stewards gecertificeerde recycler.
Ging je reparatie niet zoals gepland? Check dan onze Antwoordencommunity voor hulp bij het oplossen van je probleem.
Annuleren: ik heb deze handleiding niet afgemaakt.
421 andere personen hebben deze handleiding voltooid.
Met dank aan deze vertalers:
96%

Thomas Keulemans helpt ons de wereld te herstellen! Wil je bijdragen?
Begin met vertalen ›

Team

59 opmerkingen
A good guide though for the antenna instead of disconnecting the cable it would be easier to simply slide out the plate and wire from the side of the battery tray
The antenna and battery don’t need to be disconnected, you can easily move them out of the way.
When reassembling, reconnecting the ribbon cable for the RL button is fiddly, easier if you can avoid disconnecting it as well. Just rotate the plastic battery plate a quarter turn counterclockwise to get it out of the way and access the analog stick.
You can test the controller immediately after seating the joystick to make sure the ribbon cable is properly connected.
In agreement with the others, antenna definitely doesn’t need to be removed. Also noticed that the Y000 bit worked a lot better than the Y00 for the outside screws.
Hello I have followed the guide succesfully for the most part, however the joy con doesn’t seem to power up after reconnecting the battery and the anthenna. I even tried swapping the batteries between joy- cons and battery from the right one does work in the left one. The right joy con doesn’t turn on even with the other battery inserted. Any ideas?
If you are able to isolate that the battery from being the source of the issue, it unfortunately may be that the battery connector socket has some damage or was shorted. I recommend inspecting that part closely to see if there is any issue and use compressed air in the relevant area.
Cooper -
I think the issue is elsewhere, since I can’t even connect the joy con physically. The other one does work even when I take out the battery and insert it into the console. This one doesn’t.
I agree, it sounds like it’s not a battery issue. If the right one doesn’t work even when attached to the console there’s probably a shorted or broken connection in the power circuitry of the motherboard.
sounds like you might have ripped the battery connector from the board if it isnt powering up. i would double check that first if you've already tried the battery in another joycon,
Caution: it appears the new joycon have a revised analog stick and the older replacement sticks will Not work. This is from an evening of research and taking apart 5 controllers. Nothing official.
New joycon have an analog stick with an “H" pattern pressed into the metal back of the stick. Older replacement sticks have an “X" imprinted and older joycon look like they have an “#".
It looks like the “#" and the “X" are interchangeable but the cable on the “H" are thinner. So the motherboard won't accept the older thicker style.
I've spent a few hours on this and have broken two replacement sticks finding this out. I haven't found anything official about Nintendo changing the sticks but I guess they eventually would to prevent the drift issue.
sorry, but this doesn’t seem to be the case in my experience. I have just removed a stick from a UK switch that I got on launch day, and this had the H shape on the back. I replaced it with a stick bought the other day off amazon that claims to be ‘new’ design and has a # shape on the back. This is my 1st time doing this but the connectors seem to fit and everything seems to be working. So I don’t know how you can conclusively say H is new and H and # don’t interchange, because in my case that’s not true.
N Carter -
just replaced original joy-cons marked H with replacement joysticks with # and working as they should.
Just chiming in with a differing experience. I have three left Joy Cons I bought at the end of 2017, one is the original from the Switch, two were bought separately. All three had the H stamped in the back, and all three were compatible with the #-stamped replacement parts I bought from the store here. I should have whipped out my calipers, but the ribbons didn’t feel any thicker.
I’m sure Scott is right: there are probably some early controllers that have a different style of connector, but I don’t believe the stamp shape is a reliable way to determine compatibility.
Scott: I hope you were able to repair your controllers!
a good guide but instead of guiding you through the process of rescrewing and reconnecting everything you just say “yea follow the guide back”. I mean it worked for me but its still better to atleast give some tipps on how for example reconnect the battery, because i personally had the most trouble with it.
Daniel, that is definitely one of the drawbacks of our guides! What specifically did you struggle with while reconnecting the battery? I can add a reminder bullet to that step to help people in the future.
I agree, pulling out the cables is a lot easier than trying to slide them back in.
N Carter -
Nicely done. Thank you for sharing.
Fixed my joycon thanks iFixit!!!
good guide overall, but I messed up the battery connector socket and now it appears it needs to be soldered back on the board. It would have been great to have a better close up of that since it was unclear to me. Any suggestions on this more in-depth repair?
No problems completing this what so ever. I did opt to not disconnect the battery and antenna. Mostly because I was having issues getting the spudger near the battery connection. Thanks so much for the fantastic guide!
hi! i’ve replaced the analog stick on my right joy-con, however, now the stick wont recognize a “click”/R3 input. i don’t know if i screwed it up or how the click is registered electronically. now i cannot calibrate the new stick, or use any R3 function. any ideas? :/
just as a suggestion is there any corrosion where the ribbon cable goes into the board?
Thanks for the guide! my only issue which doesn’t pertain to the guide itself but my new stick won’t fully center but I’m also not getting any drift either. Anyway thanks again for the guide, it was really straight forward and easy to understand. (edit: I did also calibrate the stick a few times to center but it still won’t.)
I’m glad everything went smoothly for you! If you bought the joystick from us you can contact our customer service team and they’ll send you a replacement.
Worked great! Had a joystick that was drifting and the new part and guide fixed it perfectly. The one extra note I would make is to watch out for the top spring-loaded button popping out. It came out at step 9 and I was lucky I was able to find the spring. Just something to look out for. Thanks so much for the guide!
Brilliant. This is literally the first thing I've repaired myself and it went really well. Thank you from a new right to repair fan.
Hallo ,
Ich hatte ein fixkit bestellt worin erst ein kaputtes Ersatzteil drinn war, habe aber direkt ein neues bekommen und konnte mein Nintendo jetzt erfolgreich reparieren
LG
Hallo Benny,
super, dass alles geklappt hat! Viel Spaß mit deiner Switch.
Viele Grüße!
I bought 2 sticks from ifixit and both looked used and nether fixed the drift in the right joycon and ideas what it could be or do you thing i bought bad sticks
Took mine apart hoping to find a possible loose connection causing severe battery drain on my Joy-con. Nothing seemed out of place when I put it back together, but now the only button that works on it is the R3!!! Have no idea what I could have messed up, as I did not take the circuit board out at all. It lights up and pairs, but R3 only works, and when I check the calibration, the Joycon is pegged to the bottom right, will not move.
-Update- took back apart, checked ribbon cables, and the arm on the Joystick ribbon cable was not locked, so that is fixed and the buttons work, but now they randomly activate without pressing them, and the SR and SL buttons do not work. I did not try taking out the main circuit board yet, but that is my next idea to reseat the buttons and check for possible broken ribbon cables. It will connect to the Switch, but only if I dock it to it.
Great guide. I was able to get the joystick swapped and the controller buttoned back up. But upon testing it didn’t calibrate, and in a game it just spun in circles. Took it apart again to see I failed to plug the joystick into the board. Plugged it in, reassembled and all is good. Thanks for this service.
thx for the guide
Any tips for getting the new thumb stick ribbon in the ZIF slot? It refuses to go in. The catch is raised. I’ve even tried putting the old one back and that won’t slot in either! Please help!
Easiest way is to use some tweezers to hold the side tabs. This applies some pressure to the latch and you can wiggle the latch up and down. Should slot right in! But also the ribbon doesn't need to be 100% in. If you can get it 3/4 of the way in you should be fine.
Thank you Kyler, what are the side tabs? I’ve been jiggling the latch but the ribbon isn’t getting that far in for the latch to make any difference to the ribbon’s progress! Very frustrating!
Step 10 - the recommendation to not do this should probably come before instructing the user to do it. Lol
It’s definately worth indicating that disconnecting the antenna is an optional step, this can easily be skipped providing the person carrying out the repair is carefull with the cable.
I agree 100% and was thinking the same thing.
Great guide, thank you! I want to mention that once you’re inside the Joy-Con the fasteners are JIS #000, not Phillips #00. A Phillips #00 will work in a pinch, but it does not fit well and can easily strip the head of the screw. Thanks again!
Do be careful of the R button not coming out of place, its not harmful if it does, but no one mentioned the module it interacts with being more flimsy than the ZR ribbon cable so now I’ve got an R button that doesn’t work. I hope this gets added to this guide soon.
Thank you for the helpful guide! I’ve done this a couple times now — you’ve kept several joycons out of the trash!
I'm so glad I could help! That is great to hear it's really not that hard of a repair overall! :)
Great guide as usual folks! I've replaced my joystick but unfortunately the left-right and up-down movements are not registering. Pressing the joystick down, like a button, does work though. This makes me think I successfully connected the ribbon cables, so what did I do wrong?
Having accidentally disconnected the ZR button cable, I found it substantially easier to reassemble by removing the ZR button from the assembly. This involves pulling out the ZR button itself (being careful to keep the springs) and unscrewing a tiny daughterboard containing the electrical button (which has a very short silver screw - do not mix it up with the others). Once this board is free you can easily connect the cable, install the midframe, and then reinstall the ZR button.
Hey, would I just follow the other tutorial in the repair manual?
Carlos T -
Mine still has some minor drift. Is it my connectin or would it be the joystick?
Hey Y'all, I recognize this is bad repair process on my part for not reading everything through beforehand, but in Step 10, maybe it would make sense to edit the guide so that other dummies like me don't remove the ZR cable connector before reading the footnote that says, "we don't recommend you do this". I'm having a heck of a time getting it back together. Either way, thank you very much for the guide! I've found it helpful, and I'm confident I'll get it all working eventually!
I agree! Otherwise a great guide that helped me fix the joycons that had already been fixed once before by manufacturer and still were not working. Seems great now.
I followed the steps and put the right joy con back together with a gulikit hall sensing joystick. When I calibrate the new stick, it reads the direction correctly for pressing up, left, and down. However, when I press the stick to the far right, the reading jumps between the far left and the far right in the calibration circle, even though I am only holding right. Is this a known issue with any solutions? I've calibrated it several times and have turned the switch on and off again.
When they say that battery connector is fragile, they mean it. I broke the connector and separated power socket from motherboard trying to disconnect battery. This very step requires a lot of skill I lacked. My old joycon is now useless, it was easier to purchase new one than soldier power to mobo.
I found it easier to remove the rubber cover over the joystick before changing it, and to remove it on the replacement before installing it. So that would be step 1 for me next time.
kmcrawford111 - Antwoord
Si tienes cuidado no hay que desconectar nada. Sólo el cable del joystick, evidentemente, todos los demás se pueden dejar conectados, sobre todo el de la batería para que te ayude a probar si todo funciona antes de cerrar y atornillar todo de nuevo.
Te ahorras 15 minutos y muchas posibilidades de romper cosas.
Víctor SLB - Antwoord