Ga door naar hoofdinhoud

Raleigh M20 Chain Guard Replacement

Wat je nodig hebt

  1. Raleigh M20 Chain Guard Replacement, Raleigh M20 Pedal Removal: stap 1, afbeelding 1 van 1
    • Use an 8" adjustable crescent wrench to fit it into the base of the pedal.

  2. Raleigh M20 Chain Guard Replacement: stap 2, afbeelding 1 van 2 Raleigh M20 Chain Guard Replacement: stap 2, afbeelding 2 van 2
    • Twist the the wrench in a counter -clockwise direction to unscrew the right-side pedal (The chain side).

    • Repeat the process on the other side with a clockwise direction.

  3. Raleigh M20 Chain Guard Replacement: stap 3, afbeelding 1 van 1
    • Turn the wrench continuously until the pedal detaches from the crank arm.

  4. Raleigh M20 Chain Guard Replacement, Chain Guard: stap 4, afbeelding 1 van 2 Raleigh M20 Chain Guard Replacement, Chain Guard: stap 4, afbeelding 2 van 2
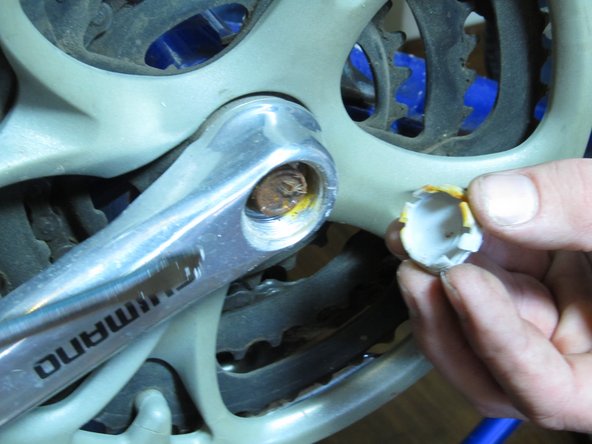
    • Use a flathead screwdriver to remove the dust cap of the crank arm.

    • Repeat the process on other side.

  5. Raleigh M20 Chain Guard Replacement: stap 5, afbeelding 1 van 2 Raleigh M20 Chain Guard Replacement: stap 5, afbeelding 2 van 2
    • Next, use a socket wrench to unscrew the crank arm.

    • Turn the socket wrench clockwise to remove the bolt.

  6. Raleigh M20 Chain Guard Replacement: stap 6, afbeelding 1 van 3 Raleigh M20 Chain Guard Replacement: stap 6, afbeelding 2 van 3 Raleigh M20 Chain Guard Replacement: stap 6, afbeelding 3 van 3
    • Insert the crank arm puller into the screw hole.

    • Now use a crescent wrench to tighten the crank arm puller. Twist it in a clockwise direction until the puller is fully tightened.

    • Do not over-tighten the crank arm puller. Stop once it's fully tightened.

  7. Raleigh M20 Chain Guard Replacement: stap 7, afbeelding 1 van 3 Raleigh M20 Chain Guard Replacement: stap 7, afbeelding 2 van 3 Raleigh M20 Chain Guard Replacement: stap 7, afbeelding 3 van 3
    • Turn the crank arm puller in a clockwise direction to remove it.

    • There will be some resistance when removing the crank arm.

    • Repeat step 2 to 4 on the other side.

  8. Raleigh M20 Chain Guard Replacement: stap 8, afbeelding 1 van 2 Raleigh M20 Chain Guard Replacement: stap 8, afbeelding 2 van 2
    • Flip the crank arm over with the chainring on it.

    • Locate the four screws on the back of the chainring.

  9. Raleigh M20 Chain Guard Replacement: stap 9, afbeelding 1 van 3 Raleigh M20 Chain Guard Replacement: stap 9, afbeelding 2 van 3 Raleigh M20 Chain Guard Replacement: stap 9, afbeelding 3 van 3
    • Use a Phillips #2 screwdriver to remove the four screws on the back of the chainring.

  10. Raleigh M20 Chain Guard Replacement: stap 10, afbeelding 1 van 1
    • Flip the chain guard over.

  11. Raleigh M20 Chain Guard Replacement: stap 11, afbeelding 1 van 2 Raleigh M20 Chain Guard Replacement: stap 11, afbeelding 2 van 2
    • Hold on to the crank arm and pull out the chain guard gently.

Conclusie

To reassemble your device, follow these instructions in reverse order.

If you are replacing the chain guard, use the new chain guard when reassembling the device.

Één andere persoon heeft deze handleiding voltooid.

Carl Lind

Lid sinds: 09/26/12

55 Reputatie

1 Handleiding geschreven

Team

Cal Poly, Team 7-49, Forte Fall 2012 Lid van Cal Poly, Team 7-49, Forte Fall 2012

CPSU-FORTE-F12S7G49

5 Leden

5 handleidingen geschreven

0 opmerkingen

Voeg opmerking toe

Weergavestatistieken:

Afgelopen 24 uren: 0

Afgelopen 7 dagen: 3

Afgelopen 30 dagen: 13

Altijd: 3,872