Ga door naar hoofdinhoud

RIDGID R860052 Switch Assembly Replacement

Wat je nodig hebt

  1. RIDGID R860052 Switch Assembly Replacement, Switch Assembly: stap 1, afbeelding 1 van 2 RIDGID R860052 Switch Assembly Replacement, Switch Assembly: stap 1, afbeelding 2 van 2
    • Remove the battery from the drill before you begin.

    • Use a T10 Torx screwdriver to unscrew the ten screws on the information label side of the drill.

    • These ten screws are 19 mm long.

  2. RIDGID R860052 Switch Assembly Replacement: stap 2, afbeelding 1 van 1
    • Lift off and remove the cover with the informational label.

  3. RIDGID R860052 Switch Assembly Replacement: stap 3, afbeelding 1 van 3 RIDGID R860052 Switch Assembly Replacement: stap 3, afbeelding 2 van 3 RIDGID R860052 Switch Assembly Replacement: stap 3, afbeelding 3 van 3
    • Remove the switch assembly, chuck, and motor from all drill covers.

    • Check if all wires are connected to the switch assembly and motor as illustrated in the image.

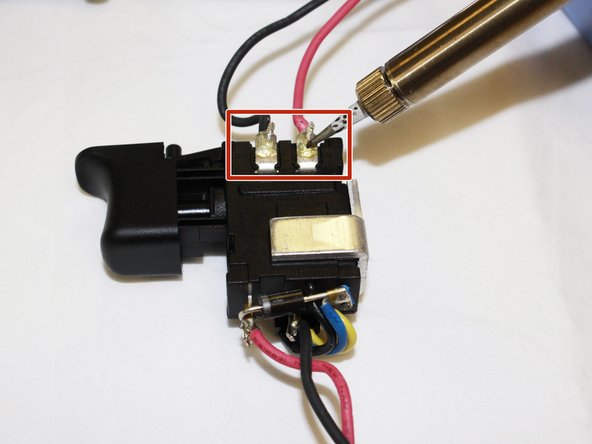
  4. RIDGID R860052 Switch Assembly Replacement: stap 4, afbeelding 1 van 2 RIDGID R860052 Switch Assembly Replacement: stap 4, afbeelding 2 van 2
    • To replace the switch assembly, desolder the black and red wires and replace with a new switch assembly.

    • Be aware of the heat level of the metal part on the soldering tool.

Conclusie

To reassemble your device, follow these instructions in reverse order.

Één andere persoon heeft deze handleiding voltooid.

Anna Wu

Lid sinds: 02/04/19

273 Reputatie

2 handleidingen geschreven

Team

UC Davis, Team S18-G4, Lore Winter 2019 Lid van UC Davis, Team S18-G4, Lore Winter 2019

UCD-LORE-W19S18G4

3 Leden

6 handleidingen geschreven

0 opmerkingen

Voeg opmerking toe

Weergavestatistieken:

Afgelopen 24 uren: 2

Afgelopen 7 dagen: 4

Afgelopen 30 dagen: 10

Altijd: 463