Ga door naar hoofdinhoud

RCA RCT6077W2 LCD Replacement

Wat je nodig hebt

  1. RCA RCT6077W2 LCD Replacement, Backplate: stap 1, afbeelding 1 van 2 RCA RCT6077W2 LCD Replacement, Backplate: stap 1, afbeelding 2 van 2
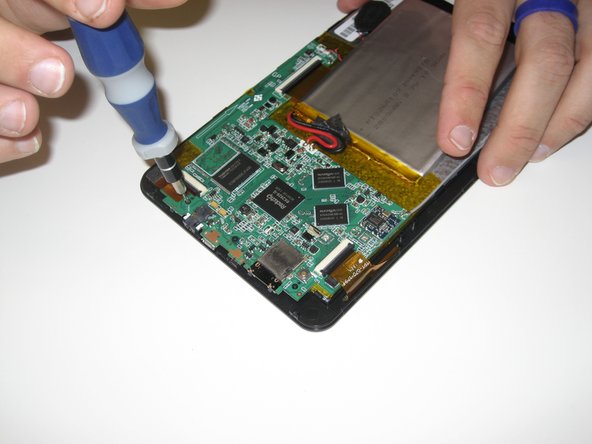
    • Remove the two 2.5mm Phillips head screws before attempting to remove the screen from the device.

  2. RCA RCT6077W2 LCD Replacement: stap 2, afbeelding 1 van 2 RCA RCT6077W2 LCD Replacement: stap 2, afbeelding 2 van 2
    • Run an opening pick around the edge of the screen to loosen it and begin to pry upward.

    • When the screen comes up like it has in the photo, it should be able to simply be removed from its casing.

    • The buttons on the end of the device will be loose when you remove the screen from the backplate. Be careful not to lose them.

  3. RCA RCT6077W2 LCD Replacement, Battery, Motherboard, Speaker, and Antenna: stap 3, afbeelding 1 van 1
    • Remove the battery by first removing the electrical tape holding it down. Then begin gently prying underneath it and around the edges with your plastic opening tool, until the battery is loose.

  4. RCA RCT6077W2 LCD Replacement: stap 4, afbeelding 1 van 1
    • Remove the antenna by peeling back the tape holding the antenna to the casing.

  5. RCA RCT6077W2 LCD Replacement: stap 5, afbeelding 1 van 2 RCA RCT6077W2 LCD Replacement: stap 5, afbeelding 2 van 2
    • Unclip the ribbon cables from the motherboard by lifting up on their latches (the black portions that the cables feed into) and gently pulling the cables.

    • Do not use force to try and remove the cables. The latch may not be lifted up all the way, and using force can separate the cable from its connector. This can damage important components of the tablet.

  6. RCA RCT6077W2 LCD Replacement: stap 6, afbeelding 1 van 2 RCA RCT6077W2 LCD Replacement: stap 6, afbeelding 2 van 2
    • Remove the three 2.5mm Phillips screws from the motherboard.

    • After removing the screws, use a plastic opening tool to gently pull the motherboard off of the double-sided tape holding it down.

  7. RCA RCT6077W2 LCD Replacement: stap 7, afbeelding 1 van 1
    • Replace the removed unit with a suitable replacement, with all of the pictured parts.

    • When reassembling the device, be sure to put the speaker back into its slot in the casing before securing the backplate.

  8. RCA RCT6077W2 LCD Replacement, LCD: stap 8, afbeelding 1 van 1
    Gereedschap gebruikt in deze stap:
    Plastic Cards
    $2.99
    Koop
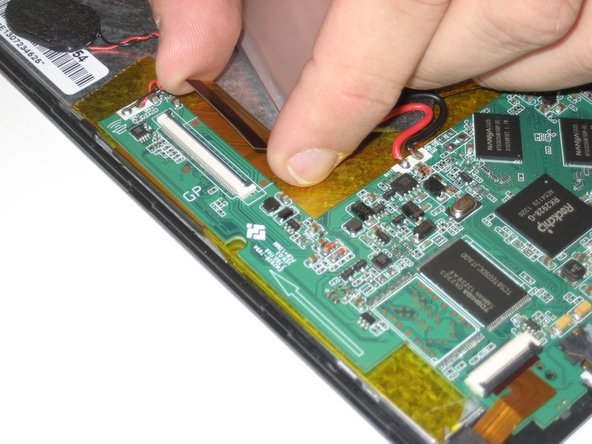
    • To remove the LCD from the screen casing, gently pry it out of the clips that are holding it in place.

    • Try and focus on one half of the LCD, as the other half will come out easily when the first half comes loose. Be careful not to damage the clips that hold the LCD in place. Also be careful not to damage the LCD housing by prying underneath it. Use plastic cards to keep clips from reattaching themselves to the device to help in its removal.

  9. RCA RCT6077W2 LCD Replacement: stap 9, afbeelding 1 van 1
    • This is the component once it is removed from the screen casing.

Conclusie

To reassemble your device, follow these instructions in reverse order.

6 andere personen hebben deze handleiding voltooid.

Ryan Williams

Lid sinds: 01/27/15

1.157 Reputatie

4 handleidingen geschreven

Team

Pasco Hernando, Team 1-2, Prince Winter 2015 Lid van Pasco Hernando, Team 1-2, Prince Winter 2015

PHSC-PRINCE-W15S1G2

6 Leden

8 handleidingen geschreven

Één opmerking

This was no help at all. What do you do after the final step? Where do I get a replacement LCD screen for this tablet?

I would really love to get a response soon, please. Thank you!

Juan Ramirez Jr - Antwoord

Voeg opmerking toe

Weergavestatistieken:

Afgelopen 24 uren: 0

Afgelopen 7 dagen: 0

Afgelopen 30 dagen: 1

Altijd: 1,900