Ga door naar hoofdinhoud

Deze handleiding heeft recentere wijzigingen. Schakel over naar de nieuwste niet-geverifieerde versie.

RCA Pro10 Edition Battery Replacement

Wat je nodig hebt

  1. RCA Pro10 Edition Battery Replacement, Speaker: stap 1, afbeelding 1 van 2 RCA Pro10 Edition Battery Replacement, Speaker: stap 1, afbeelding 2 van 2
    • Using a separating tool, look for a seam in the plastic casing that looks most accessible.

    • Use the prying tool to separate the front and back casing, working your way around the perimeter.

    • Utilize a card tool or a pick to assist in keeping the case separated.

    • To reassemble the device simply align the two casing halves and pinch to snap together or press down on the edges while the device in on a table.

  2. RCA Pro10 Edition Battery Replacement: stap 2, afbeelding 1 van 1
    • Flip over the back of the device while keeping it close to the front, the speaker is attached to it.

    • Remove the yellow tape securing the speaker to the back casing.

  3. RCA Pro10 Edition Battery Replacement: stap 3, afbeelding 1 van 2 RCA Pro10 Edition Battery Replacement: stap 3, afbeelding 2 van 2
    • Use the separating tool to pry the speaker from its surface.

    • Use caution when removing the speaker, you may damage the screen.

    • Cut or desolder the wires to replace or repair the speaker.

  4. RCA Pro10 Edition Battery Replacement, Battery: stap 4, afbeelding 1 van 2 RCA Pro10 Edition Battery Replacement, Battery: stap 4, afbeelding 2 van 2
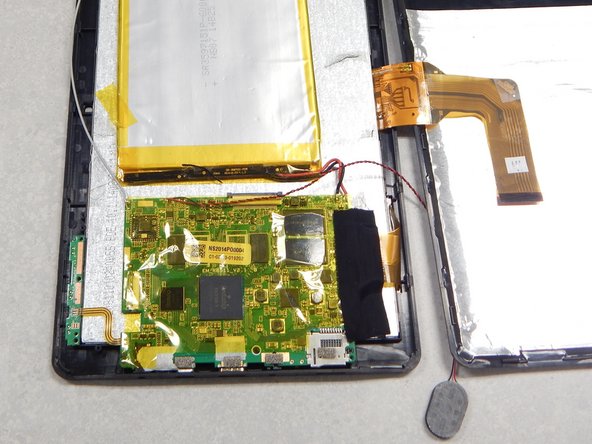
    • Peel off the black tape on the battery and main-board.

    • Peel off the black tape securing the screen ribbon cable to the back of the screen.

    • Use caution to avoid damaging either ribbon cable.

  5. RCA Pro10 Edition Battery Replacement: stap 5, afbeelding 1 van 2 RCA Pro10 Edition Battery Replacement: stap 5, afbeelding 2 van 2
    • Slide out the ribbon cable lock that is securing the screen ribbon cable.

    • Move the ribbon cable out of the way using tape if necessary.

  6. RCA Pro10 Edition Battery Replacement: stap 6, afbeelding 1 van 2 RCA Pro10 Edition Battery Replacement: stap 6, afbeelding 2 van 2
    • Remove the yellow tape securing the battery to the screen.

    • Use a plastic card or pick to separate the battery from the screen.

    • Do not bend or puncture battery, battery is difficult to separate from screen.

    • Cut or desolder the wires on the battery to remove or replace it.

Conclusie

To reassemble your device, follow these instructions in reverse order.

10 andere personen hebben deze handleiding voltooid.

Dayne Russell

Lid sinds: 01/27/15

401 Reputatie

4 handleidingen geschreven

Team

Pasco Hernando, Team 1-1, Prince Winter 2015 Lid van Pasco Hernando, Team 1-1, Prince Winter 2015

PHSC-PRINCE-W15S1G1

6 Leden

10 handleidingen geschreven

0 opmerkingen

Voeg opmerking toe

Weergavestatistieken:

Afgelopen 24 uren: 0

Afgelopen 7 dagen: 3

Afgelopen 30 dagen: 9

Altijd: 15,923