Ga door naar hoofdinhoud

Protocol Galileo Stealth Motor Replacement

Wat je nodig hebt

  1. Protocol Galileo Stealth Motor Replacement, Propeller: stap 1, afbeelding 1 van 1
    • Remove the chrome shaft cover by lightly pulling it away from the drone.

  2. Protocol Galileo Stealth Motor Replacement: stap 2, afbeelding 1 van 1
    • Using a Phillips #000 screwdriver, remove the 7mm screw from the propeller stop.

    • Be sure to apply adequate pressure when removing the screw to prevent stripping it out.

  3. Protocol Galileo Stealth Motor Replacement: stap 3, afbeelding 1 van 1
    • Remove the propeller stop from shaft by lightly pulling it away from the drone.

  4. Protocol Galileo Stealth Motor Replacement: stap 4, afbeelding 1 van 1
    • Remove the propeller from shaft by lightly pulling it away from the drone.

  5. Protocol Galileo Stealth Motor Replacement, Housing: stap 5, afbeelding 1 van 2 Protocol Galileo Stealth Motor Replacement, Housing: stap 5, afbeelding 2 van 2
    • Remove the 8mm long Phillips #0 screws (24 total) from the lower housing unit.

    • Take care to place the screws in a safe place to prevent losing them.

  6. Protocol Galileo Stealth Motor Replacement: stap 6, afbeelding 1 van 1
    • Separate the upper and lower housing units by lightly pulling the two housing units apart.

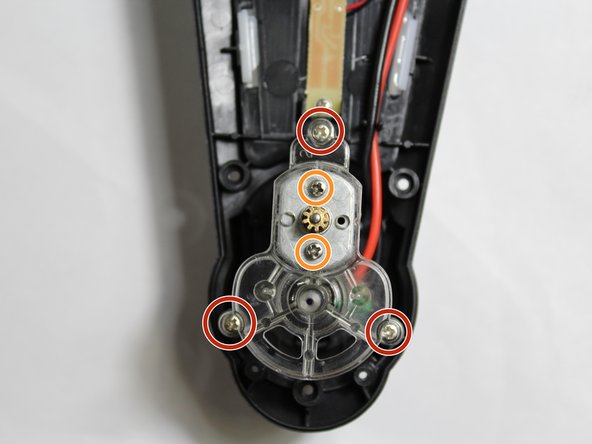
  7. Protocol Galileo Stealth Motor Replacement, Motor: stap 7, afbeelding 1 van 2 Protocol Galileo Stealth Motor Replacement, Motor: stap 7, afbeelding 2 van 2
    • Remove the 3 outer 8mm long Phillips #0 screws from the lower drone housing.

    • Remove the 2 inner 3 mm long Phillips #0 screws from the drone motor.

    • Place screws in a safe place to prevent misplacing them.

  8. Protocol Galileo Stealth Motor Replacement: stap 8, afbeelding 1 van 1
    • Remove the two 6mm long Phillips #0 screws from the lower motor cover located on the underside of the drone.

    • Place the screws in a safe place to prevent misplacing them.

  9. Protocol Galileo Stealth Motor Replacement: stap 9, afbeelding 1 van 1
    • Remove the motor cover by lightly pulling it away from the drone.

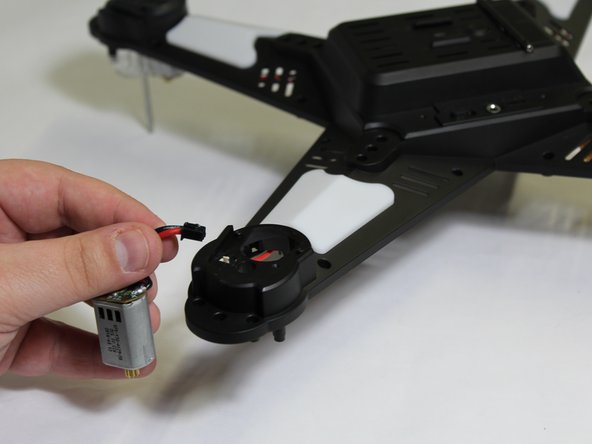
  10. Protocol Galileo Stealth Motor Replacement: stap 10, afbeelding 1 van 2 Protocol Galileo Stealth Motor Replacement: stap 10, afbeelding 2 van 2
    • Unclip the wire plug by applying light pressure to the wire plug with the plastic opening tool, and remove the motor.

    • This plug can be a bit difficult to remove, but it does not require much force to remove.

    • Avoid damaging the plug and wires when unclipping wire plug.

Conclusie

To reassemble your device, follow these instructions in reverse order.

Één andere persoon heeft deze handleiding voltooid.

Matthew Selting

Lid sinds: 02/15/18

432 Reputatie

4 handleidingen geschreven

Team

UW Stout, Team S8-G4, Ogden Spring 2018 Lid van UW Stout, Team S8-G4, Ogden Spring 2018

UWSTOUT-OGDEN-S18S8G4

4 Leden

6 handleidingen geschreven

0 opmerkingen

Voeg opmerking toe

Weergavestatistieken:

Afgelopen 24 uren: 0

Afgelopen 7 dagen: 3

Afgelopen 30 dagen: 14

Altijd: 1,083