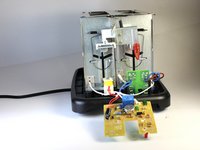
Ga door naar hoofdinhoud

Professional Series PS77401 Power Cord Replacement

Wat je nodig hebt

  1. Professional Series PS77401 Power Cord Replacement, Shell: stap 1, afbeelding 1 van 1
    • Make sure that the toaster is unplugged before attempting any sort of disassembly!

  2. Professional Series PS77401 Power Cord Replacement: stap 2, afbeelding 1 van 2 Professional Series PS77401 Power Cord Replacement: stap 2, afbeelding 2 van 2
    • Grip the black plastic lever nub firmly and carefully remove it from the metal lever. Use one hand to hold the toaster in place while you pull the lever nub with the other.

    • If this is the first time detaching this piece, it will take some effort to remove. Be careful as pulling too hard can cause damage to the inner lever mechanism.

  3. Professional Series PS77401 Power Cord Replacement: stap 3, afbeelding 1 van 3 Professional Series PS77401 Power Cord Replacement: stap 3, afbeelding 2 van 3 Professional Series PS77401 Power Cord Replacement: stap 3, afbeelding 3 van 3
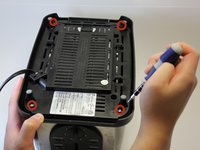
    • Flipping the toaster upside down, use a T7 Torx Screwdriver to remove the four 10mm screws that keep the outer shell attached.

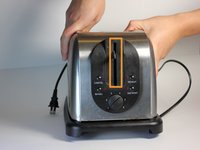
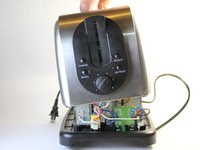
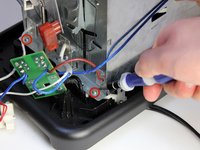
    • Flip the toaster back over and slide off the shell making sure to slip the toaster lever (now without the black plastic nub) through the lever opening in the shell.

    • The outer shell should now only be connected by its internal wiring.

  4. Professional Series PS77401 Power Cord Replacement: stap 4, afbeelding 1 van 2 Professional Series PS77401 Power Cord Replacement: stap 4, afbeelding 2 van 2
    • Locate and remove the two 8mm screws that attach the circuit board (located inside of the shell) from the shell itself using the Phillips #2 screwdriver.

    • The shell should now be completely separated from the rest of the toaster.

  5. Professional Series PS77401 Power Cord Replacement, Power Cord: stap 5, afbeelding 1 van 2 Professional Series PS77401 Power Cord Replacement, Power Cord: stap 5, afbeelding 2 van 2
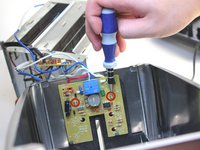
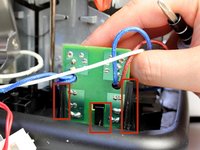
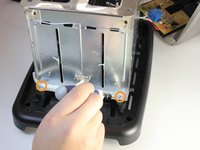
    • Remove the small circuit board by pulling on the two side tabs while simultaneously releasing the middle clip.

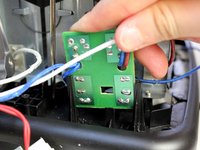
    • Slide the small circuit board out of it's clips.

  6. Professional Series PS77401 Power Cord Replacement: stap 6, afbeelding 1 van 2 Professional Series PS77401 Power Cord Replacement: stap 6, afbeelding 2 van 2
    • Using a Philips #2 screwdriver, remove the front two 8mm screws attaching the chassis to the base.

    • Flip the toaster around and proceed to remove the two remaining 8mm screws.

  7. Professional Series PS77401 Power Cord Replacement: stap 7, afbeelding 1 van 1
    • Upon removing the chassis, look in the toaster base to find the little white tab holding the power cord in place. Use a Philips screwdriver to remove the two 10mm screws.

  8. Professional Series PS77401 Power Cord Replacement: stap 8, afbeelding 1 van 1
    • De-solder the two power cord wires that are connected to the small circuit board.

    • Solder on replacement power cord.

    • If you're unsure of how to solder here is a helpful guide: Soldering Guide

Conclusie

To reassemble your device, follow these instructions in reverse order.

Één andere persoon heeft deze handleiding voltooid.

Zachary

Lid sinds: 01/23/14

243 Reputatie

2 handleidingen geschreven

Team

Cal Poly, Team 10-36, Maness Winter 2014 Lid van Cal Poly, Team 10-36, Maness Winter 2014

CPSU-MANESS-W14S10G36

4 Leden

5 handleidingen geschreven

0 opmerkingen

Voeg opmerking toe

Weergavestatistieken:

Afgelopen 24 uren: 0

Afgelopen 7 dagen: 1

Afgelopen 30 dagen: 3

Altijd: 576