Deze versie kan foutieve bewerkingen bevatten. Schakel over naar de recentste gecontroleerde momentopname.
Wat je nodig hebt
-
Deze stap is niet vertaald. Help het te vertalen
-
Turn the keyboard locking screw so that it is parallel to the space bar.
-
Pull the keyboard release tabs toward you and lift up on the keyboard until it pops free.
-
Lift the keyboard out by pulling it up and away from you. Rest the keyboard, face down, on top of the track pad.
-
-
Deze stap is niet vertaald. Help het te vertalen
-
Pull the keyboard ribbon straight up from the logic board. Place the keyboard aside.
-
-
Deze stap is niet vertaald. Help het te vertalen
-
Remove the two silver Phillips #1 screws that attach the heat shield to the internal metal framework.
-
Lift the heat shield up and pull it toward you.
-
-
Deze stap is niet vertaald. Help het te vertalen
-
Firmly grasp the plastic tab attached to the Airport card and pull up and then to the right.
-
-
Deze stap is niet vertaald. Help het te vertalen
-
Disconnect the antenna cable from the Airport card.
-
-
Deze stap is niet vertaald. Help het te vertalen
-
Pull the battery cable directly up from the logic board.
-
Remove the battery from its holder by pulling up and to the left.
-
-
Deze stap is niet vertaald. Help het te vertalen
-
Remove the long silver Phillips #1 screw from the heat sink.
-
Remove the two T8 Torx screws that attach the heat sink to the processor.
-
-
Deze stap is niet vertaald. Help het te vertalen
-
Lift the heat sink up from the left side and pull it out.
-
-
Deze stap is niet vertaald. Help het te vertalen
-
Grasp the plastic tab on the processor's right side and pull it directly up.
-
-
Deze stap is niet vertaald. Help het te vertalen
-
Remove the black Torx screw from the right side of the modem.
-
Remove the small black plastic rectangle with four holes.
-
-
Deze stap is niet vertaald. Help het te vertalen
-
Use the tips of your fingers, a spudger, or a flat non-metal tool to get under the modem's edge and pry it up from its socket.
-
-
Deze stap is niet vertaald. Help het te vertalen
-
Disconnect the cable from the right side of the modem.
-
-
-
Deze stap is niet vertaald. Help het te vertalen
-
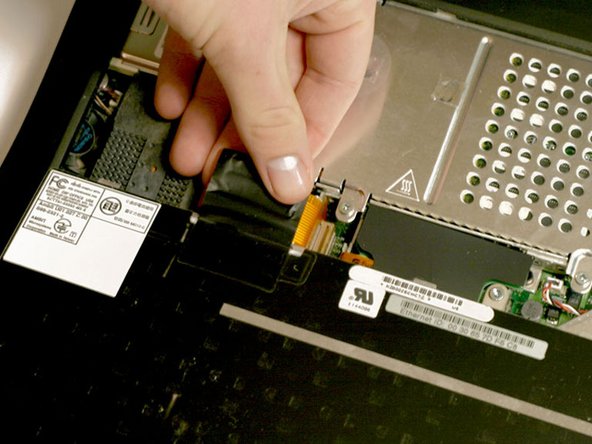
Grasp the orange cable at the left end of the hard drive and disconnect it from the logic board.
-
-
Deze stap is niet vertaald. Help het te vertalen
-
Grasp the plastic tab and pull the hard drive up and to the left, making sure that the metal bracket doesn't catch on the black plastic casing.
-
-
Deze stap is niet vertaald. Help het te vertalen
-
Push the display back so that it lies flat.
-
Slip your index finger or a nylon tool under the clutch cover near the power button and pull gently upward until you feel it come free.
-
Repeat the previous step on the left side.
-
-
Deze stap is niet vertaald. Help het te vertalen
-
Lift the clutch cover up and off, rotating it toward yourself.
-
-
Deze stap is niet vertaald. Help het te vertalen
-
Grasp the orange display data cable and disconnect it from the logic board.
-
-
Deze stap is niet vertaald. Help het te vertalen
-
Remove the single black Torx screw that fastens the display cable to the plastic casing.
-
Grasp the thin display inverter board at its left end; lift up and rotate toward yourself.
-
-
Deze stap is niet vertaald. Help het te vertalen
-
Disconnect the white inverter cable from the right end of the board
-
-
Deze stap is niet vertaald. Help het te vertalen
-
Disconnect the inverter plug, pulling directly up from the logic board.
-
-
Deze stap is niet vertaald. Help het te vertalen
-
Turn the laptop around so that its back faces you.
-
Open the port door located at the back of the laptop.
-
Remove the four black Torx screws.
-
-
Deze stap is niet vertaald. Help het te vertalen
-
Returning to the front, pull the black Airport antenna up from its recessed housing.
-
-
Deze stap is niet vertaald. Help het te vertalen
-
Hold the display on both sides and pull directly up until its hinges are free of their mounts.
-
-
Deze stap is niet vertaald. Help het te vertalen
-
Disconnect the wide orange cable that connects the airport card slot to the logic board.
-
-
Deze stap is niet vertaald. Help het te vertalen
-
Remove the three long silver and one short black Torx screws from the beige plastic casing.
-
-
Deze stap is niet vertaald. Help het te vertalen
-
Slide the thin plastic shield away from you, out from under the black casing.
-
Disconnect the newly revealed thin orange ribbon from the logic board.
-
Remove the two long silver Torx screws.
-
-
Deze stap is niet vertaald. Help het te vertalen
-
Turn the laptop over.
-
Remove the five short Torx screws from the bottom casing.
-
Remove the two long Torx screws in the front left and front right corners; make sure to put these back in the proper place when reassembling.
-
-
Deze stap is niet vertaald. Help het te vertalen
-
Turn the laptop back over.
-
Remove three short black Torx screws from the metal frame.
-
Remove the small Torx screw to the far left that fastens the logic board to the casing.
-
-
Deze stap is niet vertaald. Help het te vertalen
-
Grasp the upper plastic casing where it locks into the internal frame and pull back. When the plastic tab has cleared the slot that the casing locks into, pull up enough to keep it from locking back into place.
-
-
Deze stap is niet vertaald. Help het te vertalen
-
The PC card eject button on the laptop's left side prevents the upper casing from lifting up. In order to bypass the button, push it in far enough so that you can pull the upper casing's left side out and up beyond the button.
-
-
Deze stap is niet vertaald. Help het te vertalen
-
Lift the left side of the case partly up so that you can access and disconnect the audio in/out cables from the sound card in the upper right of the case.
-
Remove the upper casing. Note that there are two tabs on the laptop's front that often cause the upper case to stick.
-
-
Deze stap is niet vertaald. Help het te vertalen
-
Remove the two long silver Torx screws from the power card in the center of the laptop
-
-
Deze stap is niet vertaald. Help het te vertalen
-
Grasp the power card near the black shield and lift up.
-
-
Deze stap is niet vertaald. Help het te vertalen
-
Gently clasp the left side of the metal shield between your thumb and forefinger and carefully pull up and toward the front of the laptop.
-
-
Deze stap is niet vertaald. Help het te vertalen
-
Remove the single short black Torx screw anchoring the metal framework to the lower casing.
-
Use needle-nose pliers or a five millimeter nut driver to remove the small metal nut from the bolt.
-
-
Deze stap is niet vertaald. Help het te vertalen
-
Disconnect the fan cable from the left side of the logic board.
-
-
Deze stap is niet vertaald. Help het te vertalen
-
Turn the laptop so that its back is facing you.
-
Lift up on the left side of the metal framework and remove the single black Torx screw.
-
-
Deze stap is niet vertaald. Help het te vertalen
-
Grasp the EMI Filter by its black end and rotate it toward the front of the laptop. Pull the filter up and beyond the screw bracket.
-
Remove the metal framework.
-
-
Deze stap is niet vertaald. Help het te vertalen
-
Lift the sound card out by pulling up on both the right and left sides.
-


Annuleren: ik heb deze handleiding niet afgemaakt.
5 andere personen hebben deze handleiding voltooid.
Bijgevoegde documenten

2 opmerkingen
I recently was trying to replace the hard drive in my Pismo, but didn't unplug the computer. I didn't realize this until after I'd taken out the hard drive. The result was that the computer would not start. The hard drive wouldn't start spinning, there was no startup chime. I replaced the sound card and now it boots and runs fine.