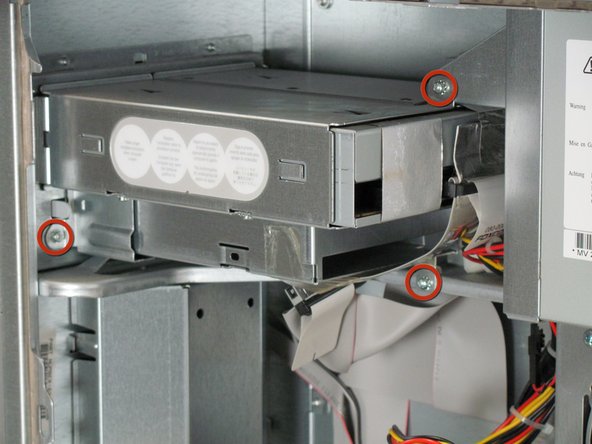
Ga door naar hoofdinhoud

Power Mac G4 Quicksilver Optical Drive Replacement

Wat je nodig hebt

  1. Power Mac G4 Quicksilver Optical Drive Replacement, Opening the case: stap 1, afbeelding 1 van 1
    • The handle to open your computer is located on top of the right side panel.

  2. Power Mac G4 Quicksilver Optical Drive Replacement: stap 2, afbeelding 1 van 2 Power Mac G4 Quicksilver Optical Drive Replacement: stap 2, afbeelding 2 van 2
    • Grab the circular handle and pull outward.

  3. Power Mac G4 Quicksilver Optical Drive Replacement: stap 3, afbeelding 1 van 1
    • Your computer is now open and ready for repair.

  4. Power Mac G4 Quicksilver Optical Drive Replacement, Power Mac G4 Quicksilver Optical Drive Disassembly: stap 4, afbeelding 1 van 1
    • The optical drive is in the top left corner of the case.

  5. Power Mac G4 Quicksilver Optical Drive Replacement: stap 5, afbeelding 1 van 2 Power Mac G4 Quicksilver Optical Drive Replacement: stap 5, afbeelding 2 van 2
    • There are four screws to be removed.

    • The first screw can be seen in the first picture.

    • The remaining three screws can be seen in the second picture.

  6. Power Mac G4 Quicksilver Optical Drive Replacement: stap 6, afbeelding 1 van 1
    • Remove the optical drive by pulling the drive away from the front of the computer and out.

  7. Power Mac G4 Quicksilver Optical Drive Replacement: stap 7, afbeelding 1 van 1
    • Detach the two cables attached to the back of the drive.

    • The flat ribbon cable can be detached by pulling the silver tab. The multicolored cable can be removed by grasping the plastic connector on either side and pulling with substantial force.

  8. Power Mac G4 Quicksilver Optical Drive Replacement, Optical Drive: stap 8, afbeelding 1 van 1
    • Remove the four screws holding the enclosure to the drive.

  9. Power Mac G4 Quicksilver Optical Drive Replacement: stap 9, afbeelding 1 van 1
    • Push on the back of the drive (side with the connectors) to slide the drive out of the enclosure.

    • Your optical drive is now ready to be replaced.

Conclusie

To reassemble your device, follow these instructions in reverse order.

8 andere personen hebben deze handleiding voltooid.

Ryan Bylard

Lid sinds: 01/20/10

1.325 Reputatie

5 handleidingen geschreven

Team

Cal Poly, Team 14-41, Regan Winter 2010 Lid van Cal Poly, Team 14-41, Regan Winter 2010

CPSU-REGAN-W10S14G41

4 Leden

17 handleidingen geschreven

0 opmerkingen

Voeg opmerking toe

Weergavestatistieken:

Afgelopen 24 uren: 0

Afgelopen 7 dagen: 5

Afgelopen 30 dagen: 17

Altijd: 11,217