Ga door naar hoofdinhoud

PlayStation Vita GPS Antenna Cable Replacement

Wat je nodig hebt

  1. PlayStation Vita GPS Antenna Cable Replacement, Case Separation: stap 1, afbeelding 1 van 2 PlayStation Vita GPS Antenna Cable Replacement, Case Separation: stap 1, afbeelding 2 van 2
    • Power off and remove the memory card.

    • Using a Phillips #00 screwdriver, remove the four 6.4mm screws on the back casing.

  2. PlayStation Vita GPS Antenna Cable Replacement: stap 2, afbeelding 1 van 3 PlayStation Vita GPS Antenna Cable Replacement: stap 2, afbeelding 2 van 3 PlayStation Vita GPS Antenna Cable Replacement: stap 2, afbeelding 3 van 3
    • Using your fingernail or a spudger, pry open the accessory port cover on the top of the device.

    • Using a Phillips #00 screwdriver, remove the two 5.4mm screws hidden beneath the accessory port cover.

  3. PlayStation Vita GPS Antenna Cable Replacement: stap 3, afbeelding 1 van 2 PlayStation Vita GPS Antenna Cable Replacement: stap 3, afbeelding 2 van 2
    • Remove the two 5.4mm Phillips #00 screws on the bottom of the device near the charging port.

  4. PlayStation Vita GPS Antenna Cable Replacement: stap 4, afbeelding 1 van 3 PlayStation Vita GPS Antenna Cable Replacement: stap 4, afbeelding 2 van 3 PlayStation Vita GPS Antenna Cable Replacement: stap 4, afbeelding 3 van 3
    • Beginning at the sides of the device, use a plastic opening tool to separate the front and rear cases.

    • Continue working your way around the device gently prying it open.

    • There are still wires holding the front and rear cases together. You may damage the connections if you yank the cases completely apart.

  5. PlayStation Vita GPS Antenna Cable Replacement: stap 5, afbeelding 1 van 2 PlayStation Vita GPS Antenna Cable Replacement: stap 5, afbeelding 2 van 2
    • Gently separate the two cases, minding the battery and the touch screen controller connectors holding the two cases together.

  6. PlayStation Vita GPS Antenna Cable Replacement: stap 6, afbeelding 1 van 1
    • Using a spudger, free the touch screen controller flex cable by gently prying up the connection.

  7. PlayStation Vita GPS Antenna Cable Replacement: stap 7, afbeelding 1 van 1
    • Free the battery cable by gently prying up on the connection with a spudger.

  8. PlayStation Vita GPS Antenna Cable Replacement: stap 8, afbeelding 1 van 1
    • Separate the front and rear cases.

  9. PlayStation Vita GPS Antenna Cable Replacement, GPS Antenna Cable: stap 9, afbeelding 1 van 1
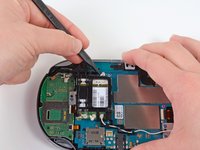
    • Using the pointy end of the spudger, gently pry the GPS antenna cable off the wireless card.

  10. PlayStation Vita GPS Antenna Cable Replacement: stap 10, afbeelding 1 van 2 PlayStation Vita GPS Antenna Cable Replacement: stap 10, afbeelding 2 van 2
    • Using the pointy end of a spudger, gently pry the GPS antenna cable off of the motherboard.

    • Deroute the GPS antenna cable out of the casing and remove it.

Conclusie

To reassemble your device, follow these instructions in reverse order.

Brittany McCrigler

Lid sinds: 03/05/12

88.898 Reputatie

131 handleidingen geschreven

Team

iFixit Lid van iFixit

Staff

136 Leden

16.562 handleidingen geschreven

0 opmerkingen

Voeg opmerking toe

Weergavestatistieken:

Afgelopen 24 uren: 1

Afgelopen 7 dagen: 3

Afgelopen 30 dagen: 23

Altijd: 4,537