Ga door naar hoofdinhoud

Panasonic camera DMC FS 16 CCD cleaning

Wat je nodig hebt

  1. Panasonic camera DMC FS 16 CCD cleaning, CCD Cleaning: stap 1, afbeelding 1 van 3 Panasonic camera DMC FS 16 CCD cleaning, CCD Cleaning: stap 1, afbeelding 2 van 3 Panasonic camera DMC FS 16 CCD cleaning, CCD Cleaning: stap 1, afbeelding 3 van 3
    • Images taken with the FS16 of the same object before and after cleaning.

    • In the second picture the shadows are marked.

    • The third picture shows a picture after the successful repair

  2. Panasonic camera DMC FS 16 CCD cleaning: stap 2, afbeelding 1 van 2 Panasonic camera DMC FS 16 CCD cleaning: stap 2, afbeelding 2 van 2
    • Open the battery compartment cover and remove the battery and the memory card,

  3. Panasonic camera DMC FS 16 CCD cleaning: stap 3, afbeelding 1 van 1
    • Remove the two 4.6 mm # 000 Phillips screws from the bottom near the tripod thread

  4. Panasonic camera DMC FS 16 CCD cleaning: stap 4, afbeelding 1 van 3 Panasonic camera DMC FS 16 CCD cleaning: stap 4, afbeelding 2 van 3 Panasonic camera DMC FS 16 CCD cleaning: stap 4, afbeelding 3 van 3
    • Remove the single 3.3 mm # 000 Phillips screw from the right side.

    • Carefully remove the side cover with your hand.

    • Remove the single 3.3 mm Phillips screw you found underneath the cover.

  5. Panasonic camera DMC FS 16 CCD cleaning: stap 5, afbeelding 1 van 1
    • Remove the four 3.3 mm Phillips screws from the left side

  6. Panasonic camera DMC FS 16 CCD cleaning: stap 6, afbeelding 1 van 2 Panasonic camera DMC FS 16 CCD cleaning: stap 6, afbeelding 2 van 2
    • Use a spudger or plastic opener to remove the rear cover. Start next to the USB cover and slide the tool along the camera. Lift the rear housing cover off.

    • In the second picture you see the camera with the back cover removed.

  7. Panasonic camera DMC FS 16 CCD cleaning: stap 7, afbeelding 1 van 1
    • Carefully lift the keyboard board vertically upwards with your fingers.

    • The keyboard is still connected and connection is on the back of the board. Just pull it vertically upwards.

  8. Panasonic camera DMC FS 16 CCD cleaning: stap 8, afbeelding 1 van 1
    • Under the keyboard board you will find a gray plastic molding. This part is just jammed and with a bit of patience you can remove it with a spudger. Make sure that none of the sensitive detents break off. Start prying at the bottom.

  9. Panasonic camera DMC FS 16 CCD cleaning: stap 9, afbeelding 1 van 1
    • Under the gray plastic molding you will find the motherboard. You do not have to replace the ribbon cable to the display. It is enough to fold the display away!

    • Concealed in the image by the tool: the display is attached with a 2.0 mm # 000 Phillips screw. Remove that screw

  10. Panasonic camera DMC FS 16 CCD cleaning: stap 10, afbeelding 1 van 2 Panasonic camera DMC FS 16 CCD cleaning: stap 10, afbeelding 2 van 2
    • On the opposite side, the display is fixed with a thin piece of sheet metal. Carefully bend the metal away with tweezers or similar tool

    • Gently flip the display to the right side like a book page.

  11. Panasonic camera DMC FS 16 CCD cleaning: stap 11, afbeelding 1 van 2 Panasonic camera DMC FS 16 CCD cleaning: stap 11, afbeelding 2 van 2
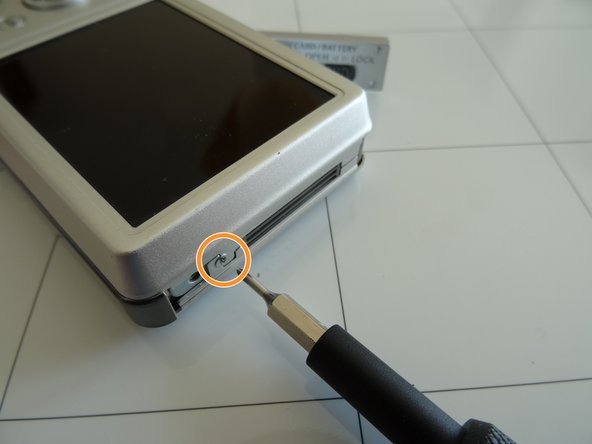
    • Under the display is another shielding plate. It is attached with two 6.4 mm #000 Phillips screws. Remove those to remove the shield

    • Remove the shield

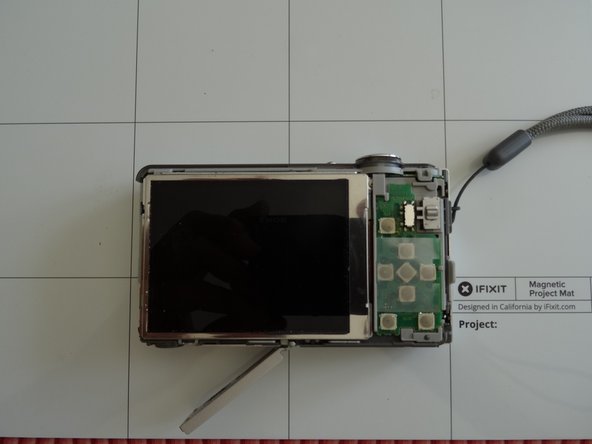
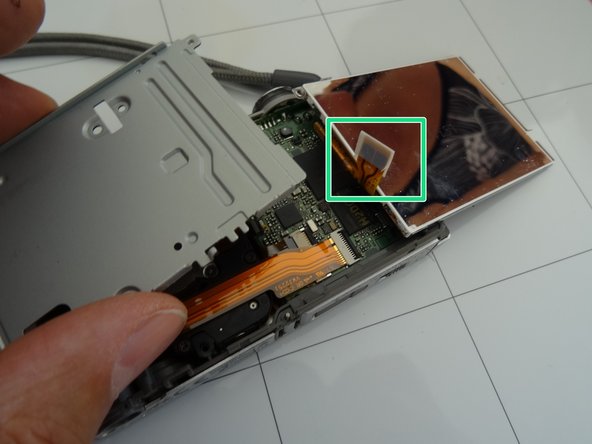
    • Not to be alarmed: An unused connection will be visible on the display. It is secured with insulating tape. When assembling, push this ribbon cable back under the shielding plate.

  12. Panasonic camera DMC FS 16 CCD cleaning: stap 12, afbeelding 1 van 1
    • The back of the CCD is exposed.

    • For cleaning the CCD will not have to be disconnected.

    • Remove the three 3.0mm # 000 Phillips screws from the back of the CCD

  13. Panasonic camera DMC FS 16 CCD cleaning: stap 13, afbeelding 1 van 1
    • Flip the CCD up.

    • In the picture the CCD is marked green and the back of the lens marked orange. If you look closely, you can even see the dust grains.

    • Work embarrassingly clean! Every new speck of dust destroys the work. Do not blow on parts with your mouth! Use proper tools

    • Blow the CCD and the back of the lens out with a few puffs of compressed air to remove any dust and lint. Clean both with a lint-free cotton swab and some high-percentage (greater than 95%) alcohol. Let the alcohol dry.

Conclusie

Follow the steps in reversed order to reassemble your device.

3 andere personen hebben deze handleiding voltooid.

Met dank aan deze vertalers:

de en

100%

oldturkey03 helpt ons de wereld te herstellen! Wil je bijdragen?
Begin met vertalen ›

VauWeh

Lid sinds: 10/19/15

202.409 Reputatie

246 handleidingen geschreven

Team

Repair is War on Entropy Lid van Repair is War on Entropy

Community

25 Leden

1.103 handleidingen geschreven

5 opmerkingen

Thank you so much for this - much loved little camera saved from the bin!

Paul Jeffrey - Antwoord

I'm glad I could help!

VauWeh -

Sehr genaue Anleitung, da kann man gar nichts falsch machen. Zeitaufwand knapp 20 Minuten. Danke!

Alex Z. - Antwoord

Vielen Dank für diese Reparatur-Anleitung! Super bebildert und beschriftet, da kann nichts schiefgehen. Für die Schrauben habe ich mir ein Paketband mit der Klebeseite nach oben fixiert, so dass ich diese entsprechend den Arbeitsschritten ablegen kann.

Wilhelm Weber - Antwoord

Vielen Dank für die professionelle Reparaturanleitung.

Dirk K

Sid Wid - Antwoord

Voeg opmerking toe

Weergavestatistieken:

Afgelopen 24 uren: 0

Afgelopen 7 dagen: 4

Afgelopen 30 dagen: 15

Altijd: 1,040