Ga door naar hoofdinhoud

Panasonic DMC-FZ70 Operation Unit Replacement

Wat je nodig hebt

  1. Panasonic DMC-FZ70 Operation  Unit Replacement, Back Panel: stap 1, afbeelding 1 van 2 Panasonic DMC-FZ70 Operation  Unit Replacement, Back Panel: stap 1, afbeelding 2 van 2
    • All screws should be removed using a Phillips #0 screwdriver.

    • Using your screwdriver, unscrew the two 5.0 mm Philips screws to the right of the LCD screen.

  2. Panasonic DMC-FZ70 Operation  Unit Replacement: stap 2, afbeelding 1 van 2 Panasonic DMC-FZ70 Operation  Unit Replacement: stap 2, afbeelding 2 van 2
    • Flip the camera over to the left side of the screen and unscrew the 5mm Phillips screw found there.

  3. Panasonic DMC-FZ70 Operation  Unit Replacement: stap 3, afbeelding 1 van 2 Panasonic DMC-FZ70 Operation  Unit Replacement: stap 3, afbeelding 2 van 2
    • Turn the camera upside down and unscrew the three 5mm screws found on the bottom.

  4. Panasonic DMC-FZ70 Operation  Unit Replacement: stap 4, afbeelding 1 van 2 Panasonic DMC-FZ70 Operation  Unit Replacement: stap 4, afbeelding 2 van 2
    • On the top of the camera locate the two rails with a thin sheet of metal on the floor between them.

    • With a metal spudger, lift this sheet and push it out of the rail device to detach it from the camera.

  5. Panasonic DMC-FZ70 Operation  Unit Replacement: stap 5, afbeelding 1 van 1
    • Proceed to remove the four 5mm Phillips screws that you just uncovered.

  6. Panasonic DMC-FZ70 Operation  Unit Replacement: stap 6, afbeelding 1 van 1
    • Slowly pull on both side of the camera, until both halves begin to separate from each other.

    • Do not pull too hard, as both halves are held together with ZIF connector cables.

  7. Panasonic DMC-FZ70 Operation  Unit Replacement: stap 7, afbeelding 1 van 3 Panasonic DMC-FZ70 Operation  Unit Replacement: stap 7, afbeelding 2 van 3 Panasonic DMC-FZ70 Operation  Unit Replacement: stap 7, afbeelding 3 van 3
    • Using a plastic opening tool, carefully flip up the small black levers that attach the ribbon cables to the ZIF connectors on the motherboard.

    • Carefully pull the ribbon cables out of the slot once they have been released.

    • Only the two indicated connectors need to be removed to separate the two halves of the camera.

  8. Panasonic DMC-FZ70 Operation  Unit Replacement, Motherboard: stap 8, afbeelding 1 van 1
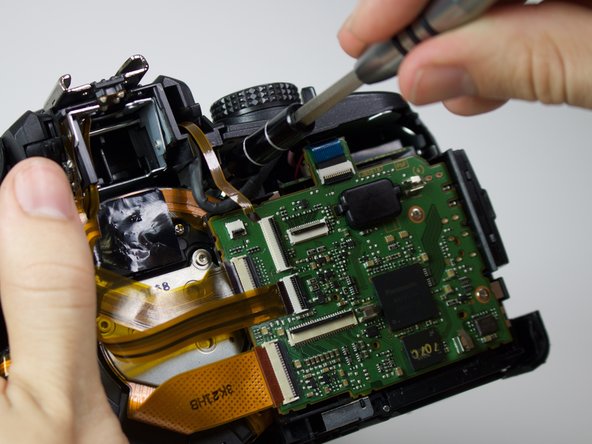
    • Using a Torx driver, unscrew the two 5mm Phillipd screws on the motherboard

  9. Panasonic DMC-FZ70 Operation  Unit Replacement: stap 9, afbeelding 1 van 3 Panasonic DMC-FZ70 Operation  Unit Replacement: stap 9, afbeelding 2 van 3 Panasonic DMC-FZ70 Operation  Unit Replacement: stap 9, afbeelding 3 van 3
    • The five ribbon cables shown will need to be removed from the ZIF connectors. Using a plastic opening tool, unlock the cables by lifting the black strip on the rectangular connection socket.

    • Carefully pull each of the ribbon cables out of their sockets.

    • The cable should slide out smoothly- any significant resistance might signal that the locking lever has not yet released the cable.

  10. Panasonic DMC-FZ70 Operation  Unit Replacement: stap 10, afbeelding 1 van 2 Panasonic DMC-FZ70 Operation  Unit Replacement: stap 10, afbeelding 2 van 2
    • Once the screws and the ribbon cables have been removed, lift the mother board from its slot.

  11. Panasonic DMC-FZ70 Operation  Unit Replacement, Operation  Unit: stap 11, afbeelding 1 van 2 Panasonic DMC-FZ70 Operation  Unit Replacement, Operation  Unit: stap 11, afbeelding 2 van 2
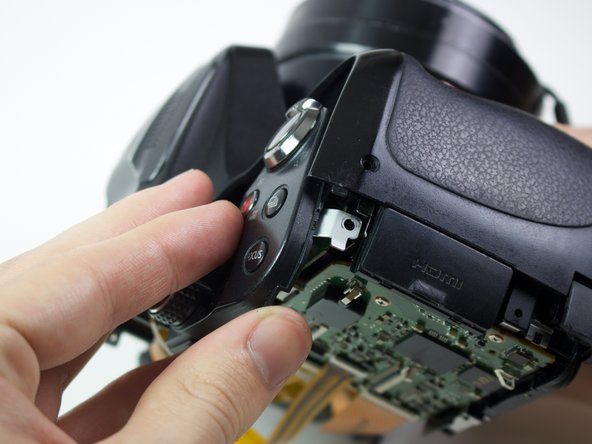
    • Unscrew one 10mm Phillips screw to the right and underneath the viewfinder.

  12. Panasonic DMC-FZ70 Operation  Unit Replacement: stap 12, afbeelding 1 van 1
    • Using a plastic opening tool, flip up the switch on the ZIF connector underneath the operations unit and pull the ribbon out of the motherboard.

  13. Panasonic DMC-FZ70 Operation  Unit Replacement: stap 13, afbeelding 1 van 3 Panasonic DMC-FZ70 Operation  Unit Replacement: stap 13, afbeelding 2 van 3 Panasonic DMC-FZ70 Operation  Unit Replacement: stap 13, afbeelding 3 van 3
    • Slide out and replace the operation unit.

Conclusie

To reassemble your device, follow these instructions in reverse order.

4 andere personen hebben deze handleiding voltooid.

Alberto Rodriguez

Lid sinds: 01/24/17

531 Reputatie

4 handleidingen geschreven

Team

Cal Poly, Team 21-3, Maness Winter 2017 Lid van Cal Poly, Team 21-3, Maness Winter 2017

CPSU-MANESS-W17S21G3

6 Leden

12 handleidingen geschreven

Één opmerking

Alberto,

Great instructions! Saved me $165 (compared to camera repair shop).

Professor Roy Hinkley - Antwoord

Voeg opmerking toe

Weergavestatistieken:

Afgelopen 24 uren: 2

Afgelopen 7 dagen: 6

Afgelopen 30 dagen: 27

Altijd: 1,973