Ga door naar hoofdinhoud

PSP 300x UMD Drive Replacement

Wat je nodig hebt

  1. PSP 300x UMD Drive Replacement, Battery: stap 1, afbeelding 1 van 3 PSP 300x UMD Drive Replacement, Battery: stap 1, afbeelding 2 van 3 PSP 300x UMD Drive Replacement, Battery: stap 1, afbeelding 3 van 3
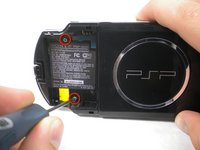
    • Place the PSP face down and locate the battery cover on the left side of the device.

    • Lift and remove the battery cover to reveal the battery.

    • Remove the battery.

  2. PSP 300x UMD Drive Replacement, Casing: stap 2, afbeelding 1 van 1
    • Peel back the warranty sticker that is behind the battery with a spudger or your fingernail.

  3. PSP 300x UMD Drive Replacement: stap 3, afbeelding 1 van 2 PSP 300x UMD Drive Replacement: stap 3, afbeelding 2 van 2
    • Unscrew all four screws from the back of the PSP with the Phillips #00 Screwdriver.

    • Two are located behind the battery's warranty sticker.

    • Two are located on the right side of the PSP.

  4. PSP 300x UMD Drive Replacement: stap 4, afbeelding 1 van 1
    • Next, unscrew the two screws located at the top of the PSP.

  5. PSP 300x UMD Drive Replacement: stap 5, afbeelding 1 van 1
    • Then, remove the single screw from the bottom edge of the PSP (which is positioned next to the barcode).

  6. PSP 300x UMD Drive Replacement: stap 6, afbeelding 1 van 2 PSP 300x UMD Drive Replacement: stap 6, afbeelding 2 van 2
    • Slide the spudger in between the outer casing of the PSP, beginning at the "R" shoulder button, and gently pry off the casing.


    • Remove the front casing completely.

  7. PSP 300x UMD Drive Replacement, LCD Screen: stap 7, afbeelding 1 van 2 PSP 300x UMD Drive Replacement, LCD Screen: stap 7, afbeelding 2 van 2
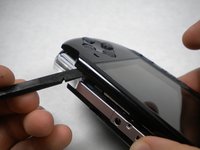
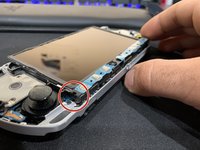
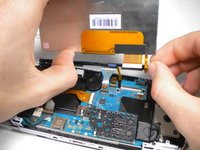
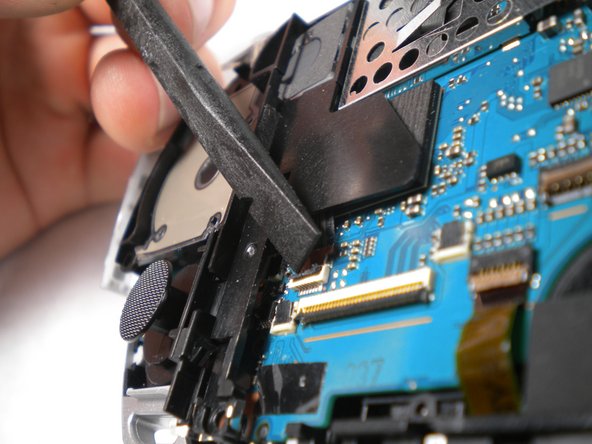
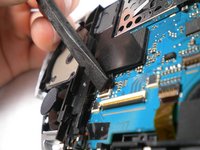
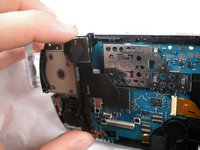
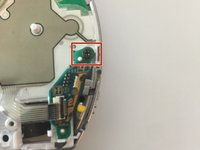
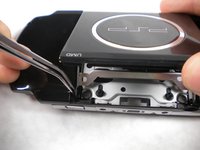
    • Push the homebar to the right to release the tab located on the right side of the LCD screen.

    • DO NOT completely remove the homebar, as it is still connected by ribbon cables.

  8. PSP 300x UMD Drive Replacement: stap 8, afbeelding 1 van 3 PSP 300x UMD Drive Replacement: stap 8, afbeelding 2 van 3 PSP 300x UMD Drive Replacement: stap 8, afbeelding 3 van 3
    • Slowly lift the LCD screen off the PSP starting at the top edge corner.

    • Again, the LCD screen is attached by ribbon cables, so do not remove it completely.

    • Orientation of PSP is flipped in photo.

  9. PSP 300x UMD Drive Replacement: stap 9, afbeelding 1 van 2 PSP 300x UMD Drive Replacement: stap 9, afbeelding 2 van 2
    • Flip the small brown locks on the four ribbon cable connectors up using a spudger or fingernail.

    • Pull all four ribbon cables out.

    • Now remove the LCD screen and homebar from the PSP.

  10. PSP 300x UMD Drive Replacement: stap 10, afbeelding 1 van 1
    • Remove the metal tab that lies above the LCD screen.

    • Upon reassembly, make note that the stamped lettering faces down, and the large tab fits just above the motherboard to the right hand side of the left trigger.

  11. PSP 300x UMD Drive Replacement, Trigger Buttons: stap 11, afbeelding 1 van 1
    • Remove the screw securing 'L' trigger to the PSP.

  12. PSP 300x UMD Drive Replacement: stap 12, afbeelding 1 van 1
    • Remove the white plastic piece that holds the 'L' trigger in place.

  13. PSP 300x UMD Drive Replacement: stap 13, afbeelding 1 van 1
    • Remove the 'L' trigger from the PSP.

  14. PSP 300x UMD Drive Replacement: stap 14, afbeelding 1 van 1
    • Remove the screw securing the 'R' trigger.

  15. PSP 300x UMD Drive Replacement: stap 15, afbeelding 1 van 1
    • Remove the white plastic piece that holds the 'R' trigger in place.

  16. PSP 300x UMD Drive Replacement: stap 16, afbeelding 1 van 1
    • Remove the 'R' trigger from the PSP.

  17. PSP 300x UMD Drive Replacement, Analog Stick: stap 17, afbeelding 1 van 1
    • Remove the screw from the bottom left edge of the PSP.

  18. PSP 300x UMD Drive Replacement: stap 18, afbeelding 1 van 1
    • Being careful not to break the ribbon cable, use the spudger to peel the adhesive button of the the 'L' trigger off the PSP.

  19. PSP 300x UMD Drive Replacement: stap 19, afbeelding 1 van 2 PSP 300x UMD Drive Replacement: stap 19, afbeelding 2 van 2
    • Using a fingernail or spudger, flip up the retaining bracket on the d-pad and 'L' trigger ribbon cable.

    • Lift the black plastic bracket along with the d-pad contact pad, disconnecting the ribbon cable as you lift.

  20. PSP 300x UMD Drive Replacement: stap 20, afbeelding 1 van 1
    • Remove the cable from the connector and remove the entire black piece from the PSP.

  21. PSP 300x UMD Drive Replacement: stap 21, afbeelding 1 van 1
    • Remove the screw holding the analog stick in place.

  22. PSP 300x UMD Drive Replacement: stap 22, afbeelding 1 van 2 PSP 300x UMD Drive Replacement: stap 22, afbeelding 2 van 2
    • Flip up the lock on the analog sticks ribbon cable.

    • Remove the analog stick from the PSP.

  23. PSP 300x UMD Drive Replacement, Power Jack: stap 23, afbeelding 1 van 1
    • Flip up the lock and detach the ribbon cable above the power jack.

  24. PSP 300x UMD Drive Replacement: stap 24, afbeelding 1 van 1
    • Remove the screw from the power jack.

  25. PSP 300x UMD Drive Replacement: stap 25, afbeelding 1 van 1
    • Carefully bend back the black tab holding the power jack in place and start pulling the jack up to release it from this clip.

  26. PSP 300x UMD Drive Replacement: stap 26, afbeelding 1 van 1
    • Pull the plug connecting the power jack to the motherboard.

    • Remove the power jack.

  27. PSP 300x UMD Drive Replacement, Speaker: stap 27, afbeelding 1 van 2 PSP 300x UMD Drive Replacement, Speaker: stap 27, afbeelding 2 van 2
    • Push the black tab at the bottom of the speaker to pop the speaker out of place, and remove the speaker.

    • The speaker is spring loaded, so be sure to keep an eye on it in case it starts doing flips into the air when you push the tab. Be careful not to lose or damage it!

    • Make sure the new/replacement speaker does not spring out during reassembly.

  28. PSP 300x UMD Drive Replacement, Motherboard: stap 28, afbeelding 1 van 1
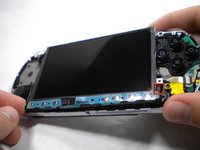
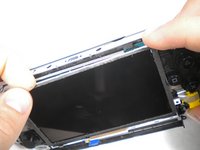
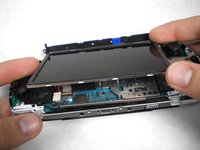
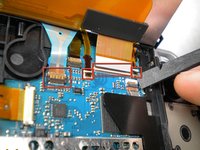
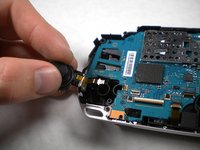
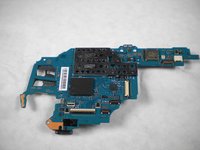
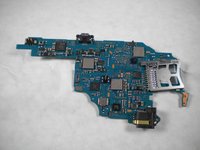
    • Remove the cable carefully by lifting upwards from port attached to the motherboard .

  29. PSP 300x UMD Drive Replacement: stap 29, afbeelding 1 van 1
    • Flip up both of the locks and remove both cables as shown

  30. PSP 300x UMD Drive Replacement: stap 30, afbeelding 1 van 1
    • Flip up the lock and remove the ribbon cable located at the bottom edge of the PSP.

  31. PSP 300x UMD Drive Replacement: stap 31, afbeelding 1 van 1
    • Use a Phillips #00 screwdriver to remove the bottom left screw attached to the PSP

  32. PSP 300x UMD Drive Replacement, Remove Power Switch Panel: stap 32, afbeelding 1 van 3 PSP 300x UMD Drive Replacement, Remove Power Switch Panel: stap 32, afbeelding 2 van 3 PSP 300x UMD Drive Replacement, Remove Power Switch Panel: stap 32, afbeelding 3 van 3
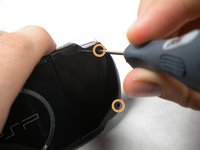
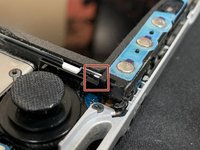
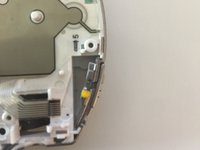
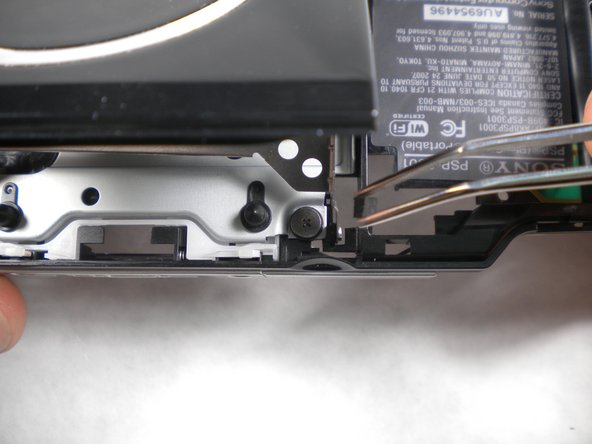
    • Remove the screw located at the top of the power switch panel.

    • Gently lift and remove the panel from the switch side

  33. PSP 300x UMD Drive Replacement: stap 33, afbeelding 1 van 1
    • Remove the silver rim on the right side of the PSP.

  34. PSP 300x UMD Drive Replacement: stap 34, afbeelding 1 van 1
    • Remove the silver rim on the left side of the PSP.

  35. PSP 300x UMD Drive Replacement: stap 35, afbeelding 1 van 2 PSP 300x UMD Drive Replacement: stap 35, afbeelding 2 van 2
    • Remove the motherboard from the PSP

  36. PSP 300x UMD Drive Replacement, UMD Drive: stap 36, afbeelding 1 van 1
    • On the bottom of the back of the PSP, pull the white plastic piece out.

  37. PSP 300x UMD Drive Replacement: stap 37, afbeelding 1 van 1
    • Use a spudger and pull the spring out and remove it from the PSP.

  38. PSP 300x UMD Drive Replacement: stap 38, afbeelding 1 van 2 PSP 300x UMD Drive Replacement: stap 38, afbeelding 2 van 2
    • Open the UMD (disk drive) and locate the two small black rubber squares wedged in the space between the casing and the metal drive hinge on either side.

    • Pull these out using a pair of tweezers.

  39. PSP 300x UMD Drive Replacement: stap 39, afbeelding 1 van 1
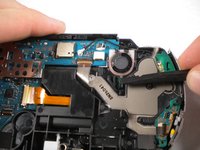
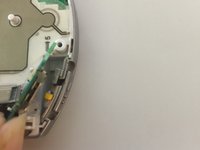
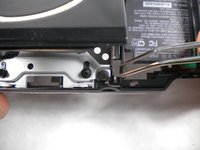
    • Detach the metal piece from where it is attached to the body underneath the rubber pieces that were just removed.

    • The side of the piece that is closest to the door opening should now be loose. The whole piece should now be slid farther into the drive through the slots.

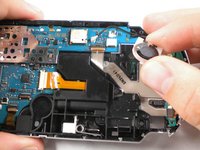
    • Once you slide the piece toward the back of the slots, the side that is still attached can be pried towards the center of the drive on each side to remove it from the slots on the door.

  40. PSP 300x UMD Drive Replacement: stap 40, afbeelding 1 van 1
    • Grabbing the PSP with both hands, gently pinch the UMD lid towards the right side (the side without the battery).

    • Pull up and the the left side carefully to remove the lid from the PSP. (The casing may have to flex a little bit to allow this)

  41. PSP 300x UMD Drive Replacement: stap 41, afbeelding 1 van 1
    • Remove the four screw from the UMD drive.

  42. PSP 300x UMD Drive Replacement: stap 42, afbeelding 1 van 1
    • Remove the UMD Drive.

Conclusie

To reassemble your device, follow these instructions in reverse order.

22 andere personen hebben deze handleiding voltooid.

mbnewsom

Lid sinds: 10/28/09

3.094 Reputatie

11 handleidingen geschreven

6 opmerkingen

Perfect!!! You forgot to mention 'GET YOUR EYEGLASSES' for the 50+ year old fathers that have to help on this procedure!!!! Man, oh man, are those parts small and delicate!!!! GREAT tutorial, than you very much! Blind in Boston.

Rosebud Mosaics - Antwoord

The tutorial was great btw, however after assembling everything into my new blue Mod i was left with a white plastic piece and a spring witch is in my psp 3001 models , not sure but i see in the last picture of this tutorial you have the white piece left in the drive. it is located behind the cd rom part near the top of the psp where the 2 x holes are. it sucks cause it dont close properly without the white piece and theres also 1 of the 2 springs not mentioned in this tutorial neither im trying to figure out where it goes. But thanks for this guide as it has helped me alot..

:)

Ken

Kenneth A - Antwoord

Someone found the location of the missing spring? Haven’t figured it out yet…

tanja-stephan -

This has too many extra steps. If you’re *just* taking out the UMD drive, you only need to follow these sections: battery, casing, LCD screen, UMD drive. This guide should really just be called “how to completely disassemble your PSP 3000”.

Christopher Dickinson - Antwoord

What about removing the UMD trigger? I didn’t see it anywhere in this tutorial. Please help.

C Rad - Antwoord

Voeg opmerking toe

Weergavestatistieken:

Afgelopen 24 uren: 24

Afgelopen 7 dagen: 156

Afgelopen 30 dagen: 648

Altijd: 43,946