Ga door naar hoofdinhoud

Oster 2-Slice Toaster TSSTJC5BBK Disassembly

Wat je nodig hebt

  1. Oster 2-Slice Toaster TSSTJC5BBK Disassembly, Oster 2-Slice Toaster TSSTJC5BBK Disassembly: stap 1, afbeelding 1 van 1
    • Firmly grip the knob of the toaster, and pull it away from the body.

  2. Oster 2-Slice Toaster TSSTJC5BBK Disassembly: stap 2, afbeelding 1 van 1
    • Turn the toaster to the other side, and remove the tray from the bottom of the toaster.

  3. Oster 2-Slice Toaster TSSTJC5BBK Disassembly: stap 3, afbeelding 1 van 1
    • Rotate the toaster to the back.

    • Remove six screws from the bottom of the toaster with a Phillips #0 screwdriver.

  4. Oster 2-Slice Toaster TSSTJC5BBK Disassembly: stap 4, afbeelding 1 van 1
    • Use a plastic opening pick to pry the plastic cover from the bottom.

    • Once the top has been pried off, you can lift the plastic cover off.

    • Be careful to do this gently, since the circuit boards are still connected to the plastic cover, and you can risk tearing out the wires.

  5. Oster 2-Slice Toaster TSSTJC5BBK Disassembly: stap 5, afbeelding 1 van 2 Oster 2-Slice Toaster TSSTJC5BBK Disassembly: stap 5, afbeelding 2 van 2
    • When you remove the cover from the base, there will be three circuit boards attached to the inside of the cover.

    • Remove the three screws holding the top two circuit boards.

  6. Oster 2-Slice Toaster TSSTJC5BBK Disassembly: stap 6, afbeelding 1 van 1
    • Remove the two screws holding the bottom circuit board.

  7. Oster 2-Slice Toaster TSSTJC5BBK Disassembly: stap 7, afbeelding 1 van 2 Oster 2-Slice Toaster TSSTJC5BBK Disassembly: stap 7, afbeelding 2 van 2
    • Once we remove the circuit boards, we can start to see how the toaster operates.

  8. Oster 2-Slice Toaster TSSTJC5BBK Disassembly: stap 8, afbeelding 1 van 1
    • After you remove the circuit boards, there will be button covers still on the outer case.

    • Remove them by either pulling them out or pushing them in from the outside.

  9. Oster 2-Slice Toaster TSSTJC5BBK Disassembly: stap 9, afbeelding 1 van 1
    • Use a Jimmy to pry the metal tabs on top of the toaster.

  10. Oster 2-Slice Toaster TSSTJC5BBK Disassembly: stap 10, afbeelding 1 van 2 Oster 2-Slice Toaster TSSTJC5BBK Disassembly: stap 10, afbeelding 2 van 2
    • Pry the metal top off of the tabs.

    • The metal top is still attached to a spring and cannot be fully removed from the toaster.

  11. Oster 2-Slice Toaster TSSTJC5BBK Disassembly: stap 11, afbeelding 1 van 2 Oster 2-Slice Toaster TSSTJC5BBK Disassembly: stap 11, afbeelding 2 van 2
    • Detach the spring from the metal tabs by pulling the hook out with pliers.

    • Remove the metal top from the toaster.

  12. Oster 2-Slice Toaster TSSTJC5BBK Disassembly: stap 12, afbeelding 1 van 1
    • Unfold the tabs holding the side covers on both sides.

  13. Oster 2-Slice Toaster TSSTJC5BBK Disassembly: stap 13, afbeelding 1 van 3 Oster 2-Slice Toaster TSSTJC5BBK Disassembly: stap 13, afbeelding 2 van 3 Oster 2-Slice Toaster TSSTJC5BBK Disassembly: stap 13, afbeelding 3 van 3
    • Pry the metal side covers from the toaster.

    • Be careful as you do this; there are wires attached to the metal sides that could be torn if you pull too hard!

  14. Oster 2-Slice Toaster TSSTJC5BBK Disassembly: stap 14, afbeelding 1 van 1
    • The current will run through the left, center, and right heating elements in parallel. The resistance within the elements create heat that is expelled onto the toast.

  15. Oster 2-Slice Toaster TSSTJC5BBK Disassembly: stap 15, afbeelding 1 van 3 Oster 2-Slice Toaster TSSTJC5BBK Disassembly: stap 15, afbeelding 2 van 3 Oster 2-Slice Toaster TSSTJC5BBK Disassembly: stap 15, afbeelding 3 van 3
    • Now turn the toaster to the front, where the last circuit board is still attached.

    • Remove the circuit board by snapping the plastic holders keeping it in place. The plastic holders are attached to the bottom of the circuit board, on opposite sides.

  16. Oster 2-Slice Toaster TSSTJC5BBK Disassembly: stap 16, afbeelding 1 van 1
    • The schematic shows an alternating 120 Volt current that enters the heating elements only when the switch is pushed down. Once it is down, the heating elements, each 35 ohms of resistance, receive the current and produce heat.

  17. Oster 2-Slice Toaster TSSTJC5BBK Disassembly: stap 17, afbeelding 1 van 1
    • Remove the fourth circuit board from the toaster. This circuit board contains switch that connects the current with the user interface and the heating elements.

    • Be careful as you remove it; pulling it too hard can snap the wires attaching it to the toaster.

  18. Oster 2-Slice Toaster TSSTJC5BBK Disassembly: stap 18, afbeelding 1 van 3 Oster 2-Slice Toaster TSSTJC5BBK Disassembly: stap 18, afbeelding 2 van 3 Oster 2-Slice Toaster TSSTJC5BBK Disassembly: stap 18, afbeelding 3 van 3
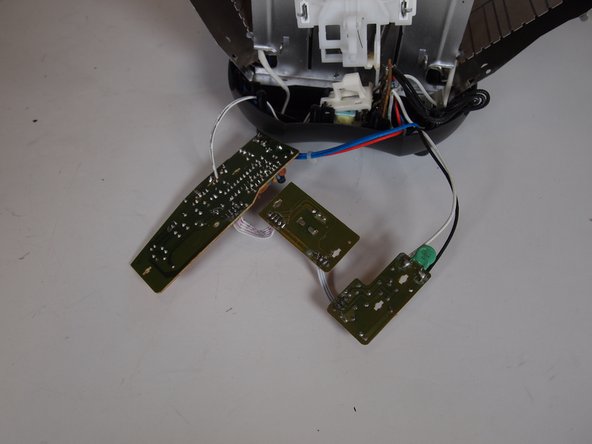
    • The three circuit boards all take in user input from buttons or a dial. The button inputs affect the volume of current flowing through the heating elements. The dial controls the time that the heating elements are receiving current. The cancel button releases the mechanical switch.

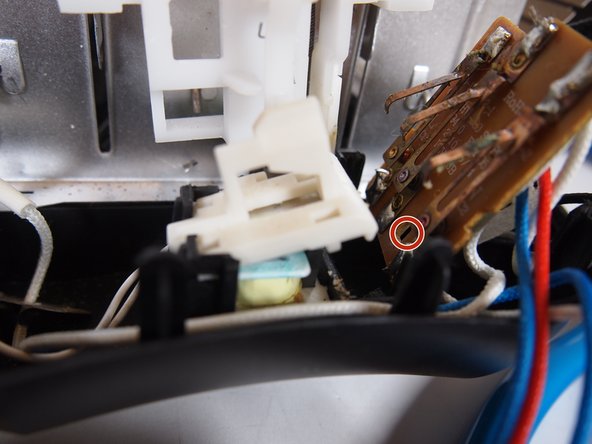
    • The switch in picture 2 is pressed down by the user, then held down mechanically. The time it is down is determined by the dial or whether the cancel button is pressed. The switch connects the current to the heating elements.

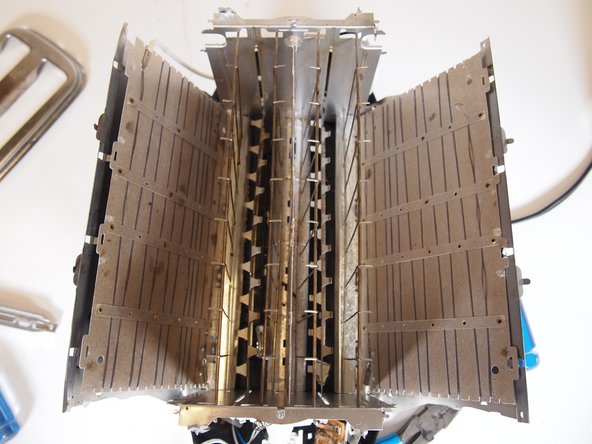
    • The heating elements are each 35 ohms. When the switch is connected, they convert the electrical current within them into heat projected outward toward the toast.

Conclusie

To reassemble your device, follow these instructions in reverse order.

Één andere persoon heeft deze handleiding voltooid.

0 opmerkingen

Voeg opmerking toe

Weergavestatistieken:

Afgelopen 24 uren: 1

Afgelopen 7 dagen: 11

Afgelopen 30 dagen: 44

Altijd: 700