Inleiding
De oplaadbare batterij zorgt ervoor dat het apparaat van stroom voorzien wordt. Deze dient vervangen te worden wanneer hij beschadigd is of slijt na veelvuldig gebruik. Sommige stappen in deze procedure vereisen het desolderen van verbindingen. Kijk hier voor soldeertechnieken.
Wat je nodig hebt
-
-
Gebruik het laadstation om de kleine plastic plug aan de onderzijde van de tandenborstel te verwijderen: plaats de borstel op het laadstation en draai deze 90 graden tegen de klok in.
-
-
-
Gebruik een spudger om de twee plastic klemmetjes naast de inductiespoel los te maken. Deze klemmetjes zetten de interne assemblage in de behuizing vast.
-
Druk op de roterende kop van de tandenborstel om de interne assemblage uit het frame te duwen.
You need to release the induction coil’s plastic clips before you try to slide it out! This is a key missing step.
I agree with Matthew. You must insert a spudger and release the plastic clips while pressing down on the rotating head. I held the rotating head with a pair of pliars and then released the plastic clips and it popped right out.
i third that, this needs to be added ASAP, you have no chance of getting it out without unclicking those two latches that lock the inner assembly to the outer casing.
I'd recommend changing this to say where these tabs are. Basically, you insert the spudger between the left and right side plastic arms/tabs going to the coil assembly and the body. If you have light pressure applied to the head at the right time, you'll feel them move when you insert a spudger and put a tiny bit of leverage.
You can see these tabs most easily in step 7. The tab shown in the second photo doesn't really have anything to do with anything (maybe that's the ill-advised leverage method).
-
-
-
-
Wikkel de uiteinden van de draadjes van de plastic pootjes af met behulp van een pincet.
Unnecessary step for battery replacement! The electrode of the battery is solely the single solder point in the middle and the battery comes out just as well if you just leave the coil. If all you want is to replace the battery. just leave the coil, It’s fiddly and risky to break the wire and more work, only disadvantages. Good efforts!
I'm not doing this right now, but thank you!
Achtung dieser Schritt ist für den reinen Akkutausch unnötig und quasi falsch! Die Spule kann verbleiben, der Akku ist einzig die einzelne mittige Lötstelle!
-
-
-
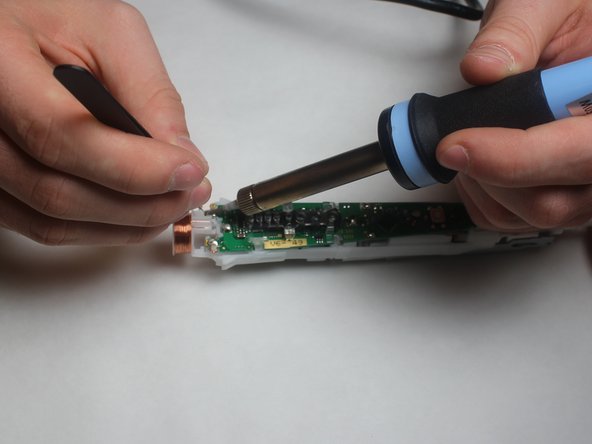
Gebruik een soldeerijzer om de soldeertin die de batterij bovenop het moederbord verbindt te smelten. Verwijder de electrode door deze door de plastic behuizing heen te trekken nadat het van het bord is gedesoldeerd.
-
Herhaal voor de twee gesoldeerde verbindingen aan beide zijden van het moederbord, net boven het zwarte diamantvormige component. De elektrode-folies kun je vanaf de achterzijde door het bord heen trekken nadat het soldeertin is gesmolten.
Second is totally unnecessary step for battery replacement. Only the one in the middle is the electrode of the battery. Same in the earlier step with the coil, don’t unsolder the coil if all you want to do is battery replacement. Just more fiddly work and risk of damage.
-
-
-
Gebruik een metalen spudger om de batterij uit zijn behuizing te wrikken. De electrodes blijven aan de batterij verbonden.
Is this a lithium ion battery and will it definitely work for the Oral-B Black 7000? Any help is greatly appreciated, the exact part number replacement would be nice...
Kind regards
Chai
NiMH Battery is needed!
Lithium-ion will not work with the regular charging station
Not sure what you mean by regular charging station, but I have the Pro 7000 (NiMH Battery) and the Smart 1500 (Li-ion Battery) and they both came with the same model 3757 charger in the box.
Joe Cox -
-


Om het apparaat weer in elkaar te zetten volg je de voorgaande stappen in omgekeerde volgorde.
Om het apparaat weer in elkaar te zetten volg je de voorgaande stappen in omgekeerde volgorde.
Annuleren: ik heb deze handleiding niet afgemaakt.
5 andere personen hebben deze handleiding voltooid.
Met dank aan deze vertalers:
100%


Deze vertalers helpen ons de wereld te repareren! Wil je bijdragen?
Begin met vertalen ›
Team

IUPUI, Team S1-G1, Harley Fall 2017 Lid van IUPUI, Team S1-G1, Harley Fall 2017
IUPUI-HARLEY-F17S1G1
3 Leden
16 handleidingen geschreven
4 opmerkingen
Wo bekommt man einen neuen AKU
Andreas
Der sollte es sein. Er muss Lötfahnen haben! Miss die Länge nach, 42 oder 48 mm.
VauWeh -