Ga door naar hoofdinhoud

OontZ Angle 3 Motherboard Replacement

Wat je nodig hebt

  1. OontZ Angle 3 Motherboard Replacement, Back Case: stap 1, afbeelding 1 van 3 OontZ Angle 3 Motherboard Replacement, Back Case: stap 1, afbeelding 2 van 3 OontZ Angle 3 Motherboard Replacement, Back Case: stap 1, afbeelding 3 van 3
    • Make sure that the OontZ Angle 3 is powered off before starting the disassembly.

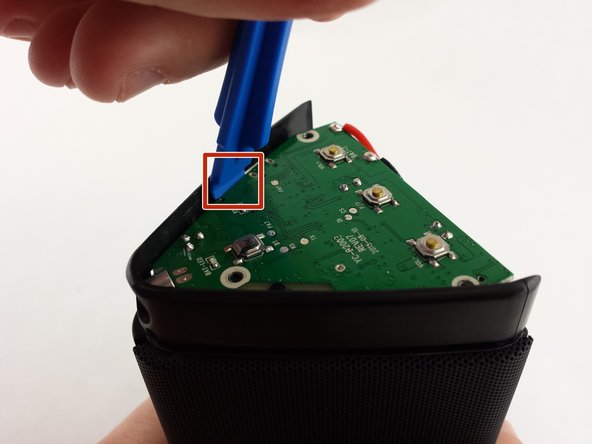
    • Use the plastic opening tool to remove the rubber caps from each end of the speaker.

  2. OontZ Angle 3 Motherboard Replacement: stap 2, afbeelding 1 van 1
    • Remove four (4) 11.7 mm Phillips #0 screws from each side at the bottom of the speaker.

  3. OontZ Angle 3 Motherboard Replacement: stap 3, afbeelding 1 van 2 OontZ Angle 3 Motherboard Replacement: stap 3, afbeelding 2 van 2
    • Use the plastic opening tool on one of the corners to separate the bottom piece from the speaker, and then remove the piece.

  4. OontZ Angle 3 Motherboard Replacement, Motherboard: stap 4, afbeelding 1 van 3 OontZ Angle 3 Motherboard Replacement, Motherboard: stap 4, afbeelding 2 van 3 OontZ Angle 3 Motherboard Replacement, Motherboard: stap 4, afbeelding 3 van 3
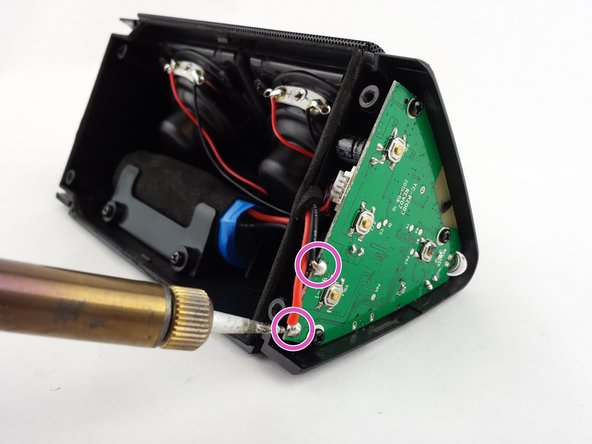
    • Locate the soldering connections for the battery on the motherboard and the wires for the speakers.

    • Use the soldering iron to disconnect the battery wires from the motherboard.

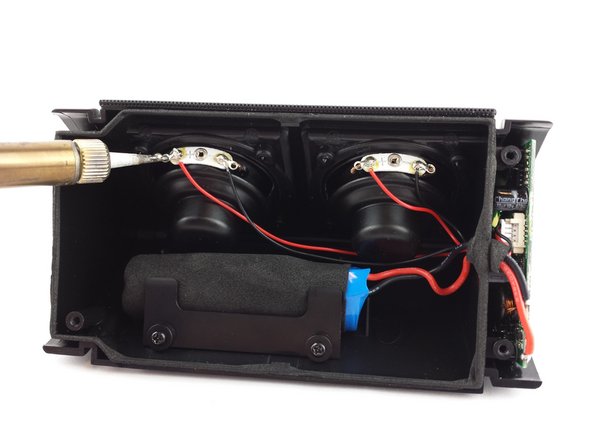
    • Use the soldering iron to disconnect the speaker wires from the motherboard.

    • When reconnecting the battery and speakers to the new motherboard, be careful to make the connections to the correct nodes as well as establish a complete connection, as the speakers could break with an incorrect connection and the battery risks overheating or erupting in flames if corrected incorrectly or poorly.

  5. OontZ Angle 3 Motherboard Replacement: stap 5, afbeelding 1 van 3 OontZ Angle 3 Motherboard Replacement: stap 5, afbeelding 2 van 3 OontZ Angle 3 Motherboard Replacement: stap 5, afbeelding 3 van 3
    • Remove the three (3) 3.6mm screws using a Phillips #0 screwdriver.

    • Use the plastic opening tool about midway down one side of the motherboard to pry it out of the casing.

    • Remove the faulty motherboard.

Conclusie

To reassemble your device, follow these instructions in reverse order.

7 andere personen hebben deze handleiding voltooid.

Mason Hollander

Lid sinds: 01/20/16

1.387 Reputatie

4 handleidingen geschreven

Team

USF Tampa, Team 15-6, Remmell Spring 2016 Lid van USF Tampa, Team 15-6, Remmell Spring 2016

USFT-REMMELL-S16S15G6

4 Leden

4 handleidingen geschreven

15 opmerkingen

where do i buy mother board of oontz angle 3?

Jomar Agcaoili - Antwoord

how much does a new motherboard cost??

Linda Coppola - Antwoord

Can you post where to get a new MB?

Brian Dickert - Antwoord

It does require a part...the new motherboard!

Brian Dickert - Antwoord

I'm having a hard time tracking down motherboards too. But the guide is still helpful if someone wants to harvest a motherboard out of another broken Oontz and use it in their own. If anyone else finds a source for the motherboard, feel free to edit the guide and include a link to it in the details section. Maybe if we all work together we can find a source.

Kelsea Weber - Antwoord

Voeg opmerking toe

Weergavestatistieken:

Afgelopen 24 uren: 2

Afgelopen 7 dagen: 14

Afgelopen 30 dagen: 48

Altijd: 12,150