Deze versie kan foutieve bewerkingen bevatten. Schakel over naar de recentste gecontroleerde momentopname.
Wat je nodig hebt
-
Deze stap is niet vertaald. Help het te vertalen
-
Insert a SIM card eject tool, bit, or a straightened paperclip into the small hole below the SIM card tray, located near the rear cameras on the edge of the phone.
-
Press firmly to eject the tray.
-
-
Deze stap is niet vertaald. Help het te vertalen
-
Remove the two 2.6 mm T2 screws straddling the USB-C port on the bottom edge of the phone.
-
-
Deze stap is niet vertaald. Help het te vertalen
-
Display panel seam: This seam is part of the display assembly. Do not pry at this seam, or you will separate and damage the display panel.
-
Frame seam: This is where the plastic frame meets the back cover. Only pry at this seam.
-
There are twelve clips that hold the frame against the rear case. Be aware of their location as you pry the back cover off in the following steps.
-
-
Deze stap is niet vertaald. Help het te vertalen
-
Place a suction cup near the bottom edge of the display.
-
Pull on the suction cup with strong steady force.
-
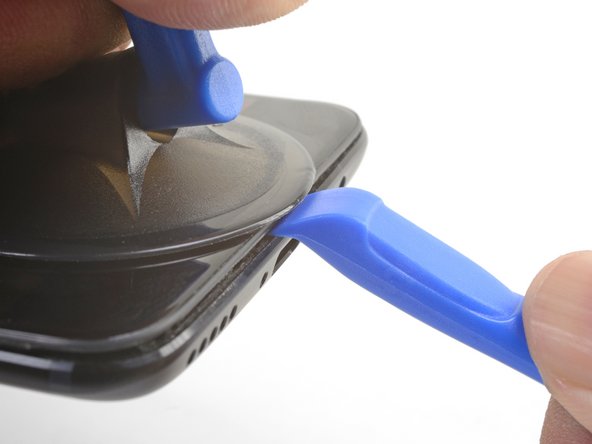
Press the edge of an opening tool straight into the frame seam near the suction cup until the edge wedges between the plastic frame and the back cover's lip.
-
-
Deze stap is niet vertaald. Help het te vertalen
-
Once the opening tool's edge is wedged in position, carefully slide the tool along the bottom edge of the phone.
-
Carefully guide the opening tool around the left corner of the phone while keeping the tool's edge within the seam.
-
-
Deze stap is niet vertaald. Help het te vertalen
-
Lever the opening tool to release the first clip from the frame.
-
-
Deze stap is niet vertaald. Help het te vertalen
-
Continue sliding the opening tool along the long edge, releasing the clips along the way.
-
-
Deze stap is niet vertaald. Help het te vertalen
-
With the bottom and left edge of the phone freed, gently wiggle the frame to release the top and right edge clips.
-
Align the top edge of the frame to the back cover and ensure that the top clips slip into place.
-
Squeeze along the long edges of the phone to snap the remaining clips into place.
-
-
-
Deze stap is niet vertaald. Help het te vertalen
-
With all the clips released, flip the phone over so that the display is face-down.
-
Swing the back cover around and rest it on top of the exposed frame.
-
-
Deze stap is niet vertaald. Help het te vertalen
-
Remove the 2.6 mm Phillips screw holding the cable bracket above the battery in place.
-
Lift up and remove the cable bracket.
-
-
Deze stap is niet vertaald. Help het te vertalen
-
Use the point of a spudger to pry up and disconnect the back cover flex cable from its socket.
-
-
Deze stap is niet vertaald. Help het te vertalen
-
Use the point of a spudger to pry up and disconnect the battery connector from its socket.
-
-
Deze stap is niet vertaald. Help het te vertalen
-
Remove the six 2.6 mm Phillips screws securing the loudspeaker to the frame.
-
-
Deze stap is niet vertaald. Help het te vertalen
-
Insert the flat end of a spudger into the corner of the loudspeaker assembly and pry slightly, loosening the loudspeaker from its recess.
-
-
Deze stap is niet vertaald. Help het te vertalen
-
Use the point of a spudger to pry up and disconnect the interconnect flex cable from the socket.
-
-
Deze stap is niet vertaald. Help het te vertalen
-
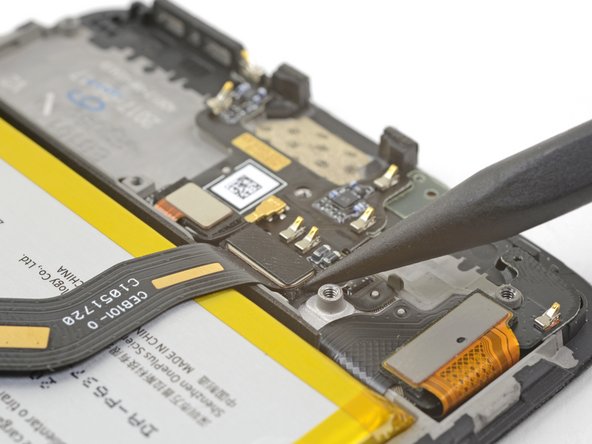
Use the point of a spudger to pry up and disconnect the display interconnect cable from its socket near the bottom edge of the motherboard.
-
-
Deze stap is niet vertaald. Help het te vertalen
-
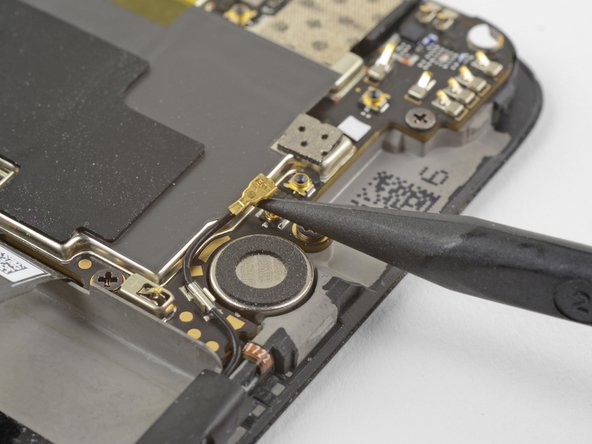
Slide the point of a spudger underneath the antenna interconnect cable that is connected to the motherboard above the vibration motor.
-
Pry up to disconnect the cable from its socket.
-
De-route the cable out of its motherboard grounding clip and move it out of the way.
-
-
Deze stap is niet vertaald. Help het te vertalen
-
Slide the point of a spudger under the small square antenna connector connected to the motherboard near the top edge.
-
Pry up to disconnect the antenna connector from its socket.
-
-
Deze stap is niet vertaald. Help het te vertalen
-
Remove the following seven 2.6 mm Phillips screws securing the motherboard:
-
-
Deze stap is niet vertaald. Help het te vertalen
-
Use your fingers to lift up the top edge of the motherboard.
-
Lift the motherboard out of its recess and remove it.
-
-
Deze stap is niet vertaald. Help het te vertalen
-
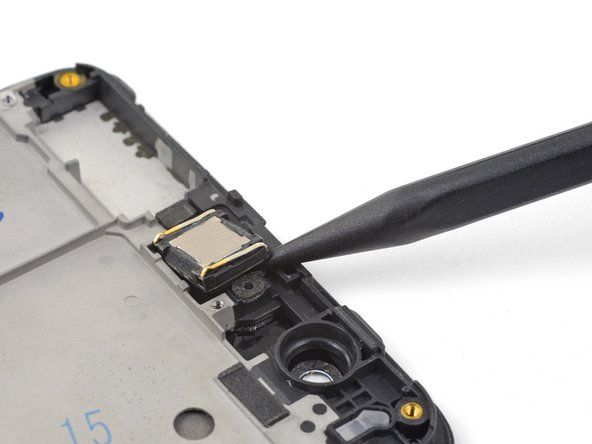
Insert the point of a spudger under the top right corner of the earpiece module and pry up, loosening the module from its recess.
-