Inleiding
This guide will instruct the reader on how to replace the heatsink in a One Education Infinity.
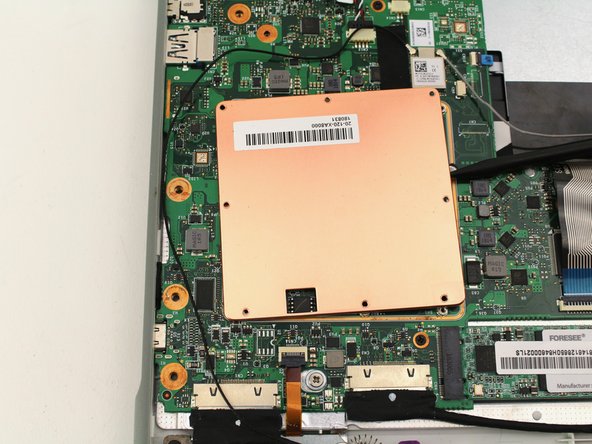
The heatsink is typically a component that diverts heat away from the processing units of the computer. The One Education Infinity doesn’t output quite enough heat to require use of a fan, so the heatsink is simply a standalone copper cover. The cover dissipates heat coming off of the CPU with its large surface area relative to the CPU itself.
However, while the heatsink is usually joined to the CPU using thermal paste to increase conductivity efficiency, this device design doesn’t have the CPU make direct contact with the heatsink, negating the need for thermal paste. Therefore, the heatsink can simply be replaced by taking the copper cover off and putting the new one on, without the need to reapply any thermal paste.
A malfunctioning heatsink can cause excessive heat around the CPU which will bring the processor above safe functioning temperatures. This can express itself through frequent crashes when the computer is performing strenuous tasks, and noticeable heat seeping from the bottom of the case. However, in this design, the heatsink doesn’t contain thermal paste and doesn’t direct the heat to a mechanical component like a fan, so a replacement may not help overheating unless the heatsink is visibly bent or damaged.
Wat je nodig hebt
-
-
Remove the screw covers and rubber feet from the bottom of the laptop with a metal spudger.
-
-
-
-
Carefully wiggle the battery cable to the right and out of the port with a plastic spudger.
-
-
-
Remove the eight 2.8 mm screws from the heatsink with a Phillips #00 screwdriver.
-


To reassemble your device, follow these instructions in reverse order.
To reassemble your device, follow these instructions in reverse order.

