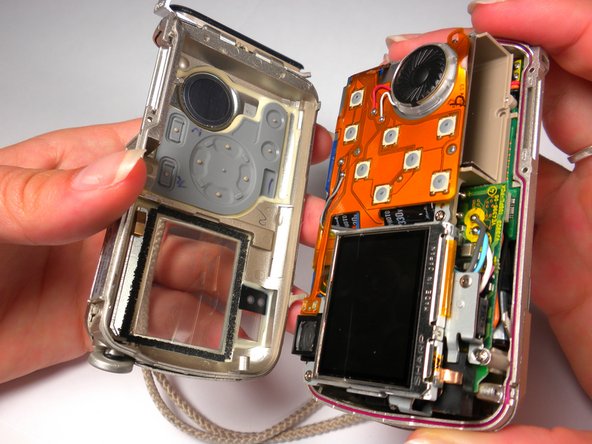
Ga door naar hoofdinhoud

Olympus Stylus 410 Logic Board Replacement

Wat je nodig hebt

  1. Olympus Stylus 410 Logic Board Replacement, Slider: stap 1, afbeelding 1 van 1
    • Locate the 2 screws on the bottom of the slider.

    • Remove both screws with a #00 Phillips screwdriver.

  2. Olympus Stylus 410 Logic Board Replacement: stap 2, afbeelding 1 van 1
    • Gently pull on the bottom of the slider until it comes off the lower track.

    • There is a little piece that connects the slider to the track. Be sure not to lose this as it is needed to put the slider back on.

  3. Olympus Stylus 410 Logic Board Replacement: stap 3, afbeelding 1 van 1
    • Lift the slider up until it comes off the upper track.

  4. Olympus Stylus 410 Logic Board Replacement: stap 4, afbeelding 1 van 1
    • The slider should now be free from the body of the camera.

  5. Olympus Stylus 410 Logic Board Replacement, Outer Case: stap 5, afbeelding 1 van 3 Olympus Stylus 410 Logic Board Replacement, Outer Case: stap 5, afbeelding 2 van 3 Olympus Stylus 410 Logic Board Replacement, Outer Case: stap 5, afbeelding 3 van 3
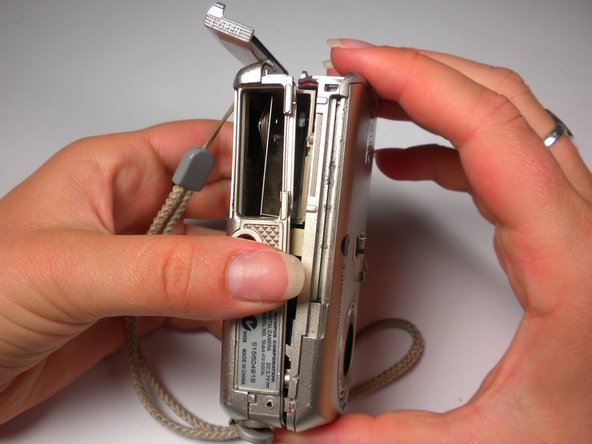
    • Locate the 3 screws on the outer metal band and remove them with a #00 Phillips screwdriver.

  6. Olympus Stylus 410 Logic Board Replacement: stap 6, afbeelding 1 van 2 Olympus Stylus 410 Logic Board Replacement: stap 6, afbeelding 2 van 2
    • Use the spudger to peel off the outer metal band, starting from the bottom of the camera.

    • The metal band it attached to the camera with glue in addition to screws. Be careful not to bend the band when removing it from the camera.

  7. Olympus Stylus 410 Logic Board Replacement: stap 7, afbeelding 1 van 2 Olympus Stylus 410 Logic Board Replacement: stap 7, afbeelding 2 van 2
    • The shutter button can now be removed. It is not connected to the camera and can be lifted off.

  8. Olympus Stylus 410 Logic Board Replacement: stap 8, afbeelding 1 van 2 Olympus Stylus 410 Logic Board Replacement: stap 8, afbeelding 2 van 2
    • Remove the memory card.

    • Locate and remove the 2 screws using a #00 Phillips screwdriver.

  9. Olympus Stylus 410 Logic Board Replacement: stap 9, afbeelding 1 van 3 Olympus Stylus 410 Logic Board Replacement: stap 9, afbeelding 2 van 3 Olympus Stylus 410 Logic Board Replacement: stap 9, afbeelding 3 van 3
    • Use a spudger around the edge of the case to loosen it.

    • Carefully wiggle the back case off. This may require a fair amount of force.

  10. Olympus Stylus 410 Logic Board Replacement: stap 10, afbeelding 1 van 1
    • Locate the 3 internal screws holding on the front of the case. Remove them with a #00 Phillips screwdriver.

  11. Olympus Stylus 410 Logic Board Replacement: stap 11, afbeelding 1 van 2 Olympus Stylus 410 Logic Board Replacement: stap 11, afbeelding 2 van 2
    • While grasping the interior and the front case, gently pull until they start to come apart. Some light wiggling may be required.

    • Be careful not to completely pull the front case off because it will still be connected with wires.

Conclusie

To reassemble your device, follow these instructions in reverse order.

Rory Aronson

Lid sinds: 04/15/10

46 Reputatie

6 handleidingen geschreven

Team

Cal Poly, Team 6-13, Maness Spring 2010 Lid van Cal Poly, Team 6-13, Maness Spring 2010

CPSU-MANESS-S10S6G13

5 Leden

17 handleidingen geschreven

0 opmerkingen

Voeg opmerking toe

Weergavestatistieken:

Afgelopen 24 uren: 0

Afgelopen 7 dagen: 1

Afgelopen 30 dagen: 5

Altijd: 2,699