Ga door naar hoofdinhoud

NuVision TM1088 Motherboard Replacement

Wat je nodig hebt

  1. NuVision TM1088 Motherboard Replacement, Rear Cover: stap 1, afbeelding 1 van 1
    • Place the plastic opening tool between the front and rear cover and pry up on each corner of the cover.

  2. NuVision TM1088 Motherboard Replacement, Motherboard: stap 2, afbeelding 1 van 1
    • Remove the two plugs for the screen by pulling up and away from the motherboard.

  3. NuVision TM1088 Motherboard Replacement: stap 3, afbeelding 1 van 1
    • Remove the plug for the cameras by pulling the plug up and away from the motherboard.

  4. NuVision TM1088 Motherboard Replacement: stap 4, afbeelding 1 van 1
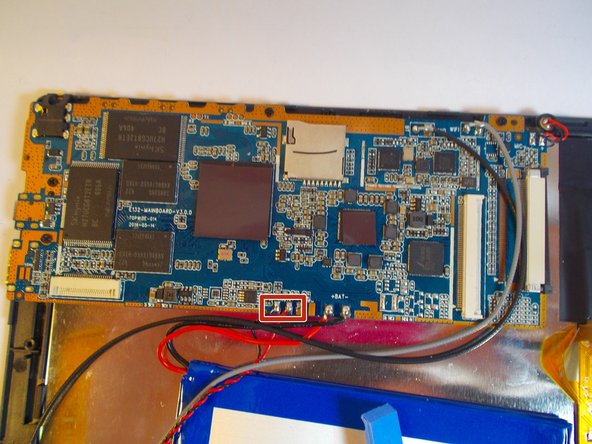
    • Melt solder and remove red and black wires leading to the battery.

  5. NuVision TM1088 Motherboard Replacement: stap 5, afbeelding 1 van 1
    • Melt the solder on the black and gray wires and remove wires from motherboard.

  6. NuVision TM1088 Motherboard Replacement: stap 6, afbeelding 1 van 1
    • Melt the solder and remove the red and black wires leading to the speaker.

  7. NuVision TM1088 Motherboard Replacement: stap 7, afbeelding 1 van 1
    • Remove the four 4 mm Phillips head screws holding in the motherboard.

  8. NuVision TM1088 Motherboard Replacement: stap 8, afbeelding 1 van 1
    • Lift the motherboard away from the front cover assembly.

Conclusie

To reassemble your device, follow these instructions in reverse order.

Één andere persoon heeft deze handleiding voltooid.

Nathaniel Nasman

Lid sinds: 03/23/15

750 Reputatie

5 handleidingen geschreven

Team

UMass Dartmouth, Team 1-1, Miles Spring 2015 Lid van UMass Dartmouth, Team 1-1, Miles Spring 2015

UMASSD-MILES-S15S1G1

3 Leden

10 handleidingen geschreven

0 opmerkingen

Voeg opmerking toe

Weergavestatistieken:

Afgelopen 24 uren: 0

Afgelopen 7 dagen: 0

Afgelopen 30 dagen: 2

Altijd: 1,643