Ga door naar hoofdinhoud

Nook Tablet Display Replacement

Wat je nodig hebt

  1. Nook Tablet Display Replacement, Back Cover: stap 1, afbeelding 1 van 1
    • Flip the Nook over.

  2. Nook Tablet Display Replacement: stap 2, afbeelding 1 van 2 Nook Tablet Display Replacement: stap 2, afbeelding 2 van 2
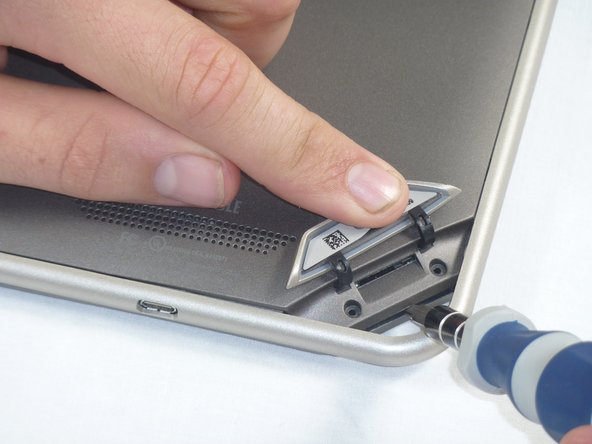
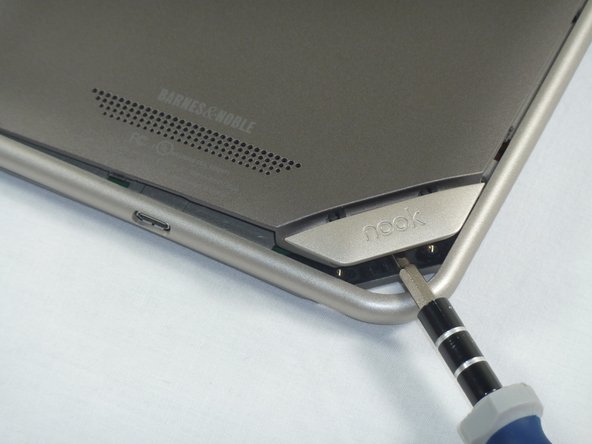
    • Lift the flap that reads "Nook" to reveal the tape that is underneath. Remove the memory card if one is present.

    • Remove the tape covering the round holes to reveal two T5 Torx screws.

    • Remove the two T5 Torx screws securing the back cover.

    Remove stickers covering T5 screws and remove screws

    badbyz - Antwoord

    Also, remove the mini SD card first or you may break it taking the back off.

    54pontiac - Antwoord

  3. Nook Tablet Display Replacement: stap 3, afbeelding 1 van 2 Nook Tablet Display Replacement: stap 3, afbeelding 2 van 2
    • Insert the flat end of a spudger between the front panel and the rear assembly.

    • Though these photos show a screwdriver, use a spudger or plastic opening tool in order to prevent damage to the device.

    • Use a spudger to lift the the back panel from the rest of the Nook.

  4. Nook Tablet Display Replacement: stap 4, afbeelding 1 van 2 Nook Tablet Display Replacement: stap 4, afbeelding 2 van 2
    • Slide the spudger around the edges of the Nook to loosen the back panel.

  5. Nook Tablet Display Replacement: stap 5, afbeelding 1 van 1
    • Pull the back panel off the Nook.

  6. Nook Tablet Display Replacement, Screen Bezel: stap 6, afbeelding 1 van 2 Nook Tablet Display Replacement, Screen Bezel: stap 6, afbeelding 2 van 2
    • Using the T5 Torx screwdriver, remove the ten T5 screws from around the edges of the silver midframe.

  7. Nook Tablet Display Replacement: stap 7, afbeelding 1 van 2 Nook Tablet Display Replacement: stap 7, afbeelding 2 van 2
    • Using a spudger or plastic opening tool, carefully pry the screen bezel away from the silver midframe.

  8. Nook Tablet Display Replacement, Disconnect the Battery: stap 8, afbeelding 1 van 2 Nook Tablet Display Replacement, Disconnect the Battery: stap 8, afbeelding 2 van 2
    • Lift up the foam pad at the corner of the battery to reveal the battery connector.

    • Use a spudger or plastic opening tool to disconnect the battery cable from the motherboard.

    • These photos show a screwdriver, but we recommend using a nonconductive tool like a spudger to prevent a potential short.

  9. Nook Tablet Display Replacement, Midframe: stap 9, afbeelding 1 van 1
    • Lift up the foam that covers the power connector and volume connector.

    • Disconnect the power and volume cables from their sockets on the motherboard.

  10. Nook Tablet Display Replacement: stap 10, afbeelding 1 van 2 Nook Tablet Display Replacement: stap 10, afbeelding 2 van 2
    • Carefully lift the silver midframe away from the motherboard and display assembly.

    • Be careful when handling the motherboard, making sure to not dislodge/shift any of its major components.

  11. Nook Tablet Display Replacement, Display: stap 11, afbeelding 1 van 2 Nook Tablet Display Replacement, Display: stap 11, afbeelding 2 van 2
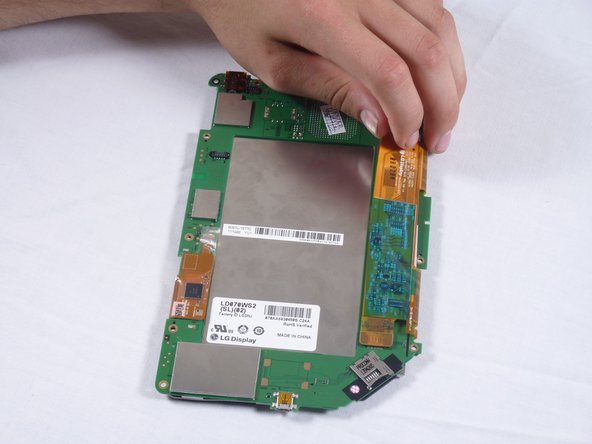
    • Orient the mother board as shown, so that the screen is facing downwards.

    • Grab the corner of the orange strip on the right side of the mother board as shown.

    • The orange strip is adhered to the mother board, gently lift the strip so that the adhesion is broken.

    • The strip will still be attached by the circuit connection to the mother board, proceed to the next step.

  12. Nook Tablet Display Replacement: stap 12, afbeelding 1 van 3 Nook Tablet Display Replacement: stap 12, afbeelding 2 van 3 Nook Tablet Display Replacement: stap 12, afbeelding 3 van 3
    • The orange strip will still be attached at this point

    • Insert the end of a flat head screw driver between the connection of the strip and mother board and pry upward.

    • Grab the strip and gently pull upward to finish the disconnection.

  13. Nook Tablet Display Replacement: stap 13, afbeelding 1 van 2 Nook Tablet Display Replacement: stap 13, afbeelding 2 van 2
    • On the left side of the motherboard, you will see another orange strip, this one is taped down to the motherboard.

    • Remove the tape.

  14. Nook Tablet Display Replacement: stap 14, afbeelding 1 van 3 Nook Tablet Display Replacement: stap 14, afbeelding 2 van 3 Nook Tablet Display Replacement: stap 14, afbeelding 3 van 3
    • After the tape has been removed, the strip will still be attached to the motherboard by the hinge pictured here.

    • Slide the tip of a flat head screwdriver under the hinge and pry the hinge upward.

    • The orange strip should now be detached from the mother board.

  15. Nook Tablet Display Replacement: stap 15, afbeelding 1 van 3 Nook Tablet Display Replacement: stap 15, afbeelding 2 van 3 Nook Tablet Display Replacement: stap 15, afbeelding 3 van 3
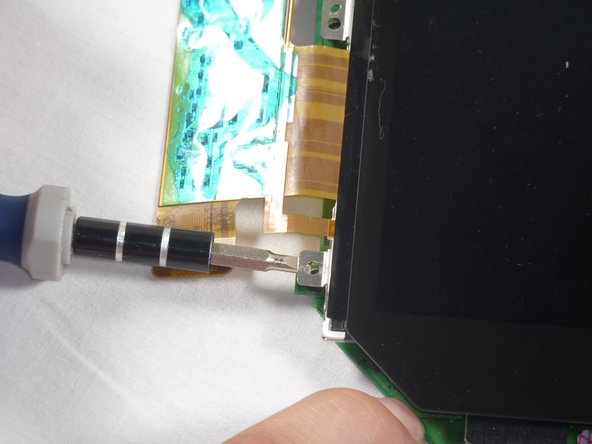
    • The screen is adhered to the mother board at the screw holes marked

    • Break the adhesion by inserting the edge of a flat head screwdriver inbetween the motherboard and the pieces of the screen at the marked holes

    • Lift the screen from the display.

    Transfer the rainbow button and tape at the bottom of your old screen to the new screen if the new screen does not have one.

    Dave Snyder - Antwoord

Conclusie

To reassemble your device, follow these instructions in reverse order.

12 andere personen hebben deze handleiding voltooid.

Michael Mooney

Lid sinds: 09/26/12

291 Reputatie

1 Handleiding geschreven

Team

Cal Poly, Team 1-4, Propen Fall 2012 Lid van Cal Poly, Team 1-4, Propen Fall 2012

CPSU-PROPEN-F12S1G4

4 Leden

14 handleidingen geschreven

2 opmerkingen

Where can one get a replacement screen for the glow-light first model?

Hank - Antwoord

I need battery

Mister A - Antwoord

Voeg opmerking toe

Weergavestatistieken:

Afgelopen 24 uren: 0

Afgelopen 7 dagen: 2

Afgelopen 30 dagen: 15

Altijd: 32,281