Inleiding
The motherboard is the central control circuitry of the Nook HD and is directly connected to many of the other internal components. While repairing a broken motherboard is beyond the scope of this guide, removing and replacing the motherboard is very doable.
Wat je nodig hebt
-
-
Be sure the device is powered off. Clean the device to prevent any dirt and dust from entering into the device.
-
Use the plastic opening tool to gently pry the plastic screen frame away from the screen. Run the plastic opening tool along the interior edge of the screen until the screen frame is completely separated from the glass.
-
The screen frame is held onto the Nook by a set of tab that run around the outside of the frame. There may also be a line of rubber cement around the Nook under the screen frame. If your Nook has this, you will have to dig deep to separate the frame from the Nook.
-
-
-
-
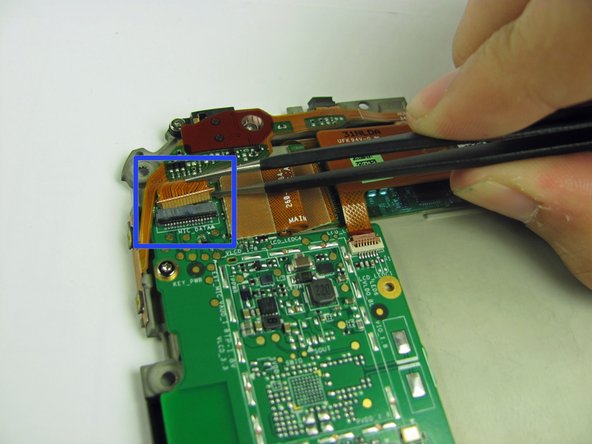
There are three ribbon cable connections that you must disconnect in order to remove the motherboard.
-
The first of these connections is small black - grey plastic connection housing.
-
Use the plastic opening tool to pull the black part of the ribbon cable housing up and away from the circuit board.
-
Carefully pull the ribbon cable out of the plastic connection housing.
-
-
-
The final connection is a large orange ribbon cable that connects to an entirely separate circuit board.
-
Use the plastic opening tool to gently pry the cable away from the smaller circuit board as to disconnect the cable from the pins.
-
Carefully pull the ribbon cable out of the plastic connection housing.
-


To reassemble your device, follow these instructions in reverse order.
To reassemble your device, follow these instructions in reverse order.
Annuleren: ik heb deze handleiding niet afgemaakt.
5 andere personen hebben deze handleiding voltooid.
Team

Cal Poly, Team 3-43, Maness Spring 2014 Lid van Cal Poly, Team 3-43, Maness Spring 2014
CPSU-MANESS-S14S3G43
5 Leden
10 handleidingen geschreven