Ga door naar hoofdinhoud

Nook Color Motherboard Replacement

Wat je nodig hebt

  1. Nook Color Motherboard Replacement, Back Cover: stap 1, afbeelding 1 van 2 Nook Color Motherboard Replacement, Back Cover: stap 1, afbeelding 2 van 2
    • Remove the two 3.8 mm screws located in the back right corner of the device using the T5 Torx screwdriver.

  2. Nook Color Motherboard Replacement: stap 2, afbeelding 1 van 2 Nook Color Motherboard Replacement: stap 2, afbeelding 2 van 2
    • Pry off the back cover with the plastic opening tool. Go around the device with the tool to ensure complete detachment.

  3. Nook Color Motherboard Replacement, Front Cover: stap 3, afbeelding 1 van 1
    • Remove the ten 4.0 mm screws from the device's perimeter using the T5 Torx screwdriver.

  4. Nook Color Motherboard Replacement: stap 4, afbeelding 1 van 2 Nook Color Motherboard Replacement: stap 4, afbeelding 2 van 2
    • Pry off the front panel using the plastic opening tool.

  5. Nook Color Motherboard Replacement: stap 5, afbeelding 1 van 2 Nook Color Motherboard Replacement: stap 5, afbeelding 2 van 2
    • Lift up on the connectors to disconnect them using the plastic opening tool.

  6. Nook Color Motherboard Replacement, Motherboard: stap 6, afbeelding 1 van 3 Nook Color Motherboard Replacement, Motherboard: stap 6, afbeelding 2 van 3 Nook Color Motherboard Replacement, Motherboard: stap 6, afbeelding 3 van 3
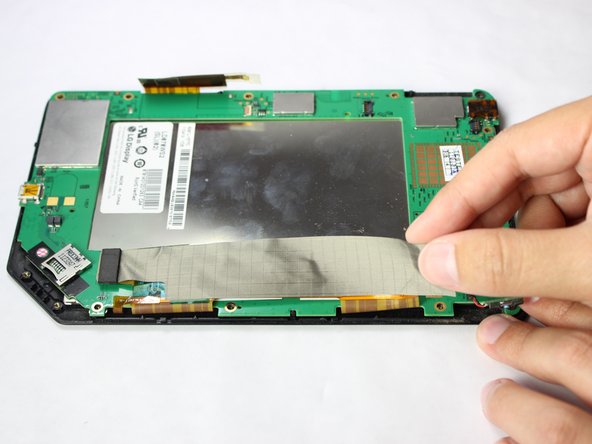
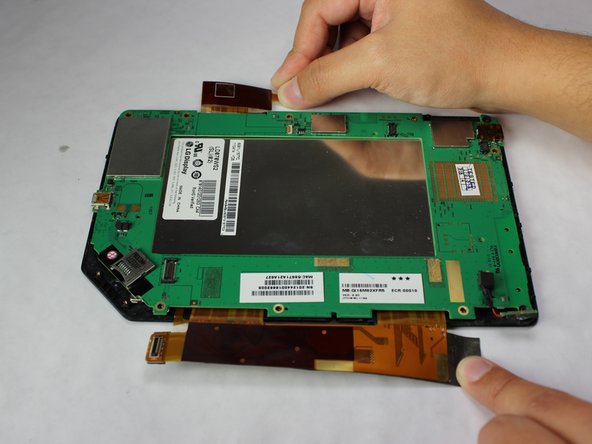
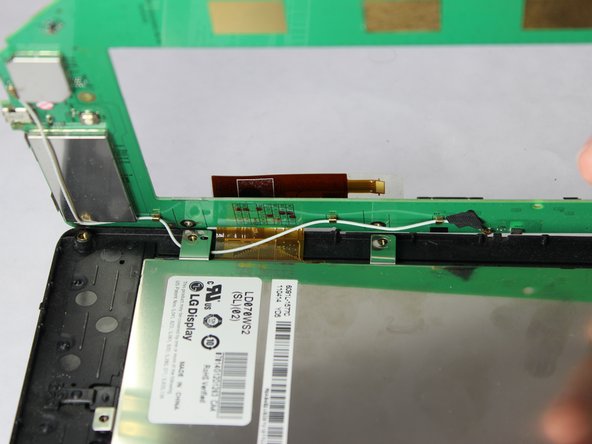
    • Gently lift and peel the orange and grey ribbon connectors to disconnect the screen and motherboard.

  7. Nook Color Motherboard Replacement: stap 7, afbeelding 1 van 1
    • Remove the easy-to-miss T5 Torx 3.8 mm screw located in the tabbed corner of the device.

  8. Nook Color Motherboard Replacement: stap 8, afbeelding 1 van 2 Nook Color Motherboard Replacement: stap 8, afbeelding 2 van 2
    • Lift the motherboard gently from the side with the larger connector ribbon.

    • Slide the white cable gently from underneath its holding place to free the motherboard completely.

    • Remove the motherboard carefully from the device.

Conclusie

To reassemble your device, follow these instructions in reverse order.

2 andere personen hebben deze handleiding voltooid.

Matthew Perdomo

Lid sinds: 01/20/15

497 Reputatie

3 handleidingen geschreven

Team

USF Tampa, Team 11-5, Blackwell Winter 2015 Lid van USF Tampa, Team 11-5, Blackwell Winter 2015

USFT-BLACKWELL-W15S11G5

3 Leden

14 handleidingen geschreven

0 opmerkingen

Voeg opmerking toe

Weergavestatistieken:

Afgelopen 24 uren: 0

Afgelopen 7 dagen: 3

Afgelopen 30 dagen: 6

Altijd: 1,072