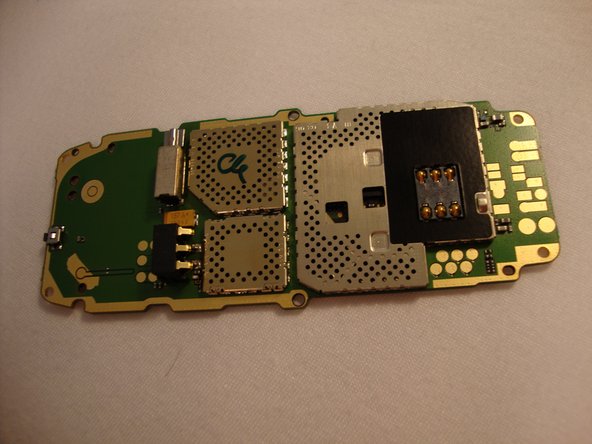
Ga door naar hoofdinhoud

Nokia 6030 Logic Board Replacement

Wat je nodig hebt

  1. Nokia 6030 Logic Board Replacement, Battery: stap 1, afbeelding 1 van 3 Nokia 6030 Logic Board Replacement, Battery: stap 1, afbeelding 2 van 3 Nokia 6030 Logic Board Replacement, Battery: stap 1, afbeelding 3 van 3
    • Press down on the grip on the back of the phone and slide the rear housing down towards the bottom of the phone.

  2. Nokia 6030 Logic Board Replacement: stap 2, afbeelding 1 van 3 Nokia 6030 Logic Board Replacement: stap 2, afbeelding 2 van 3 Nokia 6030 Logic Board Replacement: stap 2, afbeelding 3 van 3
    • Use your finger to gently pull the bottom of the battery up by using the slip found at the bottom of the phone.

    • Lift out battery and remove.

  3. Nokia 6030 Logic Board Replacement, SIM Card: stap 3, afbeelding 1 van 3 Nokia 6030 Logic Board Replacement, SIM Card: stap 3, afbeelding 2 van 3 Nokia 6030 Logic Board Replacement, SIM Card: stap 3, afbeelding 3 van 3
    • Use your finger to lift the metal cage up.

    • Remove SIM card.

  4. Nokia 6030 Logic Board Replacement: stap 4, afbeelding 1 van 1
    • Use your finger to close the metal cage.

  5. Nokia 6030 Logic Board Replacement, Front Cover: stap 5, afbeelding 1 van 3 Nokia 6030 Logic Board Replacement, Front Cover: stap 5, afbeelding 2 van 3 Nokia 6030 Logic Board Replacement, Front Cover: stap 5, afbeelding 3 van 3
    • Insert your two fingers under the two tabs found at the top of the phone underneath the black casing, then pull the casing up and slide it out slowly.

  6. Nokia 6030 Logic Board Replacement: stap 6, afbeelding 1 van 2 Nokia 6030 Logic Board Replacement: stap 6, afbeelding 2 van 2
    • After removing the top cover, turn the phone over so the screen is facing upwards.

  7. Nokia 6030 Logic Board Replacement: stap 7, afbeelding 1 van 3 Nokia 6030 Logic Board Replacement: stap 7, afbeelding 2 van 3 Nokia 6030 Logic Board Replacement: stap 7, afbeelding 3 van 3
    • Use your fingers to slowly lift the screen back towards the bottom of the phone using the arrows found at the top of the phone.

  8. Nokia 6030 Logic Board Replacement, LCD Screen: stap 8, afbeelding 1 van 3 Nokia 6030 Logic Board Replacement, LCD Screen: stap 8, afbeelding 2 van 3 Nokia 6030 Logic Board Replacement, LCD Screen: stap 8, afbeelding 3 van 3
    • Remove the six screws found along the frame of the phone with a T6 Torx screwdriver and put them to the side.

  9. Nokia 6030 Logic Board Replacement: stap 9, afbeelding 1 van 3 Nokia 6030 Logic Board Replacement: stap 9, afbeelding 2 van 3 Nokia 6030 Logic Board Replacement: stap 9, afbeelding 3 van 3
    • Gently lift the top of the screen up.

    • Be cautious of loose parts.

  10. Nokia 6030 Logic Board Replacement: stap 10, afbeelding 1 van 3 Nokia 6030 Logic Board Replacement: stap 10, afbeelding 2 van 3 Nokia 6030 Logic Board Replacement: stap 10, afbeelding 3 van 3
    • Gently pull up on the grey plastic tab.

  11. Nokia 6030 Logic Board Replacement, Logic Board: stap 11, afbeelding 1 van 3 Nokia 6030 Logic Board Replacement, Logic Board: stap 11, afbeelding 2 van 3 Nokia 6030 Logic Board Replacement, Logic Board: stap 11, afbeelding 3 van 3
    • Lift off plastic cover.

Conclusie

To reassemble your device, follow these instructions in reverse order.

Één andere persoon heeft deze handleiding voltooid.

Spencer Woodworth

Lid sinds: 04/14/10

316 Reputatie

9 handleidingen geschreven

Team

Cal Poly, Team 23-63, Johann Spring 2010 Lid van Cal Poly, Team 23-63, Johann Spring 2010

CPSU-JOHANN-S10S23G63

3 Leden

17 handleidingen geschreven

0 opmerkingen

Voeg opmerking toe

Weergavestatistieken:

Afgelopen 24 uren: 0

Afgelopen 7 dagen: 1

Afgelopen 30 dagen: 7

Altijd: 3,987