Ga door naar hoofdinhoud

Nintendo Wii DVD Drive Lens Replacement

Wat je nodig hebt

  1. Nintendo Wii DVD Drive Lens Replacement, Faceplate: stap 1, afbeelding 1 van 2 Nintendo Wii DVD Drive Lens Replacement, Faceplate: stap 1, afbeelding 2 van 2
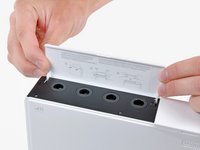
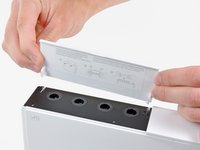
    • Use a metal spudger to remove the white plastic screw covers stuck to the lower case near the front of the Wii.

  2. Nintendo Wii DVD Drive Lens Replacement: stap 2, afbeelding 1 van 1
    • Remove the two 8.3 mm Tri-Wing screws hidden under the covers you just removed.

  3. Nintendo Wii DVD Drive Lens Replacement: stap 3, afbeelding 1 van 1
    • Remove the single 5.9 mm Phillips screw under the controller port door nearest the faceplate.

  4. Nintendo Wii DVD Drive Lens Replacement: stap 4, afbeelding 1 van 1
    • Use a metal spudger to remove the rubber foot stuck to the side of the Wii near the DVD drive opening.

  5. Nintendo Wii DVD Drive Lens Replacement: stap 5, afbeelding 1 van 1
    • Remove the single 5.9 mm Phillips screw hidden under the foot you just removed.

  6. Nintendo Wii DVD Drive Lens Replacement: stap 6, afbeelding 1 van 2 Nintendo Wii DVD Drive Lens Replacement: stap 6, afbeelding 2 van 2
    • Carefully pull the faceplate away from the front of the Wii.

    • Use a pair of tweezers to disconnect the LED cable's plastic connector from the motherboard.

    • Remove the faceplate.

  7. Nintendo Wii DVD Drive Lens Replacement, Outer Case: stap 7, afbeelding 1 van 3 Nintendo Wii DVD Drive Lens Replacement, Outer Case: stap 7, afbeelding 2 van 3 Nintendo Wii DVD Drive Lens Replacement, Outer Case: stap 7, afbeelding 3 van 3
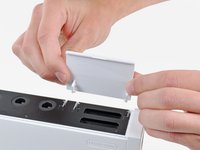
    • Open the controller port cover until it is perpendicular to the black controller port bezel.

    • Pull the controller port cover straight up to release it from the outer case.

    • Repeat this procedure for the memory card port cover.

  8. Nintendo Wii DVD Drive Lens Replacement: stap 8, afbeelding 1 van 2 Nintendo Wii DVD Drive Lens Replacement: stap 8, afbeelding 2 van 2
    • Remove the two remaining 4.1 mm Phillips screws along the top edge of the black plastic controller port bezel.

    • Lift the bezel from the long edge furthest away from the controller ports and remove it from the Wii.

  9. Nintendo Wii DVD Drive Lens Replacement: stap 9, afbeelding 1 van 1
    • Remove the two 5 mm Phillips screws above the controller ports.

  10. Nintendo Wii DVD Drive Lens Replacement: stap 10, afbeelding 1 van 1
    • Use a metal spudger to remove the three highlighted screw covers stuck to the side of the Wii.

  11. Nintendo Wii DVD Drive Lens Replacement: stap 11, afbeelding 1 van 1
    • Remove the following screws:

    • Two 5 mm Phillips screws

    • One 8.2 mm Tri-Wing screw

  12. Nintendo Wii DVD Drive Lens Replacement: stap 12, afbeelding 1 van 1
    • Use a metal spudger to remove the two rubber feet stuck to the bottom face of the Wii near the rear ports.

  13. Nintendo Wii DVD Drive Lens Replacement: stap 13, afbeelding 1 van 1
    • Remove the two 8.2 mm Tri-Wing screws hidden under the feet you just removed.

    • You may use a 4 mm hex driver to extend your bit into the recesses and reach the screws.

  14. Nintendo Wii DVD Drive Lens Replacement: stap 14, afbeelding 1 van 1
    • Lift the outer case straight up off the body of the Wii.

  15. Nintendo Wii DVD Drive Lens Replacement, DVD Drive: stap 15, afbeelding 1 van 2 Nintendo Wii DVD Drive Lens Replacement, DVD Drive: stap 15, afbeelding 2 van 2
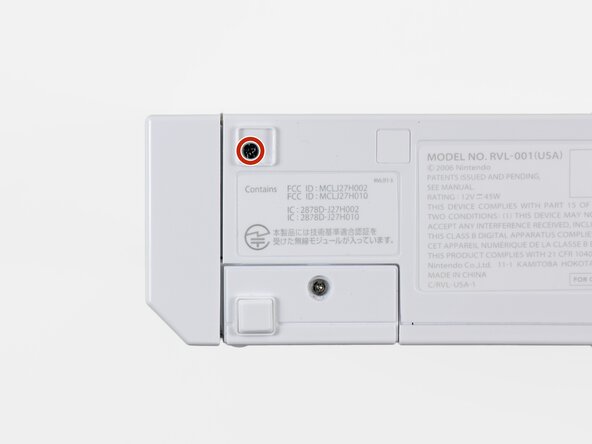
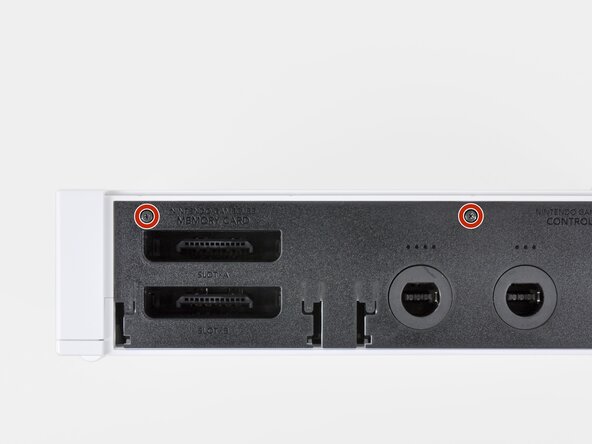
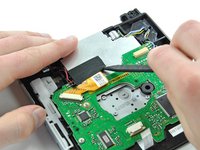
    • Remove the small Phillips screw securing the battery door to the bottom panel.

    • This screw is captive to the battery door.

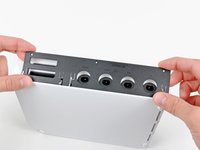
    • Pull the battery door out of the Wii.

    • The system time will be reset once you remove the battery door.

    • This is a good time to change the CR2032 battery if it hasn't been changed recently.

  16. Nintendo Wii DVD Drive Lens Replacement: stap 16, afbeelding 1 van 1
    • Remove the 8.2 mm Tri-Wing screw that was hidden beneath the battery door.

  17. Nintendo Wii DVD Drive Lens Replacement: stap 17, afbeelding 1 van 1
    • Remove the two 8.2 mm Tri-Wing screws securing the DVD drive shield near the controller ports.

  18. Nintendo Wii DVD Drive Lens Replacement: stap 18, afbeelding 1 van 1
    • Lift the DVD drive shield upward and remove it from the Wii.

  19. Nintendo Wii DVD Drive Lens Replacement: stap 19, afbeelding 1 van 1
    • Remove the four 9 mm #1 Phillips screws securing the DVD drive to the bottom panel.

  20. Nintendo Wii DVD Drive Lens Replacement: stap 20, afbeelding 1 van 1
    • Lift the side of the DVD drive opposite the controller ports enough to access the cables on its bottom face.

    • Carefully pull the DVD drive power cable out from under the plastic shroud near the heat sink.

  21. Nintendo Wii DVD Drive Lens Replacement: stap 21, afbeelding 1 van 1
    • Pull the DVD drive power cable away from its socket on the DVD drive.

  22. Nintendo Wii DVD Drive Lens Replacement: stap 22, afbeelding 1 van 2 Nintendo Wii DVD Drive Lens Replacement: stap 22, afbeelding 2 van 2
    • Use your fingernail to flip up the retaining flap on the DVD drive ribbon cable socket.

    • Be sure you are prying up on the retaining flap, not the socket itself.

    • Pull the DVD drive ribbon cable out of its socket.

    • Remove the DVD drive from the Wii.

  23. Nintendo Wii DVD Drive Lens Replacement, DVD Drive Lens: stap 23, afbeelding 1 van 1
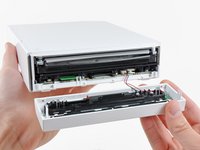
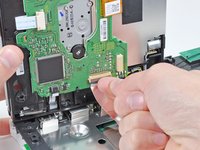
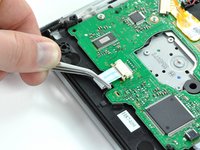
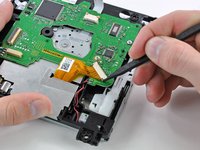
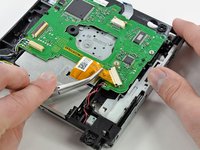
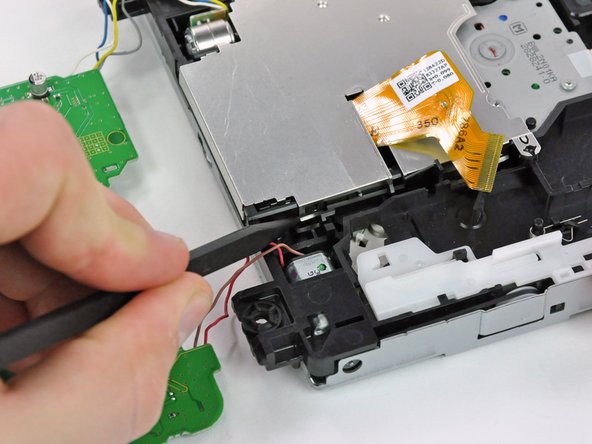
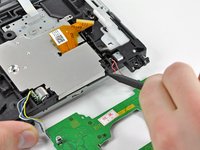
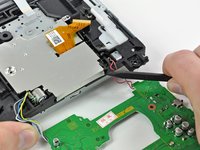
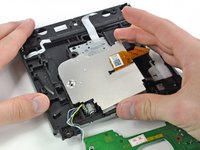
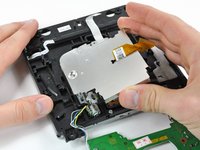
    • Pull the disc detector ribbon cable straight out of its connector with a pair of tweezers.

  24. Nintendo Wii DVD Drive Lens Replacement: stap 24, afbeelding 1 van 3 Nintendo Wii DVD Drive Lens Replacement: stap 24, afbeelding 2 van 3 Nintendo Wii DVD Drive Lens Replacement: stap 24, afbeelding 3 van 3
    • Use the tip of a spudger to push the sides of the ZIF connector fastener securing the spindle motor ribbon cable directly away from the connector.

    • Disconnect the spindle motor ribbon cable by pulling it straight out of its connector with a pair of tweezers.

  25. Nintendo Wii DVD Drive Lens Replacement: stap 25, afbeelding 1 van 2 Nintendo Wii DVD Drive Lens Replacement: stap 25, afbeelding 2 van 2
    • Remove the piece of black cloth tape that covers a portion of the lens ribbon cable.

  26. Nintendo Wii DVD Drive Lens Replacement: stap 26, afbeelding 1 van 3 Nintendo Wii DVD Drive Lens Replacement: stap 26, afbeelding 2 van 3 Nintendo Wii DVD Drive Lens Replacement: stap 26, afbeelding 3 van 3
    • Disconnect the lens ribbon cable by first pushing the two locking tabs of the ZIF connector towards the ribbon cable with the tip of a spudger.

    • Use a pair of tweezers to pull the lens ribbon cable straight out of its connector.

  27. Nintendo Wii DVD Drive Lens Replacement: stap 27, afbeelding 1 van 1
    • Remove the two 5.0 mm Phillips screws securing the DVD drive board to the drive housing.

  28. Nintendo Wii DVD Drive Lens Replacement: stap 28, afbeelding 1 van 3 Nintendo Wii DVD Drive Lens Replacement: stap 28, afbeelding 2 van 3 Nintendo Wii DVD Drive Lens Replacement: stap 28, afbeelding 3 van 3
    • Lift the DVD drive board off the drive housing by first lifting the side with the lens ribbon cable connector.

    • Pull the opposite side of the DVD drive board straight out while lifting the entire board straight up to free it from the small black plastic tabs holding it in place.

  29. Nintendo Wii DVD Drive Lens Replacement: stap 29, afbeelding 1 van 1
    • De-route the cables that are soldered to the DVD drive board from underneath their black plastic tabs with the tip of a spudger.

  30. Nintendo Wii DVD Drive Lens Replacement: stap 30, afbeelding 1 van 1
    • Lay the DVD drive board next to the DVD drive in such a manner that the cables soldered to the DVD drive board are out of the way (as shown in the picture)

    • Remove the single 5.0 mm Phillips screw from the DVD lens EMI shield.

  31. Nintendo Wii DVD Drive Lens Replacement: stap 31, afbeelding 1 van 3 Nintendo Wii DVD Drive Lens Replacement: stap 31, afbeelding 2 van 3 Nintendo Wii DVD Drive Lens Replacement: stap 31, afbeelding 3 van 3
    • The side of the EMI shield with the slot for the DVD lens ribbon cable has two small metal clips that fasten to black plastic tabs on the DVD drive housing.

    • Use the tip of a spudger to bend the two metal clips up enough so that they are no longer fastened to their respective plastic tabs.

    • The EMI shield is made of a soft, malleable metal. It can be easily be bent out and back into shape, but excessive fatigue may cause the clips to break.

    • Make sure both clips are pushed back down into their original positions at reassembly.

  32. Nintendo Wii DVD Drive Lens Replacement: stap 32, afbeelding 1 van 2 Nintendo Wii DVD Drive Lens Replacement: stap 32, afbeelding 2 van 2
    • Small tabs on the EMI shield sit in two holes on the outside edge of the DVD drive housing.

    • Insert the tip of a spudger into the hole that is closer to the red and pink wires that connect to the DVD drive board.

    • Rotate the spudger to pry the first tab out of its hole on the DVD drive housing.

  33. Nintendo Wii DVD Drive Lens Replacement: stap 33, afbeelding 1 van 2 Nintendo Wii DVD Drive Lens Replacement: stap 33, afbeelding 2 van 2
    • Repeat the action in the previous step to pry the second tab on the EMI shield out of its hole on the DVD drive housing.

    • It may be necessary to hold the opposite edge of the EMI shield to keep any of the clips or tabs from reseating.

  34. Nintendo Wii DVD Drive Lens Replacement: stap 34, afbeelding 1 van 2 Nintendo Wii DVD Drive Lens Replacement: stap 34, afbeelding 2 van 2
    • Grasp the EMI shield by the two edges that are free and rotate the entire piece slightly towards the edge that is still held down until the final two remaining clips are free.

    • Lift the EMI shield straight off the DVD drive.

  35. Nintendo Wii DVD Drive Lens Replacement: stap 35, afbeelding 1 van 1
    • Remove the 5.0 mm Phillips screw that is closer to the yellow, blue, white, and grey wires.

  36. Nintendo Wii DVD Drive Lens Replacement: stap 36, afbeelding 1 van 3 Nintendo Wii DVD Drive Lens Replacement: stap 36, afbeelding 2 van 3 Nintendo Wii DVD Drive Lens Replacement: stap 36, afbeelding 3 van 3
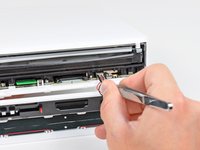
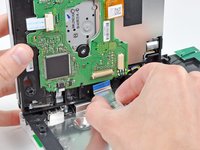
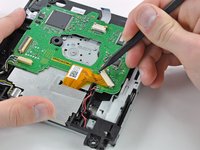
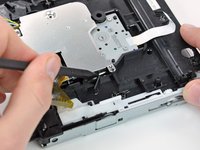
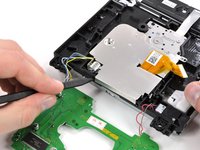
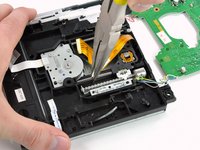
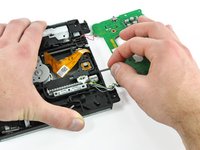
    • While holding the DVD drive with one hand, grasp the DVD drive lens retaining pin (closest to the screw that was just removed) with a pair of needle nose pliers.

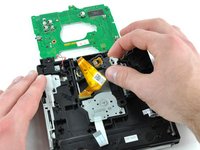
    • Slide the retaining pin out towards the edge of the DVD drive housing.

    • Freeing the pin will require some force, and will then become very easy.

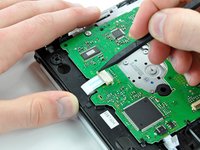
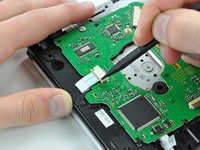
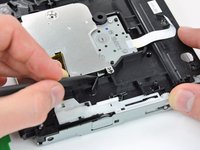
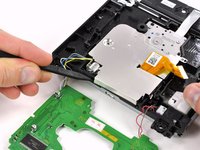
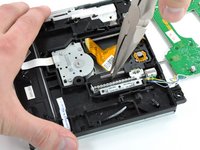
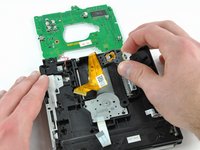
    • Once the pin moves easily, grab it with your fingers and pull it out of the DVD drive housing completely.

  37. Nintendo Wii DVD Drive Lens Replacement: stap 37, afbeelding 1 van 2 Nintendo Wii DVD Drive Lens Replacement: stap 37, afbeelding 2 van 2
    • Grab the DVD drive lens assembly by the side that the retaining pin was just removed from.

    • Remove the lens assembly from the DVD drive housing.

  38. Nintendo Wii DVD Drive Lens Replacement: stap 38, afbeelding 1 van 2 Nintendo Wii DVD Drive Lens Replacement: stap 38, afbeelding 2 van 2
    • Remove the 4.2 mm Phillips screw that secures the white plastic bracket to the lens assembly.

    • Lift the bracket off the lens assembly.

    • If you are going to install a new lens, make sure to transfer the white plastic bracket and screw to the new laser lens before installation.

Conclusie

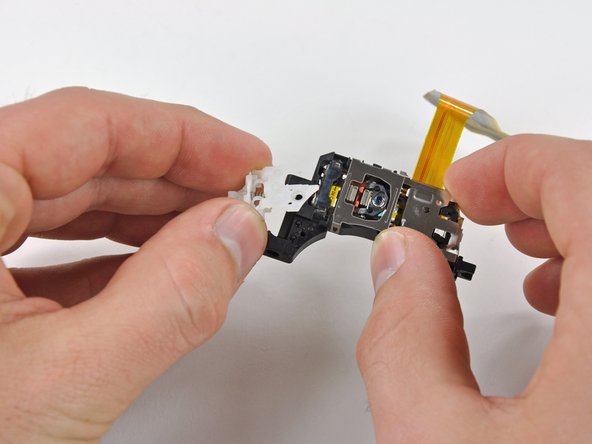
To reassemble your device, follow these instructions in reverse order.

137 andere personen hebben deze handleiding voltooid.

David Hodson

Lid sinds: 04/13/10

150.352 Reputatie

127 handleidingen geschreven

25 opmerkingen

Many thanks for the excellent guide - my wii is working again!

Niel Viljoen - Antwoord

WOW! I have seen a lot of repair manuals and guides, and this has to be one of the best!

Appreciate the care and craftsmanship it took to put this together.

One suggestion: Please add pics of the screws with specs to compare the sizes.

Terry - Antwoord

very informative...if the laser is dirty or the lens is broken....will the tray from the drive come out and go inside...as normal ....please assist...

Techy - Antwoord

All went well. The main problem I had was tweezers of low quality. Also, during assembly, some screws was to tricky, so I needed to magnetize screwdriver and for that purpose I used - a speaker :)

Great tutorial, in deed. David just saved Christmas for me and my family.

Dragan - Antwoord

This is one of the best set of instructions I have ever used. Easy to follow steps with accurate illustrations. Very well done, I don't know how you could make it any better! A++,

camoore4800 - Antwoord

Voeg opmerking toe

Weergavestatistieken:

Afgelopen 24 uren: 44

Afgelopen 7 dagen: 247

Afgelopen 30 dagen: 1,033

Altijd: 184,789