Ga door naar hoofdinhoud

Nintendo Entertainment System Springs Not Properly Mounted on Cartridge Tray Replacement

Wat je nodig hebt

  1. Nintendo Entertainment System Springs Not Properly Mounted on Cartridge Tray Replacement, Game Cartridge Tray: stap 1, afbeelding 1 van 2 Nintendo Entertainment System Springs Not Properly Mounted on Cartridge Tray Replacement, Game Cartridge Tray: stap 1, afbeelding 2 van 2
    • Remove the six 13.25mm Phillips screws on the bottom of the game console with a #2.5 flathead screwdriver.

    • The screws are recessed about 40 mm.

    • Flip the game console right side up and take off the top by pulling it up and away from the rest of the device with your hands.

  2. Nintendo Entertainment System Springs Not Properly Mounted on Cartridge Tray Replacement: stap 2, afbeelding 1 van 2 Nintendo Entertainment System Springs Not Properly Mounted on Cartridge Tray Replacement: stap 2, afbeelding 2 van 2
    • Remove the seven 13.25mm Phillips screws from the metal cover with a Phillips head #2 screwdriver.

    • Remove the metal cover by pulling it up and away from the rest of the console with your hands.

  3. Nintendo Entertainment System Springs Not Properly Mounted on Cartridge Tray Replacement: stap 3, afbeelding 1 van 3 Nintendo Entertainment System Springs Not Properly Mounted on Cartridge Tray Replacement: stap 3, afbeelding 2 van 3 Nintendo Entertainment System Springs Not Properly Mounted on Cartridge Tray Replacement: stap 3, afbeelding 3 van 3
    • Remove the two silver 17.45mm Phillips screws from the cartridge tray using a Phillips head #2 screwdriver.

    • Remove the two bronze 13.25mm Phillips screws from the cartridge tray using a Phillips head #2 screwdriver.

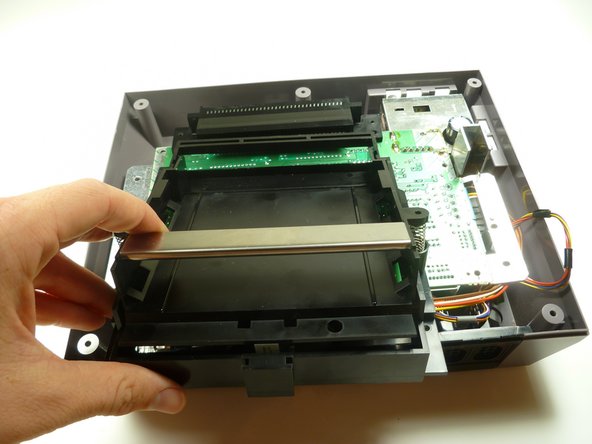
    • Slide the cartridge tray toward you, away from the 72-PIN connector, and off the motherboard assembly.

  4. Nintendo Entertainment System Springs Not Properly Mounted on Cartridge Tray Replacement: stap 4, afbeelding 1 van 2 Nintendo Entertainment System Springs Not Properly Mounted on Cartridge Tray Replacement: stap 4, afbeelding 2 van 2
    • Note: Underneath the cartridge tray is a black trapezoid-shaped tab/lip (see marker). When properly assembled this tab/lip goes below the motherboard and shielding as seen here.

    • During reassembly, make sure you orient this tab underneath the motherboard in addition to orienting the tray on top. Failure to do so will bow the cartridge tray and place stress on the component, causing the cartridge spring mechanism to bind.

  5. Nintendo Entertainment System Springs Not Properly Mounted on Cartridge Tray Replacement, Springs Not Properly Mounted on Cartridge Tray: stap 5, afbeelding 1 van 1
    • Use your fingernail to squeeze down on one side of the spring and reposition the spring back on to the plastic nipple attached to the smaller part of the game cartridge frame.

Conclusie

To reassemble your device, follow these instructions in reverse order.

4 andere personen hebben deze handleiding voltooid.

nicholasweiser

Lid sinds: 09/22/10

2.634 Reputatie

6 handleidingen geschreven

Team

Cal Poly, Team 14-40, Forte Fall 2010 Lid van Cal Poly, Team 14-40, Forte Fall 2010

CPSU-FORTE-F10S14G40

4 Leden

20 handleidingen geschreven

0 opmerkingen

Voeg opmerking toe

Weergavestatistieken:

Afgelopen 24 uren: 2

Afgelopen 7 dagen: 5

Afgelopen 30 dagen: 25

Altijd: 8,356