Ga door naar hoofdinhoud

Nintendo DSi XL Buttons Replacement

Wat je nodig hebt

  1. Nintendo DSi XL Buttons Replacement, Battery: stap 1, afbeelding 1 van 2 Nintendo DSi XL Buttons Replacement, Battery: stap 1, afbeelding 2 van 2
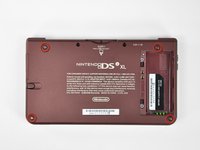
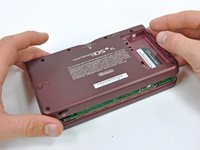
    • Remove the two Phillips screws securing the battery cover to the back of the handheld console.

    • Lift the battery cover off the back of the DSi XL.

  2. Nintendo DSi XL Buttons Replacement: stap 2, afbeelding 1 van 1
    • Lift the battery from the DSi XL.

  3. Nintendo DSi XL Buttons Replacement, Lower Case: stap 3, afbeelding 1 van 3 Nintendo DSi XL Buttons Replacement, Lower Case: stap 3, afbeelding 2 van 3 Nintendo DSi XL Buttons Replacement, Lower Case: stap 3, afbeelding 3 van 3
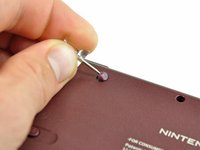
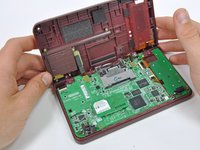
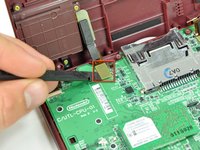
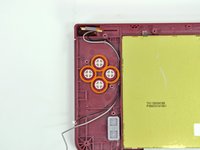
    • Remove the four rubber screw covers on the lower case by prying them up with a push pin.

  4. Nintendo DSi XL Buttons Replacement: stap 4, afbeelding 1 van 1
    • Remove the following seven Phillips screws that secure the lower case to the rest of the DSi XL:

    • Four silver 5.3 mm screws

    • Two black 5.3 mm screws

    • One black 2.5 mm screw

  5. Nintendo DSi XL Buttons Replacement: stap 5, afbeelding 1 van 3 Nintendo DSi XL Buttons Replacement: stap 5, afbeelding 2 van 3 Nintendo DSi XL Buttons Replacement: stap 5, afbeelding 3 van 3
    • Turn the DSi XL over, and open the display.

    • Insert a spudger between the upper and lower case at the bottom left corner of the DSi.

    • Slide the spudger along the bottom edge of the upper case to release the latches securing the upper case to the lower case.

  6. Nintendo DSi XL Buttons Replacement: stap 6, afbeelding 1 van 2 Nintendo DSi XL Buttons Replacement: stap 6, afbeelding 2 van 2
    • Close the display and turn the DSi XL over.

    • Lift the lower case from the front edge.

    • Rotate the lower case away from the DSi.

    • The lower case cannot be completely removed yet, since it is still connected to the motherboard.

  7. Nintendo DSi XL Buttons Replacement: stap 7, afbeelding 1 van 2 Nintendo DSi XL Buttons Replacement: stap 7, afbeelding 2 van 2
    • Using a spudger, pry the SD card/right shoulder button connector off its socket.

    • Pry the volume button/left shoulder button connector off its socket on the motherboard with a spudger.

  8. Nintendo DSi XL Buttons Replacement, Wi-Fi Board: stap 8, afbeelding 1 van 2 Nintendo DSi XL Buttons Replacement, Wi-Fi Board: stap 8, afbeelding 2 van 2
    • Lift the Wi-Fi board up off its socket on the motherboard.

    • Do not attempt to completely remove the Wi-Fi board yet. It is attached to the motherboard by an antenna cable.

  9. Nintendo DSi XL Buttons Replacement: stap 9, afbeelding 1 van 1
    • Use a spudger to pry the Wi-Fi cable off its socket on the underside of the Wi-Fi board.

  10. Nintendo DSi XL Buttons Replacement, Motherboard: stap 10, afbeelding 1 van 1
    • Use a spudger to pry the microphone cable off the motherboard.

    • Pry from underneath the cable.

  11. Nintendo DSi XL Buttons Replacement: stap 11, afbeelding 1 van 2 Nintendo DSi XL Buttons Replacement: stap 11, afbeelding 2 van 2
    • Using the flat end of a spudger, flip up the retaining flap on the camera ribbon ZIF connector.

    • Use the pointed end of a spudger to pull the camera ribbon from the ZIF connector.

  12. Nintendo DSi XL Buttons Replacement: stap 12, afbeelding 1 van 2 Nintendo DSi XL Buttons Replacement: stap 12, afbeelding 2 van 2
    • Using the flat end of a spudger, flip up the retaining flap on the touchscreen cable ZIF connector.

    • With the pointed end of the spudger, pull the touchscreen cable from its connector on the motherboard.

  13. Nintendo DSi XL Buttons Replacement: stap 13, afbeelding 1 van 2 Nintendo DSi XL Buttons Replacement: stap 13, afbeelding 2 van 2
    • Using the flat end of a spudger, flip up the retaining flap on the backlight cable ZIF connector.

    • With the pointed end of the spudger, pull the backlight cable from its connector on the motherboard.

  14. Nintendo DSi XL Buttons Replacement: stap 14, afbeelding 1 van 2 Nintendo DSi XL Buttons Replacement: stap 14, afbeelding 2 van 2
    • Using the flat end of a spudger, flip up the retaining flap on the lower display data cable ZIF connector.

    • With the pointed end of the spudger, pull the lower display data cable from its connector on the motherboard.

  15. Nintendo DSi XL Buttons Replacement: stap 15, afbeelding 1 van 2 Nintendo DSi XL Buttons Replacement: stap 15, afbeelding 2 van 2
    • Using the flat end of a spudger, flip up the retaining flap on the ZIF connector for the D-Pad/power button cable.

    • With the pointed end of the spudger, pull the D-Pad/power button cable from its connector on the motherboard.

  16. Nintendo DSi XL Buttons Replacement: stap 16, afbeelding 1 van 1
    • Using the flat end of the spudger, pry the battery cable up off its socket on the motherboard.

  17. Nintendo DSi XL Buttons Replacement: stap 17, afbeelding 1 van 1
    • Remove the screws securing the motherboard to the upper case:

    • A single 2.5 mm silver Phillips screw

    • Four 3.7 mm black Phillips screws

  18. Nintendo DSi XL Buttons Replacement: stap 18, afbeelding 1 van 1
    • Deroute the microphone and antenna cables through the slot in the motherboard.

  19. Nintendo DSi XL Buttons Replacement: stap 19, afbeelding 1 van 2 Nintendo DSi XL Buttons Replacement: stap 19, afbeelding 2 van 2
    • Rotate the motherboard off the lower case.

    • The motherboard cannot be completely removed yet. It is still attached by the upper LCD's display data ribbon cable.

  20. Nintendo DSi XL Buttons Replacement: stap 20, afbeelding 1 van 2 Nintendo DSi XL Buttons Replacement: stap 20, afbeelding 2 van 2
    • Using the flat end of a spudger, flip up the retaining flap on the upper display data cable ZIF connector.

    • With the pointed end of the spudger, pull the upper display data cable from its connector on the underside of the motherboard.

    • The motherboard is now free from the upper case.

  21. Nintendo DSi XL Buttons Replacement, Buttons: stap 21, afbeelding 1 van 1
    • Lift the rubber pad off the back of the buttons.

  22. Nintendo DSi XL Buttons Replacement: stap 22, afbeelding 1 van 2 Nintendo DSi XL Buttons Replacement: stap 22, afbeelding 2 van 2
    • Open the display slightly, and push each button away from the upper case.

    • Remove all four buttons from the DSi XL.

Conclusie

To reassemble your device, follow these instructions in reverse order.

Brett Hartt

Lid sinds: 04/12/10

127.749 Reputatie

143 handleidingen geschreven

Team

iFixit Lid van iFixit

Staff

136 Leden

16.573 handleidingen geschreven

0 opmerkingen

Voeg opmerking toe

Weergavestatistieken:

Afgelopen 24 uren: 1

Afgelopen 7 dagen: 16

Afgelopen 30 dagen: 70

Altijd: 9,650