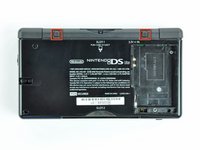
Ga door naar hoofdinhoud

Nintendo DS Lite Upper Case Replacement

Wat je nodig hebt

  1. Nintendo DS Lite Upper Case Replacement, Battery: stap 1, afbeelding 1 van 2 Nintendo DS Lite Upper Case Replacement, Battery: stap 1, afbeelding 2 van 2
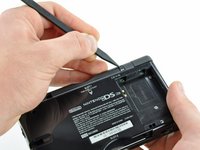
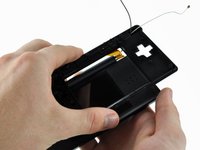
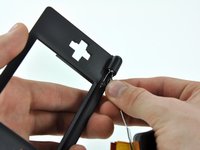
    • Unscrew the Phillips screw securing the battery cover to the lower case.

    • The screw remains captive to the battery cover.

    • Pry the battery cover upward with a spudger or fingernail, and lift out of the lower case.

  2. Nintendo DS Lite Upper Case Replacement: stap 2, afbeelding 1 van 1
    • Wedge the edge of a spudger in between the side of the battery and the lower case housing and pry upward to dislodge the battery.

    • Remove the battery from the DS Lite.

  3. Nintendo DS Lite Upper Case Replacement, Lower Case: stap 3, afbeelding 1 van 2 Nintendo DS Lite Upper Case Replacement, Lower Case: stap 3, afbeelding 2 van 2
    • Use the tip of a spudger to pry both rubber feet off the DS Lite.

  4. Nintendo DS Lite Upper Case Replacement: stap 4, afbeelding 1 van 1
    • Remove the following screws securing the lower case to the body of the DS Lite:

    • Two 4.3 mm gold Phillips screws

    • One 3.9 mm black Tri-Wing screw

    • One 3.3 mm silver Phillips screw

    • Three 5.5 mm silver Tri-Wing screws

  5. Nintendo DS Lite Upper Case Replacement: stap 5, afbeelding 1 van 3 Nintendo DS Lite Upper Case Replacement: stap 5, afbeelding 2 van 3 Nintendo DS Lite Upper Case Replacement: stap 5, afbeelding 3 van 3
    • Remove the cover from the Game Pak slot before continuing.

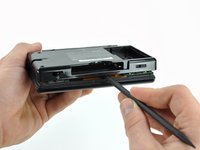
    • Insert the edge of a spudger in between the lower and upper case near the top right corner of the DS Lite.

    • Carefully run the spudger along the right edge of the DS Lite, creating an opening in the process.

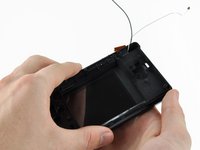
    • Continue running the spudger along the backside of the DS Lite until the majority of the lower case has been separated from the upper case.

  6. Nintendo DS Lite Upper Case Replacement: stap 6, afbeelding 1 van 1
    • Lift the lower case away from the rest of the DS Lite.

    • Pull carefully. Some units are sealed with adhesive, and pulling too hard can damage the power switch.

    • When re-assembling, make sure that power switch and volume sliders are properly aligned with the switches on the motherboard.

  7. Nintendo DS Lite Upper Case Replacement, Trigger Buttons: stap 7, afbeelding 1 van 2 Nintendo DS Lite Upper Case Replacement, Trigger Buttons: stap 7, afbeelding 2 van 2
    • Lift both trigger buttons out of the DS Lite.

    • The trigger buttons are held in very loosely by small metal pegs and springs. Don't lose track of these pieces.

    • The second picture shows the correct configuration of the trigger assembly for reassembly purposes.

  8. Nintendo DS Lite Upper Case Replacement, Wi-Fi Board: stap 8, afbeelding 1 van 1
    • Use the flat edge of a spudger to pry the Wi-Fi antenna connector straight up from its socket on the Wi-Fi board.

  9. Nintendo DS Lite Upper Case Replacement: stap 9, afbeelding 1 van 1
    • Use the flat edge of a spudger to pry the Wi-Fi board connector straight up from its socket on the motherboard.

  10. Nintendo DS Lite Upper Case Replacement: stap 10, afbeelding 1 van 1
    • Use the flat edge of a spudger to separate the right edge of the Wi-Fi board from the motherboard.

    • The Wi-Fi board is secured to the motherboard with a layer of adhesive.

    • Remove the Wi-Fi board from the DS Lite.

  11. Nintendo DS Lite Upper Case Replacement, Motherboard: stap 11, afbeelding 1 van 1
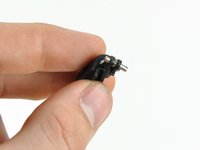
    • Use the flat edge of a spudger to pry the microphone connector straight up from its socket on the motherboard.

  12. Nintendo DS Lite Upper Case Replacement: stap 12, afbeelding 1 van 3 Nintendo DS Lite Upper Case Replacement: stap 12, afbeelding 2 van 3 Nintendo DS Lite Upper Case Replacement: stap 12, afbeelding 3 van 3
    • In the following steps you must pull the antenna cable between the DS Lite game cartridge reader and motherboard. Pull slowly and stop when you feel resistance to avoid damaging the cable or motherboard.

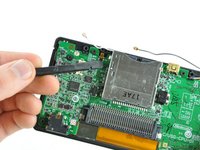
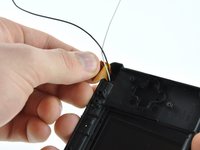
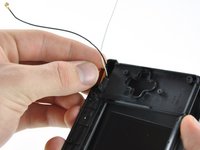
    • Position the antenna cable with its connector facing up and away from the motherboard using a spudger to hold it down lightly in the gap between chips on the motherboard.

    • Slowly and carefully pull the antenna cable until the cable connector is under the DS Lite game cartridge reader.

    • Continue pulling the cable until the cable connector comes out from under the game cartridge reader on the right side.

    • When reassembling and attempting to feed the antenna cable back under the game cartridge reader, the cable may kink or become difficult to feed through. If so, try feeding a piece of thread through first; then, tie the thread to one end of the cable connector and pull it through, guiding it past any obstructions.

  13. Nintendo DS Lite Upper Case Replacement: stap 13, afbeelding 1 van 2 Nintendo DS Lite Upper Case Replacement: stap 13, afbeelding 2 van 2
    • Use your fingernail or the edge of a spudger to carefully flip up the touchscreen ribbon cable retaining flap.

    • Make sure you are flipping up the retaining flap, not the socket itself.

    • Use the tip of a spudger to pull the touchscreen ribbon cable straight out of its socket.

  14. Nintendo DS Lite Upper Case Replacement: stap 14, afbeelding 1 van 1
    • Remove the two 3.4 mm Phillips screws securing the motherboard to the upper case.

  15. Nintendo DS Lite Upper Case Replacement: stap 15, afbeelding 1 van 1
    • Open the display enough to use your finger to push the front edge of the motherboard up and away from the upper case.

    • Do not try to remove the motherboard, as it is still connected to the upper display via the upper LCD ribbon cable.

  16. Nintendo DS Lite Upper Case Replacement: stap 16, afbeelding 1 van 2 Nintendo DS Lite Upper Case Replacement: stap 16, afbeelding 2 van 2
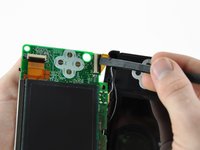
    • Use your fingernail or the flat edge of a spudger to carefully flip up the upper LCD ribbon cable retaining flap.

    • Make sure you are flipping up the retaining flap, not the socket itself.

    • Pull the motherboard away from the DS Lite to separate the upper LCD ribbon cable from its socket on the motherboard.

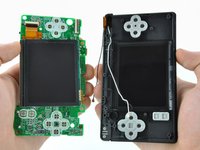
    • Remove the motherboard from the DS Lite.

    • Now you may open the retaining flap for the lower LCD screen in the same way and separate the lower LCD screen from the motherboard.

  17. Nintendo DS Lite Upper Case Replacement, Upper Case: stap 17, afbeelding 1 van 1
    • Remove the two 8.3 mm Phillips screws securing the upper case to the display assembly.

  18. Nintendo DS Lite Upper Case Replacement: stap 18, afbeelding 1 van 2 Nintendo DS Lite Upper Case Replacement: stap 18, afbeelding 2 van 2
    • Pull the upper LCD ribbon cable to the right, through the slit in the case.

    • Push the ribbon cable down through the slit.

  19. Nintendo DS Lite Upper Case Replacement: stap 19, afbeelding 1 van 2 Nintendo DS Lite Upper Case Replacement: stap 19, afbeelding 2 van 2
    • Slowly lift the upper case away from the display, making sure the ribbon cable does not get caught.

  20. Nintendo DS Lite Upper Case Replacement: stap 20, afbeelding 1 van 2 Nintendo DS Lite Upper Case Replacement: stap 20, afbeelding 2 van 2
    • Once the ribbon cable is free from the upper case, pull the antenna and Wi-Fi cables through the hole in the upper case.

    • Remove the upper case from the DS Lite.

Conclusie

To reassemble your device, follow these instructions in reverse order.

30 andere personen hebben deze handleiding voltooid.

Matthew Newsom

Lid sinds: 01/05/10

39.402 Reputatie

67 handleidingen geschreven

Één opmerking

How do I replace the battery shell? You know, the shell of the thing that turns green when powered and red when dying? I have it, but I don't know how to take the little thing out.

SquidCake - Antwoord

Voeg opmerking toe

Weergavestatistieken:

Afgelopen 24 uren: 9

Afgelopen 7 dagen: 62

Afgelopen 30 dagen: 287

Altijd: 39,936