Ga door naar hoofdinhoud

Nintendo 3DS XL 2015 WIFI Antenna Replacement

Wat je nodig hebt

  1. Nintendo 3DS XL 2015 WIFI Antenna Replacement, Battery: stap 1, afbeelding 1 van 1
    • Ensure your device is powered off before proceeding. Failure to do so may result in electrical shock or damage to the device.

    • Place the 3DS upside down. Remove the game card, headphones, charging cable, stylus, or anything else that may be connected to the device.

  2. Nintendo 3DS XL 2015 WIFI Antenna Replacement: stap 2, afbeelding 1 van 1
    • Using a JIS #0 screwdriver, loosen the two black screws on the back.

    • The screws are held in place by captive washers and should not be completely removed.

  3. Nintendo 3DS XL 2015 WIFI Antenna Replacement: stap 3, afbeelding 1 van 1
    • Once the screws are loosened, pry open the back cover.

  4. Nintendo 3DS XL 2015 WIFI Antenna Replacement: stap 4, afbeelding 1 van 1
    • The battery is located on the left hand side of the 3DS - to remove, use the small gap located at the top-middle and pull up with a non metal pointed tool.

  5. Nintendo 3DS XL 2015 WIFI Antenna Replacement, Motherboard: stap 5, afbeelding 1 van 1
    • Using a JIS #000 screwdriver, remove the six 6mm screws around the edges of the secondary cover.

  6. Nintendo 3DS XL 2015 WIFI Antenna Replacement: stap 6, afbeelding 1 van 2 Nintendo 3DS XL 2015 WIFI Antenna Replacement: stap 6, afbeelding 2 van 2
    • Using tweezers, carefully pop out the rubber bumpers located at the top side of the 3DS. Removing them will reveal another two 6mm screws. Remove these screws using a JIS #000 as well.

  7. Nintendo 3DS XL 2015 WIFI Antenna Replacement: stap 7, afbeelding 1 van 3 Nintendo 3DS XL 2015 WIFI Antenna Replacement: stap 7, afbeelding 2 van 3 Nintendo 3DS XL 2015 WIFI Antenna Replacement: stap 7, afbeelding 3 van 3
    • To separate the cover, carefully lift it up and away from the hinges (in order to clear the headphone port), then pivot it towards the hinges to expose the circuit boards.

    • Don't fully remove the cover yet, or you may damage the delicate ribbon cable that still connects it to the motherboard.

  8. Nintendo 3DS XL 2015 WIFI Antenna Replacement: stap 8, afbeelding 1 van 1
    • Use a pair of tweezers to lift away the two plugs that latch the L/R/ZL/ZR button ribbons to the motherboard. You can now remove the back cover completely and set it aside.

  9. Nintendo 3DS XL 2015 WIFI Antenna Replacement: stap 9, afbeelding 1 van 1
    • Use tweezers to flip up the small, hinged locking flap in order to unlock the ZIF connector securing the circle pad ribbon.

    • Slide the ribbon out of the ZIF connector.

  10. Nintendo 3DS XL 2015 WIFI Antenna Replacement: stap 10, afbeelding 1 van 1
    • Using a JIS #000 screwdriver, remove the two 8 mm screws securing the circle pad.

  11. Nintendo 3DS XL 2015 WIFI Antenna Replacement: stap 11, afbeelding 1 van 1
    • Lift the circle pad casing upward to remove it. There will be some friction, but it should not require excessive force.

  12. Nintendo 3DS XL 2015 WIFI Antenna Replacement: stap 12, afbeelding 1 van 1
    • Locate the gold terminal plug with a red cable at the top left of the motherboard. Using your fingers, carefully pull the plug straight upward to remove.

    • Use a pair of tweezers to disconnect the single ribbon connector.

    • Don't do what we did -- be very careful not to pull on the red cable.

  13. Nintendo 3DS XL 2015 WIFI Antenna Replacement: stap 13, afbeelding 1 van 3 Nintendo 3DS XL 2015 WIFI Antenna Replacement: stap 13, afbeelding 2 van 3 Nintendo 3DS XL 2015 WIFI Antenna Replacement: stap 13, afbeelding 3 van 3
    • Using tweezers, gently pull the five marked ribbons out of the ZIF connectors along the sides of the motherboard.

    • These ZIF connectors are held in place by friction and do not have locks—lifting the flaps on these connectors will break them! Note that in some models the upper-most connector may have a lock.

    • Three of the ribbon connectors have plastic clamping flaps that cover the ribbon to prevent slippage. Use the tweezers to flip them up before ribbon removal.

    • When reassembling the device, be sure to flip the ZIF clamps back down.

    • While the SD card reader is shown as removed in this photo, it is optional for the removal of the motherboard.

  14. Nintendo 3DS XL 2015 WIFI Antenna Replacement: stap 14, afbeelding 1 van 1
    • Using a JIS #000 screwdriver, remove six 4mm screws along the edges of the motherboard.

  15. Nintendo 3DS XL 2015 WIFI Antenna Replacement: stap 15, afbeelding 1 van 2 Nintendo 3DS XL 2015 WIFI Antenna Replacement: stap 15, afbeelding 2 van 2
    • Carefully pivot the motherboard 90 degrees toward the hinges to reveal two more ZIF connectors on the underside of the motherboard.

    • Both have latches that must be flipped up. The left, longer latch is black; the right, shorter one is white. Flip up the flaps, slide the ribbons out and remove the motherboard.

    • Note which way the ribbons slide into their connectors carefully, as they are different.

  16. Nintendo 3DS XL 2015 WIFI Antenna Replacement, Top Display Casing: stap 16, afbeelding 1 van 2 Nintendo 3DS XL 2015 WIFI Antenna Replacement, Top Display Casing: stap 16, afbeelding 2 van 2
    • Using a 1.5 flat head, remove the four red rubber stickers that are on the inside of the casing.

    • Underneath the rubber is a silver sticky

    • Using the PH00 screw driver, remove the screws.

  17. Nintendo 3DS XL 2015 WIFI Antenna Replacement: stap 17, afbeelding 1 van 2 Nintendo 3DS XL 2015 WIFI Antenna Replacement: stap 17, afbeelding 2 van 2
    • From the hinge, slide the outer portion of the top shell so that it separates from the inner portion.

    • This step was edited recently because the previous version was risky. It told people to use a spudger and slide it around the edges. DO NOT DO THIS!!! It will snap tabs off!

    • The casing will become loose, and just lift the casing off.

  18. Nintendo 3DS XL 2015 WIFI Antenna Replacement, Speakers: stap 18, afbeelding 1 van 3 Nintendo 3DS XL 2015 WIFI Antenna Replacement, Speakers: stap 18, afbeelding 2 van 3 Nintendo 3DS XL 2015 WIFI Antenna Replacement, Speakers: stap 18, afbeelding 3 van 3
    • The speakers are on the left and right side of the 3DS, and are held down by tape.

    • Before lifting the tape up, the speaker on the right side has two input films. Carefully detach each speaker film from their respective ZIF (zero insertion force) connectors. These are the paper thin ribbons that have orange stripes along them

    • Slowly lift the tape from the speaker.

    • The speakers are soldered onto the circuit board.

  19. Nintendo 3DS XL 2015 WIFI Antenna Replacement, Upper Screen: stap 19, afbeelding 1 van 2 Nintendo 3DS XL 2015 WIFI Antenna Replacement, Upper Screen: stap 19, afbeelding 2 van 2
    • Make sure that all the taped parts are untaped from the screen and moved onto the side.

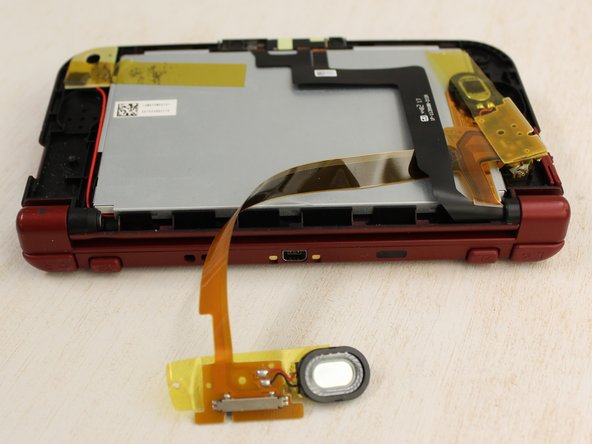
    • Using a plastic spudger, slightly lift it from underneath the lips and move it around the screen.

    • Once it is loose, lift the screen carefully.

  20. Nintendo 3DS XL 2015 WIFI Antenna Replacement: stap 20, afbeelding 1 van 1
    • The cables to the LCD are attached to the lower part of the 3DS' motherboard.

    • Be careful to avoid pulling the cables through the 3DS to prevent further damage.

    • Make sure to replace all cables to the correct location.

  21. Nintendo 3DS XL 2015 WIFI Antenna Replacement, WIFI Antenna: stap 21, afbeelding 1 van 2 Nintendo 3DS XL 2015 WIFI Antenna Replacement, WIFI Antenna: stap 21, afbeelding 2 van 2
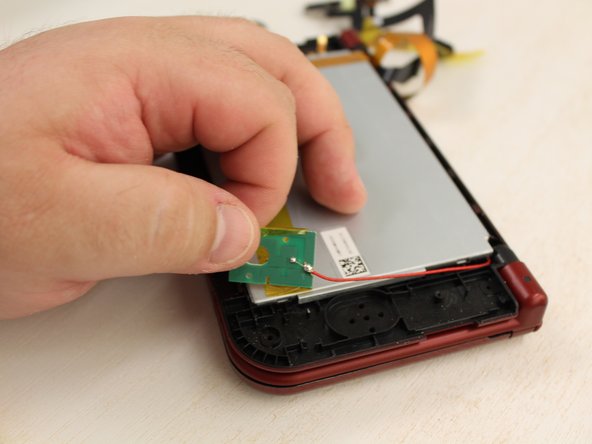
    • From the bottom of the DS, unclip the gold clip from the motherboard, and pull the antenna out slightly so it won't get caught on anything.

    • The antenna is soldered onto a small board. Easily pull the antenna till it is out of the DS.

    • This will make soldering a new antenna much easier.

Conclusie

To reassemble your device, follow these instructions in reverse order.

Één andere persoon heeft deze handleiding voltooid.

Ryan Butler

Lid sinds: 02/09/16

1.695 Reputatie

9 handleidingen geschreven

Team

iFixit, Team 1-1, Weber Winter 2016 Lid van iFixit, Team 1-1, Weber Winter 2016

FIX-WEBER-W16S1G1

4 Leden

37 handleidingen geschreven

0 opmerkingen

Voeg opmerking toe

Weergavestatistieken:

Afgelopen 24 uren: 4

Afgelopen 7 dagen: 30

Afgelopen 30 dagen: 125

Altijd: 4,872