Inleiding
This guide will walk you through the process of opening and replacing the top display casing.
Wat je nodig hebt
-
-
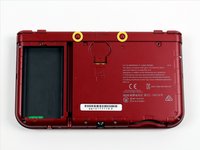
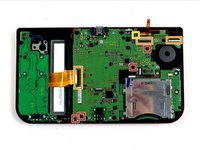
Place the 3DS upside down. Remove the game card, headphones, charging cable, stylus, or anything else that may be connected to the device.
-
-
-
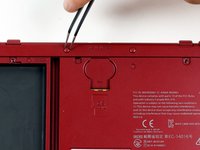
Using a JIS #00 screwdriver, remove the six 6mm screws around the edges of the secondary cover.
-
-
-
-
Use tweezers to flip up the small, hinged locking flap in order to unlock the ZIF connector securing the Circle Pad ribbon.
-
Slide the ribbon out of the ZIF connector.
-
-
-
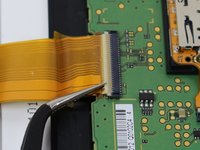
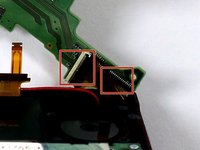
Using tweezers, gently pull the four marked ribbons out of the ZIF connectors along the sides of the motherboard.
-
Three of the ribbon connectors have plastic clamping flaps that cover the ribbon to prevent slippage. Use the tweezers to flip them up before ribbon removal.
-
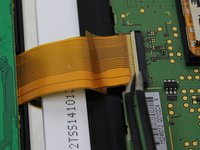
This one ribbon connector may also have a plastic clamping flap, but it's not like the others, rather it's similar to the one used for the Circle Pad. Gently flip up the flap on the side opposite the ribbon cable to remove the cable.
-
-
-
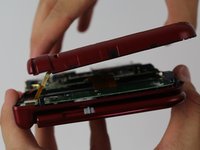
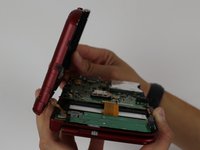
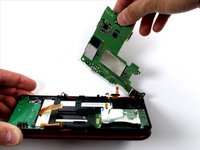
Carefully pivot the motherboard 90 degrees toward the hinges to reveal two more ZIF connectors on the underside of the motherboard.
-
Both have latches that must be flipped up. The left, longer latch is black; the right, shorter one is white. Flip up the flaps, slide the ribbons out and remove the motherboard.
-
-
-
Using a 1.5 flat head, remove the four red rubber stickers that are on the inside of the casing.
-
Underneath the rubber is a silver sticky
-
Using the PH00 screw driver, remove the screws.
-


To reassemble your device, follow these instructions in reverse order.
To reassemble your device, follow these instructions in reverse order.
Annuleren: ik heb deze handleiding niet afgemaakt.
5 andere personen hebben deze handleiding voltooid.

Team

iFixit, Team 1-1, Weber Winter 2016 Lid van iFixit, Team 1-1, Weber Winter 2016
FIX-WEBER-W16S1G1
4 Leden
37 handleidingen geschreven
3 opmerkingen
Why do we need to take apart the rest of the console? why not just do the last 2 steps to take the top off?
I don't see any reason why not to, I just tried it and doing just the last step worked perfectly.
mata413 -
The guide is incomplete, You do need to disassemble the entire thing if you plan to replace the top LCD. This is because the flat cables for the top display and cameras are channeled through the hinge and connect to the motherboard at the bottom. By the way, passing these flat cables through the cavity inside the hinge is the most difficult part of the process, I have done it myself and it's a real pain. Even people experienced in disassembling electronics will have a hard time doing it.