Ga door naar hoofdinhoud

Deze handleiding heeft recentere wijzigingen. Schakel over naar de nieuwste niet-geverifieerde versie.

Nikon Coolpix P4 LCD Screen Replacement

Wat je nodig hebt

  1. Nikon Coolpix P4 LCD Screen Replacement, Battery: stap 1, afbeelding 1 van 1
    • Flip the camera upside down (have the side with the buttons facing away from you)

    • Look for the side with the triangle icon with three lines in it, this is the battery door. Add pressure and slide this door slightly until it clicks and pops open.

  2. Nikon Coolpix P4 LCD Screen Replacement: stap 2, afbeelding 1 van 1
    • Once the door clicks, you can open it to reveal the slots holding the memory card and the battery.

    • Focusing on the larger slot, this holds the battery. Push the orange tab away from the slot, this will eject the old battery if one was previously inside.

    • Once this slot is open, you can place the new battery inside.

    • Make sure to close the orange tab to secure it in place!

  3. Nikon Coolpix P4 LCD Screen Replacement, LCD Screen: stap 3, afbeelding 1 van 1
    • Remove the four screws located on bottom of camera. (.086in screws)

  4. Nikon Coolpix P4 LCD Screen Replacement: stap 4, afbeelding 1 van 2 Nikon Coolpix P4 LCD Screen Replacement: stap 4, afbeelding 2 van 2
    • Remove the two screws, then remove the panel. (.113in screws)

  5. Nikon Coolpix P4 LCD Screen Replacement: stap 5, afbeelding 1 van 3 Nikon Coolpix P4 LCD Screen Replacement: stap 5, afbeelding 2 van 3 Nikon Coolpix P4 LCD Screen Replacement: stap 5, afbeelding 3 van 3
    • Remove panel on right side (front view) by removing these two screws. (.196in screws)

    • Remove single screw set underneath panel. (0.083in screw)

  6. Nikon Coolpix P4 LCD Screen Replacement: stap 6, afbeelding 1 van 1
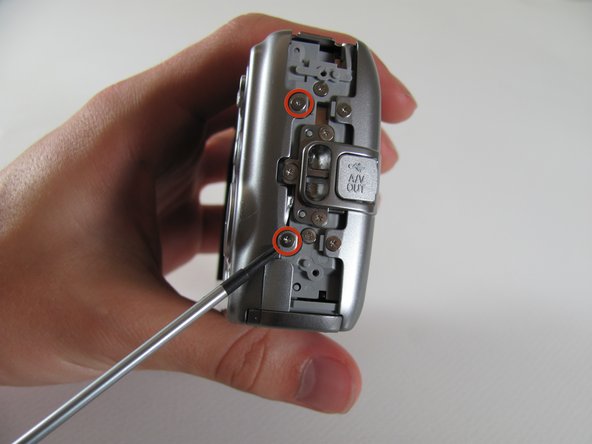
    • Remove the two screws attaching the back panel to the body on the left side. (.188in screws)

  7. Nikon Coolpix P4 LCD Screen Replacement: stap 7, afbeelding 1 van 1
    • Gently pull off back cover

  8. Nikon Coolpix P4 LCD Screen Replacement: stap 8, afbeelding 1 van 2 Nikon Coolpix P4 LCD Screen Replacement: stap 8, afbeelding 2 van 2
    • Remove the two screws holding on the back panel. Then remove the three screws on the A/V Out tab (left side). (.188in screws)

    • Remove tab.

  9. Nikon Coolpix P4 LCD Screen Replacement: stap 9, afbeelding 1 van 1
    • Remove the two screws attaching the front panel to the body on the left side. (.18in screws)

  10. Nikon Coolpix P4 LCD Screen Replacement: stap 10, afbeelding 1 van 1
    • Flip up front panel.

    • There should be wires still attaching the panel to body. DO NOT TRY TO PULL OFF COMPLETELY

  11. Nikon Coolpix P4 LCD Screen Replacement: stap 11, afbeelding 1 van 1
    • Remove three screws as shown. (Right screw:0.084in, Left screw:0.088in, Middle screw:0.114in)

  12. Nikon Coolpix P4 LCD Screen Replacement: stap 12, afbeelding 1 van 1
    • Carefully pull orange LCD connector up and out of the port.

    • Be careful to pull vertically while pushing the black tab upwards

  13. Nikon Coolpix P4 LCD Screen Replacement: stap 13, afbeelding 1 van 1
    • Remove the screw below the LCD (.124in)

  14. Nikon Coolpix P4 LCD Screen Replacement: stap 14, afbeelding 1 van 1
    • Carefully pull out the plug connecting the LCD to the motherboard.

  15. Nikon Coolpix P4 LCD Screen Replacement: stap 15, afbeelding 1 van 1
    • You can now remove the LCD from the camera body.

    • Insert new LCD and reassemble using the steps in reverse order.

Conclusie

To reassemble your device, follow these instructions in reverse order.

Luke Baumann

Lid sinds: 04/13/11

128 Reputatie

5 handleidingen geschreven

Team

Cal Poly, Team 8-5, Regan Spring 2011 Lid van Cal Poly, Team 8-5, Regan Spring 2011

CPSU-REGAN-S11S8G5

4 Leden

10 handleidingen geschreven

Één opmerking

Where did you get the screen?

jharrison - Antwoord

Voeg opmerking toe

Weergavestatistieken:

Afgelopen 24 uren: 0

Afgelopen 7 dagen: 5

Afgelopen 30 dagen: 19

Altijd: 3,094