Ga door naar hoofdinhoud

Nikon Coolpix L32 LCD Replacement

Wat je nodig hebt

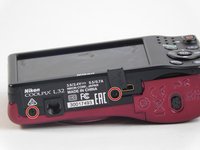
  1. Nikon Coolpix L32 LCD Replacement, Front Panel: stap 1, afbeelding 1 van 3 Nikon Coolpix L32 LCD Replacement, Front Panel: stap 1, afbeelding 2 van 3 Nikon Coolpix L32 LCD Replacement, Front Panel: stap 1, afbeelding 3 van 3
    • Remove the six(3.93mm screws) on the outside of the camera using a Phillips 00 screwdriver.

  2. Nikon Coolpix L32 LCD Replacement: stap 2, afbeelding 1 van 1
    • Open the battery compartment door and pull the black back face apart from the front red face.

  3. Nikon Coolpix L32 LCD Replacement, LCD: stap 3, afbeelding 1 van 1
    • Using the spudger, gently pull the LCD screen from the tray holding it.

    • Do not pull the LCD screen far from the camera because there is a ribbon cable connected to it.

  4. Nikon Coolpix L32 LCD Replacement: stap 4, afbeelding 1 van 1
    • Use the spudger to lift up the small white retaining flap on the motherboard that is connected to the LCD screen's ribbon cable.

  5. Nikon Coolpix L32 LCD Replacement: stap 5, afbeelding 1 van 1
    • With the small retaining white flap up, remove the LCD screen ribbon cable from the motherboard by sliding it out.

Conclusie

To reassemble your device, follow these instructions in reverse order.

Één andere persoon heeft deze handleiding voltooid.

Sherika Jacobs

Lid sinds: 09/15/16

348 Reputatie

3 handleidingen geschreven

Team

USF Tampa, Team 2-4, Blackwell Fall 2016 Lid van USF Tampa, Team 2-4, Blackwell Fall 2016

USFT-BLACKWELL-F16S2G4

4 Leden

10 handleidingen geschreven

0 opmerkingen

Voeg opmerking toe

Weergavestatistieken:

Afgelopen 24 uren: 5

Afgelopen 7 dagen: 9

Afgelopen 30 dagen: 14

Altijd: 800