Ga door naar hoofdinhoud

Nexus One Front Speaker Replacement

Wat je nodig hebt

  1. Nexus One Front Speaker Replacement, Rear Cover: stap 1, afbeelding 1 van 2 Nexus One Front Speaker Replacement, Rear Cover: stap 1, afbeelding 2 van 2
    • Using two fingers, push up on the rear cover.

  2. Nexus One Front Speaker Replacement: stap 2, afbeelding 1 van 1
    • The rear cover slides up and off.

  3. Nexus One Front Speaker Replacement, Battery: stap 3, afbeelding 1 van 1
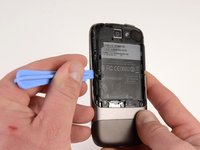
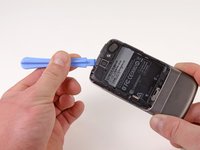
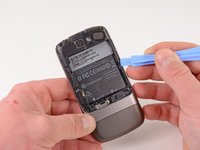
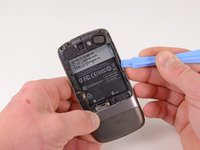
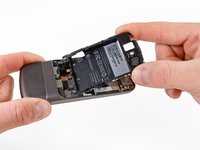
    • Using the plastic opening tools, pry the left bottom corner of the battery up.

  4. Nexus One Front Speaker Replacement: stap 4, afbeelding 1 van 1
    • Pull the battery up and out.

  5. Nexus One Front Speaker Replacement, Battery Housing: stap 5, afbeelding 1 van 1
    • Remove the two Torx T5 screws.

    • Remove the one Philips #00 screw.

  6. Nexus One Front Speaker Replacement: stap 6, afbeelding 1 van 2 Nexus One Front Speaker Replacement: stap 6, afbeelding 2 van 2
    • Using the plastic opening tool, pry up the battery housing upwards.

    • Push pry tool down, undoing the plastic tab.

  7. Nexus One Front Speaker Replacement: stap 7, afbeelding 1 van 2 Nexus One Front Speaker Replacement: stap 7, afbeelding 2 van 2
    • Pry the upper left tab open on the battery housing.

  8. Nexus One Front Speaker Replacement: stap 8, afbeelding 1 van 2 Nexus One Front Speaker Replacement: stap 8, afbeelding 2 van 2
    • Pry the top tab of the battery housing.

  9. Nexus One Front Speaker Replacement: stap 9, afbeelding 1 van 2 Nexus One Front Speaker Replacement: stap 9, afbeelding 2 van 2
    • Pry the right side tab of the battery housing.

  10. Nexus One Front Speaker Replacement: stap 10, afbeelding 1 van 2 Nexus One Front Speaker Replacement: stap 10, afbeelding 2 van 2
    • Pull up on the battery housing.

    • Slide the battery housing out to remove it.

  11. Nexus One Front Speaker Replacement, Motherboards: stap 11, afbeelding 1 van 2 Nexus One Front Speaker Replacement, Motherboards: stap 11, afbeelding 2 van 2
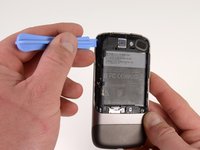
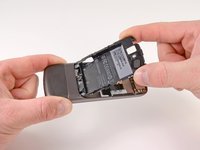
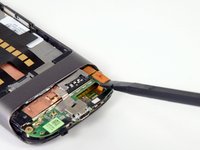
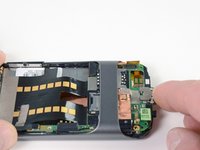
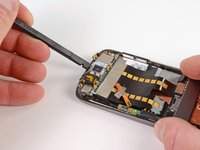
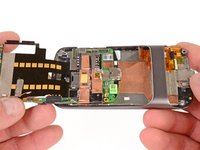
    • Insert the spudger under the connector.

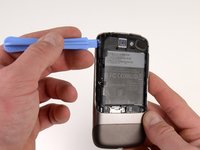
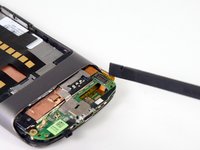
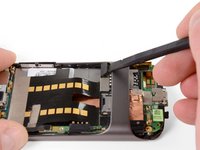
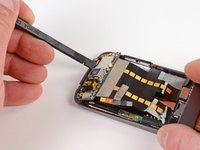
    • Push the spudger up and twist to release the connector.

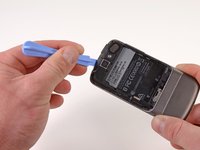
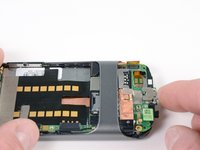
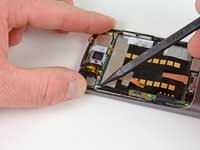
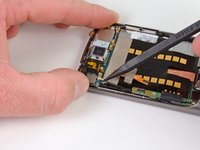
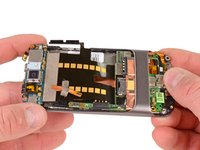
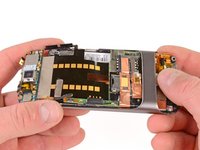
    • Repeat for the next connector.

  12. Nexus One Front Speaker Replacement: stap 12, afbeelding 1 van 3 Nexus One Front Speaker Replacement: stap 12, afbeelding 2 van 3 Nexus One Front Speaker Replacement: stap 12, afbeelding 3 van 3
    • Push on the USB port to expose the black connector.

    • Use the spudger to pry the connector upwards.

  13. Nexus One Front Speaker Replacement: stap 13, afbeelding 1 van 2 Nexus One Front Speaker Replacement: stap 13, afbeelding 2 van 2
    • Place the spugder under the antenna connector.

    • Pry connector up vertically.

  14. Nexus One Front Speaker Replacement: stap 14, afbeelding 1 van 3 Nexus One Front Speaker Replacement: stap 14, afbeelding 2 van 3 Nexus One Front Speaker Replacement: stap 14, afbeelding 3 van 3
    • Insert the spudger into tab above the camera.

    • Slide upwards until the board detaches from the case.

  15. Nexus One Front Speaker Replacement: stap 15, afbeelding 1 van 1
    • Press the pointed tip of the spudger into the space below the button assembly.

    • Wiggle the spudger tip towards the outside of the button.

    • The button assembly is under some tension and may fly off.

  16. Nexus One Front Speaker Replacement: stap 16, afbeelding 1 van 1
    • Push the pointed tip of the spudger into the base of the side button board.

    • Lift up, the board will disconnect from the case.

  17. Nexus One Front Speaker Replacement: stap 17, afbeelding 1 van 3 Nexus One Front Speaker Replacement: stap 17, afbeelding 2 van 3 Nexus One Front Speaker Replacement: stap 17, afbeelding 3 van 3
    • Push on the lower motherboard until it slides under the case support.

    • The motherboard assembly comes out as a single piece.

    • Save the small black rubber rectangular sound guide under the motherboard, to replace over the microphone.

  18. Nexus One Front Speaker Replacement, Front Speaker: stap 18, afbeelding 1 van 1
    • Using the spudger, pop up the end of the speaker.

Conclusie

To reassemble your device, follow these instructions in reverse order.

Één andere persoon heeft deze handleiding voltooid.

Niklas Johnson

Lid sinds: 01/31/12

1.207 Reputatie

18 handleidingen geschreven

0 opmerkingen

Voeg opmerking toe

Weergavestatistieken:

Afgelopen 24 uren: 0

Afgelopen 7 dagen: 0

Afgelopen 30 dagen: 2

Altijd: 2,292