Deze versie kan foutieve bewerkingen bevatten. Schakel over naar de recentste gecontroleerde momentopname.
Wat je nodig hebt
Video overzicht
-
Deze stap is niet vertaald. Help het te vertalen
-
Gently insert a plastic opening tool near the top of the Nexus 7 between the rear panel and the front panel assembly.
-
Carefully run the plastic opening tool along the top edge to pry the rear panel away from the front panel assembly of the Nexus 7.
-
-
Deze stap is niet vertaald. Help het te vertalen
-
Insert the plastic opening tool between the rear panel and the front panel assembly near the power button and pry up at several points along the right edge of the Nexus 7.
-
-
Deze stap is niet vertaald. Help het te vertalen
-
Pry up the rear panel along the left edge using the method described in previous steps.
-
-
Deze stap is niet vertaald. Help het te vertalen
-
Gently lift and remove the rear panel up off the front panel assembly.
-
-
-
Deze stap is niet vertaald. Help het te vertalen
-
Using the tip of a spudger, push first on one side then the other to "walk" the battery cable straight out of its socket on the motherboard.
-
-
Deze stap is niet vertaald. Help het te vertalen
-
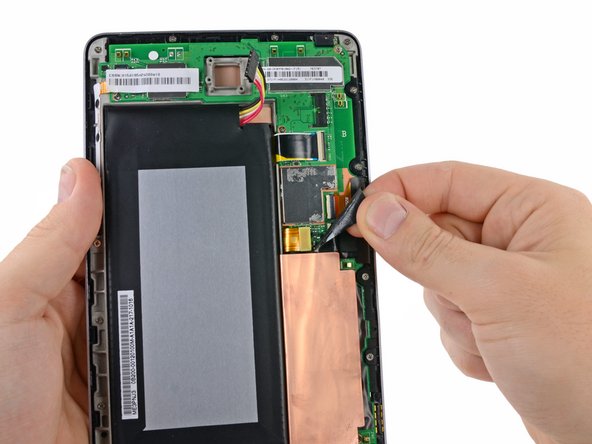
Peel the upper piece of black adhesive tape completely up off the Nexus 7.
-
Similarly, peel the lower piece of black adhesive tape, but only as far as the copper strip.
-
-
Deze stap is niet vertaald. Help het te vertalen
-
Use the flat end of a spudger to pry the display data cable straight up off its socket on the motherboard.
-
-
Deze stap is niet vertaald. Help het te vertalen
-
Use the flat end of a spudger to carefully flip up the retaining flaps on the digitizer ribbon cable ZIF sockets.
-
Use the tip of a spudger to pull the digitizer ribbon cable straight out of its socket.
-
-
Deze stap is niet vertaald. Help het te vertalen
-
Remove the following screws securing the display assembly to the metal frame:
-
Thirteen 3.2 mm silver Phillips screws
-
Two 4.25 mm black Phillips screws
-
In 3G models, the two top-center Phillips screws are slightly lower and on top of the motherboard.
-
Note that the assembly for the non-3G model will NOT fit the 3G model. When looking for the 3G assembly, look for model 'ME370TG', and note that in pictures of the 3G verison the top 2 phillips screw holes are slightly lower than the upper right and left ones.
-
-
Deze stap is niet vertaald. Help het te vertalen
-
Insert a plastic spudger on the left side of the Nexus 7, near the bottom of the battery.
-
Slide the spudger toward the top of the Nexus 7, releasing the adhesive as you go.
-
-
Deze stap is niet vertaald. Help het te vertalen
-
Carefully rotate the metal frame away from the display assembly, minding any cables that may get caught.
-
Display assembly remains.
-


Annuleren: ik heb deze handleiding niet afgemaakt.
227 andere personen hebben deze handleiding voltooid.


43 opmerkingen
great but where can i get nexus 7 digitizer, in stock reasonable price in uk please?
eBay is a good source. I paid £14 for mine and it came with tools.
I don't feel that this guide is complete, how do you separate the display from the frame?
That's because this guide is for the "Display Assembly". I just tried to remove the LCD itself, extremely difficult. I didn't succeed. Now looking for a whole assembly
I've managed to do it using a heat gun. Be careful not to apply to much heat as I warped the frame slightly in one place. Use a prying tool from the top rather than trying to push from the back as the glue is quite tough and peeling it away is easier. You need to reapply heat as you work, it then comes out quite easily. I repurposed the glue strips from the old screen, however taking out bits of glass was a bit tough. The new display fits neatly after that.
Nadim M -