Ga door naar hoofdinhoud

Nest Learning Thermostat 2nd Generation Optical Finger Motion Sensor Replacement

Wat je nodig hebt

  1. Nest Learning Thermostat 2nd Generation Optical Finger Motion Sensor  Replacement, Removal from Wall: stap 1, afbeelding 1 van 2 Nest Learning Thermostat 2nd Generation Optical Finger Motion Sensor  Replacement, Removal from Wall: stap 1, afbeelding 2 van 2
    • Grasp the display's metal outer ring with your fingers and pull directly away from the wall.

  2. Nest Learning Thermostat 2nd Generation Optical Finger Motion Sensor  Replacement, Open Display: stap 2, afbeelding 1 van 1
    • Turn the display over.

    • Remove the four 6 mm screws from the back of the display using a Phillips #0 screwdriver.

  3. Nest Learning Thermostat 2nd Generation Optical Finger Motion Sensor  Replacement, Remove the back of the display: stap 3, afbeelding 1 van 2 Nest Learning Thermostat 2nd Generation Optical Finger Motion Sensor  Replacement, Remove the back of the display: stap 3, afbeelding 2 van 2
    • Pinch the gray 20-pin connector with your fingers and pull directly away from the display.

    • Do NOT pull too far as there is a ribbon on the back panel connecting the 20-pin connector to the display.

    I pinched the connector and it will not pull out

    Robert Zelak - Antwoord

    I’m my case, the white backplate cannot be pulled until it is turned about 1cm counterclockwise to disengage the brackets that hold to the internal plate. To do this, yo need to hold the front of the Nest with the metal frame (so the it doesn’t turn), while turning the backplate.

    Alberto Lazaro - Antwoord

    And in my case, there are only 2 screws (in the 9 and 3 o’clock positions) and not 4 as shown in the photo.

    Alberto Lazaro -

  4. Nest Learning Thermostat 2nd Generation Optical Finger Motion Sensor  Replacement, Disconnect the base connection ribbon cable.: stap 4, afbeelding 1 van 3 Nest Learning Thermostat 2nd Generation Optical Finger Motion Sensor  Replacement, Disconnect the base connection ribbon cable.: stap 4, afbeelding 2 van 3 Nest Learning Thermostat 2nd Generation Optical Finger Motion Sensor  Replacement, Disconnect the base connection ribbon cable.: stap 4, afbeelding 3 van 3
    • Locate the blue pull tab at the end of the ribbon which says, "1. Pull".

    • Grasp the tab with your fingers and pull directly away from the motherboard.

    How do you reattached the ribbon back to the motherboard ??

    alexehler - Antwoord

  5. Nest Learning Thermostat 2nd Generation Optical Finger Motion Sensor  Replacement, Lift battery from the base: stap 5, afbeelding 1 van 2 Nest Learning Thermostat 2nd Generation Optical Finger Motion Sensor  Replacement, Lift battery from the base: stap 5, afbeelding 2 van 2
    • Locate the blue tab which says, "2. Pull".

    • Use tweezers to pull the battery up and away from the display.

    • Do NOT pull too far, as the battery is still connected to the motherboard and must be unplugged.

  6. Nest Learning Thermostat 2nd Generation Optical Finger Motion Sensor  Replacement, Disconnect the battery from the motherboard: stap 6, afbeelding 1 van 2 Nest Learning Thermostat 2nd Generation Optical Finger Motion Sensor  Replacement, Disconnect the battery from the motherboard: stap 6, afbeelding 2 van 2
    • Locate the blue tab which says "3 unplug".

    • Grasp the battery with your fingers. Pull gently directly away from the display to unplug the battery from the motherboard.

  7. Nest Learning Thermostat 2nd Generation Optical Finger Motion Sensor  Replacement, Remove battery from the display: stap 7, afbeelding 1 van 3 Nest Learning Thermostat 2nd Generation Optical Finger Motion Sensor  Replacement, Remove battery from the display: stap 7, afbeelding 2 van 3 Nest Learning Thermostat 2nd Generation Optical Finger Motion Sensor  Replacement, Remove battery from the display: stap 7, afbeelding 3 van 3
    • Grasp the battery with your fingers and pull directly away from motherboard to separate the battery from the display.

    Where do you buy the battery?

    Robert - Antwoord

    At least say the tipe of battery that's needed.

    Pedro Sanchez - Antwoord

    I just ordered the battery model specified. When it arrived, I realized it doesn’t have the same specs as the battery that comes with the thermostat.

    The part listed (TL284443) is 3.7 VDC, but it is only is 380mAh (1.41 Wh) (if you zoom in on the image when you click “Buy”, you can see)

    You can clearly see in the tear-down that the battery that comes with the thermostat is 2.1 Wh.

    It might work as a replacement, but doesn’t have the same capacity.

    Gerry Beggs - Antwoord

    Double check your own equip online or in the manual people.

    There are different generations of thermostats. How would this guy know which battery you need.

    Thanks for the directions.

    Helps a lot.

    LisaKK - Antwoord

    To be fair, most people don’t know that there are different generations of the Nest Thermostat and clearly they didn’t read that this was for the 2nd generation Nest Thermostat. Probably should have been pointed out in the instructions more clearly for those folks. Then they wouldn’t have been so confused about the battery voltage differences.

    Resist - Antwoord

    I am a 64 year old woman, I had the Nest next generation installed last year. So far it keeps telling me that the connection to my wi-Fi is not working and now it’s saying the battery is dead. I’ve gone through all the steps to re-connect to wi-fi to no avail. Could this be because the battery needs replacing?

    It’s 68 degrees in my house now and that’s thanks to my fireplace not this horrible device. I am going back to the regular thermostat, what a waste of hard earned money.

    Laura Rogers - Antwoord

  8. Nest Learning Thermostat 2nd Generation Optical Finger Motion Sensor  Replacement, Locate auto-away sensor: stap 8, afbeelding 1 van 1
    • Locate the auto-away sensor.

  9. Nest Learning Thermostat 2nd Generation Optical Finger Motion Sensor  Replacement, Remove screws: stap 9, afbeelding 1 van 2 Nest Learning Thermostat 2nd Generation Optical Finger Motion Sensor  Replacement, Remove screws: stap 9, afbeelding 2 van 2
    • Remove the four 3mm screws with a #0 Phillips screwdriver.

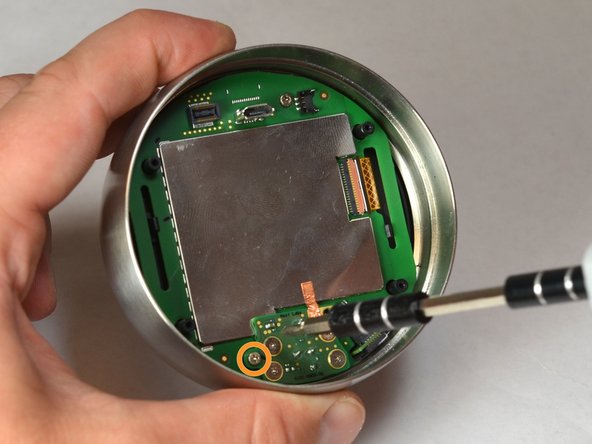
    • Remove the one 4mm screw located at the edge of the auto-away sensor. Use a #0 Phillips screwdriver.

  10. Nest Learning Thermostat 2nd Generation Optical Finger Motion Sensor  Replacement, Remove auto-away sensor: stap 10, afbeelding 1 van 3 Nest Learning Thermostat 2nd Generation Optical Finger Motion Sensor  Replacement, Remove auto-away sensor: stap 10, afbeelding 2 van 3 Nest Learning Thermostat 2nd Generation Optical Finger Motion Sensor  Replacement, Remove auto-away sensor: stap 10, afbeelding 3 van 3
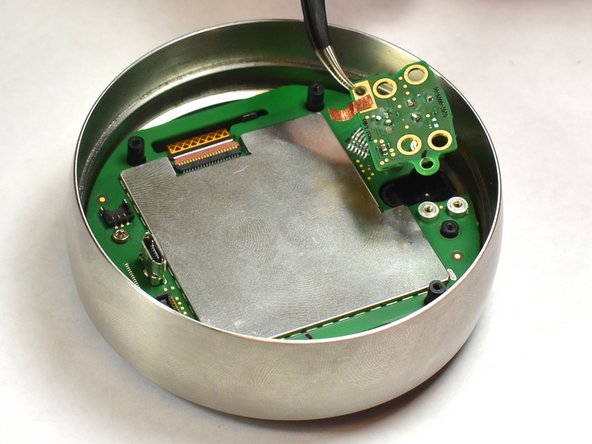
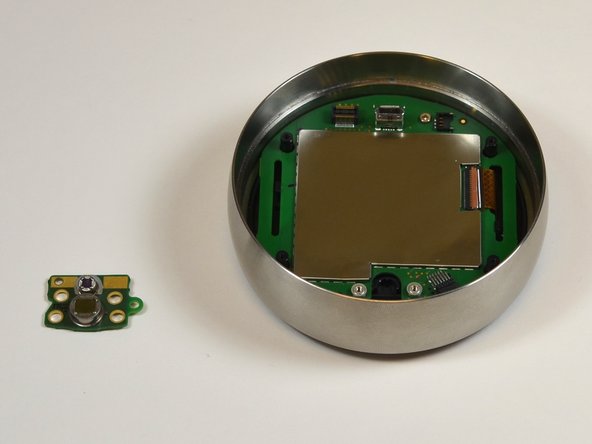
    • Lift the auto-away sensor from motherboard using tweezers.

    • Peel the copper foil gently from the EMI shield.

  11. Nest Learning Thermostat 2nd Generation Optical Finger Motion Sensor  Replacement, Remove screw from motherboard: stap 11, afbeelding 1 van 1
    • Remove the 4 mm screw from the motherboard using a #0 Phillips screwdriver.

  12. Nest Learning Thermostat 2nd Generation Optical Finger Motion Sensor  Replacement, Removal of EMI Shield: stap 12, afbeelding 1 van 2 Nest Learning Thermostat 2nd Generation Optical Finger Motion Sensor  Replacement, Removal of EMI Shield: stap 12, afbeelding 2 van 2
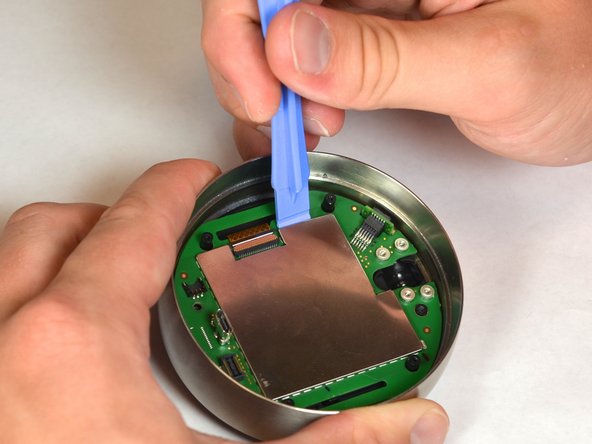
    • Remove the EMI shield from the motherboard using a plastic opening tool.

  13. Nest Learning Thermostat 2nd Generation Optical Finger Motion Sensor  Replacement, Disconnect the LCD ribbon: stap 13, afbeelding 1 van 2 Nest Learning Thermostat 2nd Generation Optical Finger Motion Sensor  Replacement, Disconnect the LCD ribbon: stap 13, afbeelding 2 van 2
    • Unsnap the LCD ribbon from the motherboard gently using tweezers.

  14. Nest Learning Thermostat 2nd Generation Optical Finger Motion Sensor  Replacement, Disconnect the motherboard from the display: stap 14, afbeelding 1 van 3 Nest Learning Thermostat 2nd Generation Optical Finger Motion Sensor  Replacement, Disconnect the motherboard from the display: stap 14, afbeelding 2 van 3 Nest Learning Thermostat 2nd Generation Optical Finger Motion Sensor  Replacement, Disconnect the motherboard from the display: stap 14, afbeelding 3 van 3
    • Locate the black tabs that hold the display to the motherboard.

    • Push the black tabs gently away from the motherboard using the plastic opening tools.

  15. Nest Learning Thermostat 2nd Generation Optical Finger Motion Sensor  Replacement, Separate the motherboard and the display: stap 15, afbeelding 1 van 2 Nest Learning Thermostat 2nd Generation Optical Finger Motion Sensor  Replacement, Separate the motherboard and the display: stap 15, afbeelding 2 van 2
    • Pull the face display gently away from the motherboard.

  16. Nest Learning Thermostat 2nd Generation Optical Finger Motion Sensor  Replacement, Separate motherboard from steal ring: stap 16, afbeelding 1 van 1
    • Using one hand to hold the steel ring, carefully lift the motherboard out of the ring using the other hand.

  17. Nest Learning Thermostat 2nd Generation Optical Finger Motion Sensor  Replacement, Removal of optical finger: stap 17, afbeelding 1 van 3 Nest Learning Thermostat 2nd Generation Optical Finger Motion Sensor  Replacement, Removal of optical finger: stap 17, afbeelding 2 van 3 Nest Learning Thermostat 2nd Generation Optical Finger Motion Sensor  Replacement, Removal of optical finger: stap 17, afbeelding 3 van 3
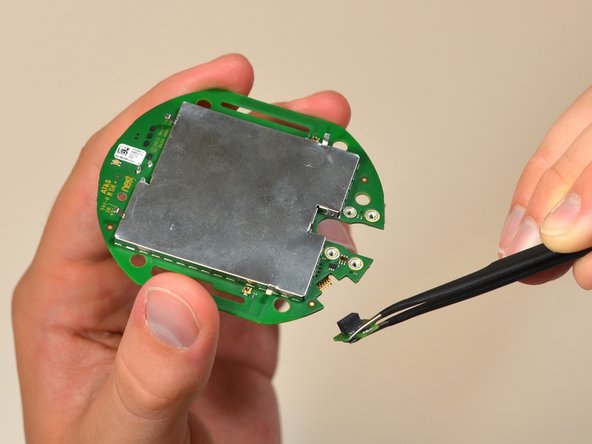
    • Locate the optical sensor, a small board attached at 90 degrees from the side of the motherboard.

    • Using the tweezers, grasp the small green piece of exposed board on the sensor, and pull directly away from the side of the motherboard.

    This site helped me plan the troubleshooting of my Nest 2Gen Thermostat. It worked well with just the cleaning of optical sensor and the encoder. No part replacement. Step 13 could have mentioned about a thin fin like clip over the ribbon cable which needs to be flipped to remove or reattach

    Ravi H - Antwoord

Conclusie

To reassemble your device, follow these instructions in reverse order.

3 andere personen hebben deze handleiding voltooid.

Charles Suleskey

Lid sinds: 09/23/14

435 Reputatie

2 handleidingen geschreven

Team

USF Tampa, Team 11-5, Blackwell Fall 2014 Lid van USF Tampa, Team 11-5, Blackwell Fall 2014

USFT-BLACKWELL-F14S11G5

5 Leden

12 handleidingen geschreven

9 opmerkingen

Where can I get the sensor?

tyjustice - Antwoord

I second this, for the life of me, I can't find it. Just data specs and how most of the electronics retailers online says it obsolete, specially since Avago got absorbed by Broadcom.

Luis A. Cornejo -

This is helpful up to the point where I need to know where to get the sensor. Where do I get the sensor?

Art Adams - Antwoord

Any update where to get a new sensor? I just received a device from a friend and it needs to be fixed.

Steven D'Ambrozio - Antwoord

The easier path would be to install a rotary encoder, and call it a day. If you do find the sensor, you have to code basically a driver for it and print your own pattern.

ic3balandran - Antwoord

I have the same issue with my nest Thermostat.

Any update where to buy a new optical sensor ?

Christophe LEMPEREUR - Antwoord

so does any one know where to buy the optical photo cell for the ring motion

Shaun Guthrie - Antwoord

This site helped me plan the troubleshooting of my Nest 2Gen Thermostat. It worked well with just the cleaning of optical sensor and the encoder. No part replacement. Step 13 could have mentioned about a thin fin like clip over the ribbon cable which needs to be flipped to remove or reattach

Ravi H - Antwoord

I 2nd the cleaning of the ring pattern and sensor with rubbing alcohol, also you can slide the sensor on it's pins to move it out a bit closer to the ring pattern. doing both these actions seems to have restored the working of the sensor.

Steven Lepage - Antwoord

Voeg opmerking toe

Weergavestatistieken:

Afgelopen 24 uren: 2

Afgelopen 7 dagen: 3

Afgelopen 30 dagen: 17

Altijd: 5,553