Ga door naar hoofdinhoud

Nest Dropcam Pro Camera Lens Replacement

Wat je nodig hebt

  1. Nest Dropcam Pro Camera Lens Replacement, Outer Case: stap 1, afbeelding 1 van 1
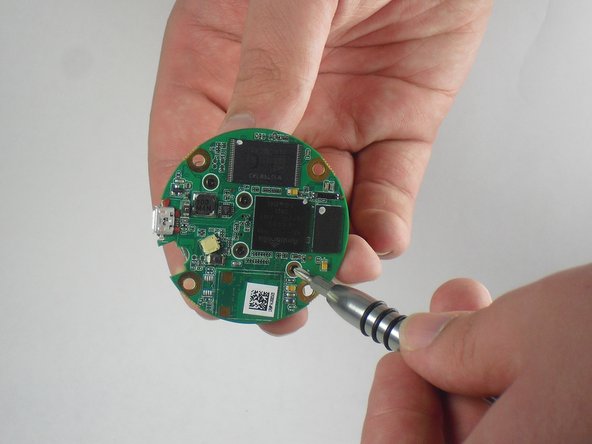
    • Press in the mounting clips on each side of the case to remove the camera from the mount.

  2. Nest Dropcam Pro Camera Lens Replacement: stap 2, afbeelding 1 van 2 Nest Dropcam Pro Camera Lens Replacement: stap 2, afbeelding 2 van 2
    • Using a Philips #0 screwdriver, remove the four 3 mm screws.

  3. Nest Dropcam Pro Camera Lens Replacement: stap 3, afbeelding 1 van 2 Nest Dropcam Pro Camera Lens Replacement: stap 3, afbeelding 2 van 2
    • Lift the front of the case slowly, as there is an antenna cable attached to the motherboard.

    • Carefully disconnect the antenna cable from the motherboard. You will feel this cable "pop" out of place when disconnected.

  4. Nest Dropcam Pro Camera Lens Replacement, Motherboard: stap 4, afbeelding 1 van 2 Nest Dropcam Pro Camera Lens Replacement, Motherboard: stap 4, afbeelding 2 van 2
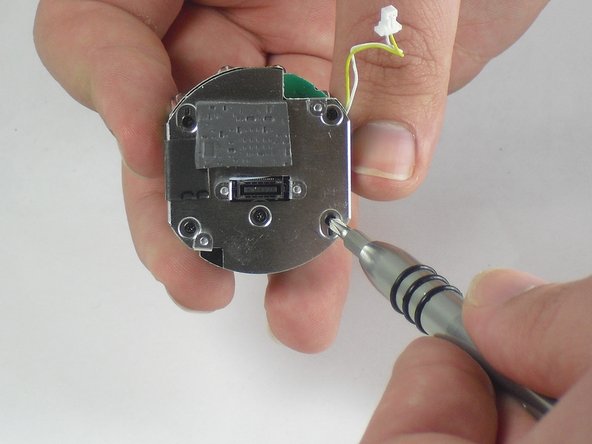
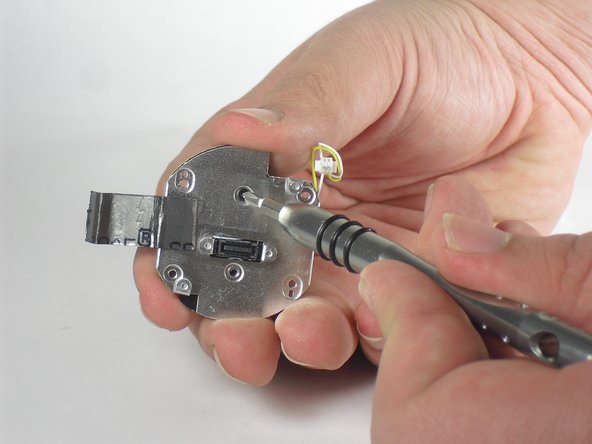
    • Insert a spudger tool under the micro-USB port and lift to separate the motherboard from the back case.

  5. Nest Dropcam Pro Camera Lens Replacement: stap 5, afbeelding 1 van 2 Nest Dropcam Pro Camera Lens Replacement: stap 5, afbeelding 2 van 2
    • Pull the motherboard away from the back case.

    • Unplug the red and black cable connecting the motherboard to the back case.

  6. Nest Dropcam Pro Camera Lens Replacement: stap 6, afbeelding 1 van 2 Nest Dropcam Pro Camera Lens Replacement: stap 6, afbeelding 2 van 2
    • Using a Philips #0 screwdriver, remove the four 2 mm screws.

  7. Nest Dropcam Pro Camera Lens Replacement: stap 7, afbeelding 1 van 2 Nest Dropcam Pro Camera Lens Replacement: stap 7, afbeelding 2 van 2
    • Lift the lens and LED assembly away from the motherboard.

    • Unplug the yellow and white cable from the motherboard.

  8. Nest Dropcam Pro Camera Lens Replacement, Camera Lens: stap 8, afbeelding 1 van 2 Nest Dropcam Pro Camera Lens Replacement, Camera Lens: stap 8, afbeelding 2 van 2
    • Using a Philips #0 screwdriver, remove the four 2 mm screws.

  9. Nest Dropcam Pro Camera Lens Replacement: stap 9, afbeelding 1 van 3 Nest Dropcam Pro Camera Lens Replacement: stap 9, afbeelding 2 van 3 Nest Dropcam Pro Camera Lens Replacement: stap 9, afbeelding 3 van 3
    • Peel off the paper seal holding the Lens and LEDs together.

    • Disconnect the red and white wire from the bottom board.

  10. Nest Dropcam Pro Camera Lens Replacement: stap 10, afbeelding 1 van 2 Nest Dropcam Pro Camera Lens Replacement: stap 10, afbeelding 2 van 2
    • Lift up the foam cover to reveal a second screw underneath.

    • Using a Philips #0 screwdriver, remove the two 3 mm screws.

  11. Nest Dropcam Pro Camera Lens Replacement: stap 11, afbeelding 1 van 1
    • With the screws gone, lift the camera lens away from the remaining components.

Conclusie

To reassemble your device, follow these instructions in reverse order.

2 andere personen hebben deze handleiding voltooid.

David Foens

Lid sinds: 09/03/15

893 Reputatie

6 handleidingen geschreven

Team

USF Tampa, Team 15-4, Blackwell Fall 2015 Lid van USF Tampa, Team 15-4, Blackwell Fall 2015

USFT-BLACKWELL-F15S15G4

3 Leden

12 handleidingen geschreven

2 opmerkingen

Where do you get replacement lens?

Jim Fischer - Antwoord

good morning , is there any store on the USA where i can send my drop camera ti get fix? it fell and doesn't want to broadcast any image.

andres - Antwoord

Voeg opmerking toe

Weergavestatistieken:

Afgelopen 24 uren: 0

Afgelopen 7 dagen: 8

Afgelopen 30 dagen: 30

Altijd: 3,479