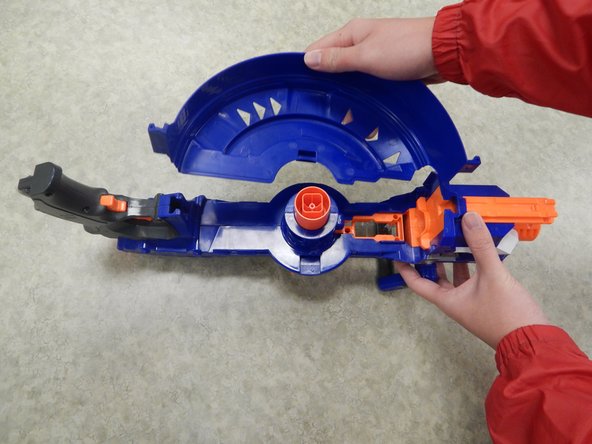
Ga door naar hoofdinhoud

Nerf N-Strike Elite Hail-Fire Left Shell Replacement

Wat je nodig hebt

  1. Nerf N-Strike Elite Hail-Fire Left Shell Replacement, Left Shell: stap 1, afbeelding 1 van 3 Nerf N-Strike Elite Hail-Fire Left Shell Replacement, Left Shell: stap 1, afbeelding 2 van 3 Nerf N-Strike Elite Hail-Fire Left Shell Replacement, Left Shell: stap 1, afbeelding 3 van 3
    • Before disassembling your Nerf Hail-Fire, be sure to remove the batteries.

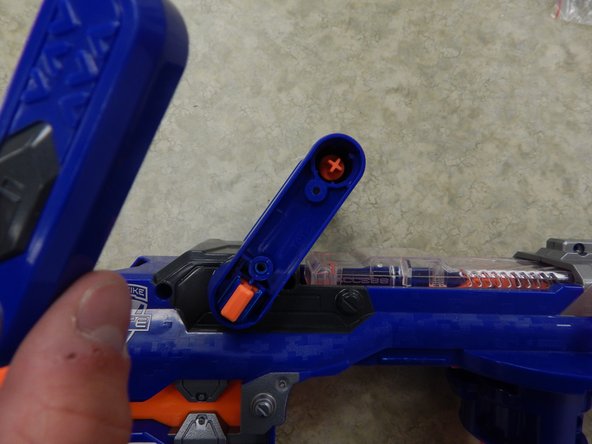
    • Remove the two 9.0 mm Phillips screws securing the battery compartment.

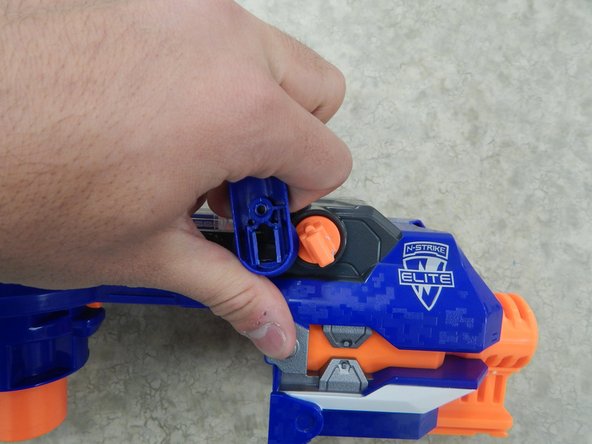
    • Slide the battery compartment out.

  2. Nerf N-Strike Elite Hail-Fire Left Shell Replacement: stap 2, afbeelding 1 van 1
    • Remove the five 9.0 mm Phillips screws securing the trigger.

  3. Nerf N-Strike Elite Hail-Fire Left Shell Replacement: stap 3, afbeelding 1 van 2 Nerf N-Strike Elite Hail-Fire Left Shell Replacement: stap 3, afbeelding 2 van 2
    • Remove the single 11.0 mm Phillips screw securing the magazine cartridge chambers.

    • Pull the entire chamber upwards to separate it from the rest of the Nerf Gun.

  4. Nerf N-Strike Elite Hail-Fire Left Shell Replacement: stap 4, afbeelding 1 van 3 Nerf N-Strike Elite Hail-Fire Left Shell Replacement: stap 4, afbeelding 2 van 3 Nerf N-Strike Elite Hail-Fire Left Shell Replacement: stap 4, afbeelding 3 van 3
    • Remove both halves of the ring by tugging on it upwards until the lock gets freed.

    • This requires quite a bit of force and if you are not careful, you may break the plastic lock.

  5. Nerf N-Strike Elite Hail-Fire Left Shell Replacement: stap 5, afbeelding 1 van 1
    • Remove the four 9.0 mm Phillips screws from the newly revealed cylinder.

  6. Nerf N-Strike Elite Hail-Fire Left Shell Replacement: stap 6, afbeelding 1 van 1
    • Remove the three 9.0 mm Phillips screws holding the top latch of the Nerf Gun together.

  7. Nerf N-Strike Elite Hail-Fire Left Shell Replacement: stap 7, afbeelding 1 van 1
    • Remove the three 9.0 mm Phillips screws holding together the firing chamber.

    • Remove the single 7.0 mm Phillips screw below the barrel.

    • Remove the two 14.0 mm Philips screws using a screwdriver with a length of approximately 4.0 inches and a diameter of approximately 0.2 cm.

  8. Nerf N-Strike Elite Hail-Fire Left Shell Replacement: stap 8, afbeelding 1 van 1
    • Remove the single 14.0 mm Phillips screw holding together the handle and the Nerf Gun.

  9. Nerf N-Strike Elite Hail-Fire Left Shell Replacement: stap 9, afbeelding 1 van 2 Nerf N-Strike Elite Hail-Fire Left Shell Replacement: stap 9, afbeelding 2 van 2
    • Remove the two 9.0 mm Phillips screws holding together the handle.

    • Remove the plastic cover of the handle.

  10. Nerf N-Strike Elite Hail-Fire Left Shell Replacement: stap 10, afbeelding 1 van 2 Nerf N-Strike Elite Hail-Fire Left Shell Replacement: stap 10, afbeelding 2 van 2
    • Insert one plastic opening tool inside one side of the orange part depicted in the picture.

    • Insert a second plastic opening tool to the other side of the orange part and gradually pull the piece out, freeing it from the handle.

  11. Nerf N-Strike Elite Hail-Fire Left Shell Replacement: stap 11, afbeelding 1 van 3 Nerf N-Strike Elite Hail-Fire Left Shell Replacement: stap 11, afbeelding 2 van 3 Nerf N-Strike Elite Hail-Fire Left Shell Replacement: stap 11, afbeelding 3 van 3
    • Pull one end of the handle away from the orange latch.

    • Repeat the procedure on the other side to completely remove the handle from the rest of the Nerf Gun.

  12. Nerf N-Strike Elite Hail-Fire Left Shell Replacement: stap 12, afbeelding 1 van 3 Nerf N-Strike Elite Hail-Fire Left Shell Replacement: stap 12, afbeelding 2 van 3 Nerf N-Strike Elite Hail-Fire Left Shell Replacement: stap 12, afbeelding 3 van 3
    • Lift the entire left shell slowly. The process should be easy and if there is any resistance, there is something wrong. You may have forgotten a screw.

    • Completely remove the left shell from the rest of the Nerf Gun.

Conclusie

To reassemble your device, follow these instructions in reverse order.

Één andere persoon heeft deze handleiding voltooid.

Aaron Poon

Lid sinds: 01/24/14

229 Reputatie

1 Handleiding geschreven

Team

Cal Poly, Team 13-13, Regan Winter 2014 Lid van Cal Poly, Team 13-13, Regan Winter 2014

CPSU-REGAN-W14S13G13

4 Leden

7 handleidingen geschreven

0 opmerkingen

Voeg opmerking toe

Weergavestatistieken:

Afgelopen 24 uren: 0

Afgelopen 7 dagen: 0

Afgelopen 30 dagen: 2

Altijd: 889