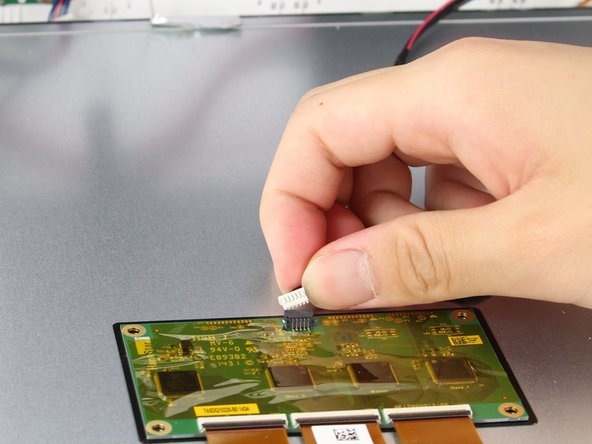
Ga door naar hoofdinhoud

Nabi Big Tab HD24 Nabi Port Replacement

Wat je nodig hebt

  1. Nabi Big Tab HD24 Nabi Port Replacement, Back Assembly: stap 1, afbeelding 1 van 1
    • Ensure that the tablet is facing you with the screen on the table.

    • Locate the four red rubber stops at the corners.

  2. Nabi Big Tab HD24 Nabi Port Replacement: stap 2, afbeelding 1 van 1
    • Use your fingers to carefully peel them off the device to reveal the screws underneath.

  3. Nabi Big Tab HD24 Nabi Port Replacement: stap 3, afbeelding 1 van 1
    • Use a Phillips #1 screwdriver to remove the 9.5 mm screw in each of the four corners.

  4. Nabi Big Tab HD24 Nabi Port Replacement: stap 4, afbeelding 1 van 1
    • Flip the tablet over such that the screen is facing upwards.

    • Locate the the 4 small openings on the sides of the tablet.

    • There should be 2 on the bottom of the tablet, 1 on each side of the tablet viewing it from the front as if you were using it.

    • Do not confuse the openings with the charging port or the USB ports. The openings will be labelled with an icon of a small fan, the Nabi logo.

  5. Nabi Big Tab HD24 Nabi Port Replacement: stap 5, afbeelding 1 van 1
    • Insert a metal spudger into one of the openings and carefully pop the device open by applying a steady downward force.

    • Repeat for the other three openings.

  6. Nabi Big Tab HD24 Nabi Port Replacement: stap 6, afbeelding 1 van 2 Nabi Big Tab HD24 Nabi Port Replacement: stap 6, afbeelding 2 van 2
    • Flip the device over so that the back assembly is facing you.

    • Use a plastic opening tool to carefully pry open the device from its hinges.

    • Take care when opening the device as there are cables running internally that are connected to both the front and the back assemblies.

  7. Nabi Big Tab HD24 Nabi Port Replacement: stap 7, afbeelding 1 van 2 Nabi Big Tab HD24 Nabi Port Replacement: stap 7, afbeelding 2 van 2
    • Locate the white port that connects the back panel to the circuit board on the back of the display.

    • Carefully pull the plastic connector straight out.

  8. Nabi Big Tab HD24 Nabi Port Replacement: stap 8, afbeelding 1 van 1
    • Be careful of the aluminum foil tape, as it can easily rip.

    • Carefully lift up the aluminum foil tape with your fingers so that the ribbon connector reveals itself.

    • Do not try to pull the ribbon cables off the screen as there is a plastic piece surrounding the ribbon cables glued onto the metal display.

  9. Nabi Big Tab HD24 Nabi Port Replacement: stap 9, afbeelding 1 van 1
    • Firmly press the two switches located on the sides of the connector and disconnect the connector from its connections.

    • Leave the connector disconnected but still intact with the metal display.

  10. Nabi Big Tab HD24 Nabi Port Replacement: stap 10, afbeelding 1 van 1
    • Use a plastic opening tool and carefully push it underneath the grey plastic case surrounding the ribbon cable.

    • Apply a downward force to carefully peel the grey plastic off of the metal display.

  11. Nabi Big Tab HD24 Nabi Port Replacement: stap 11, afbeelding 1 van 1
    • Locate the two cables running on both sides of the device found at the bottom side of the screen.

  12. Nabi Big Tab HD24 Nabi Port Replacement: stap 12, afbeelding 1 van 2 Nabi Big Tab HD24 Nabi Port Replacement: stap 12, afbeelding 2 van 2
    • Carefully grab both sides of the white plastic piece with your fingers and gently pull directly upward.

    • Do not pull from the red and black cable as it is not very sturdy and may come undone from the connector.

  13. Nabi Big Tab HD24 Nabi Port Replacement, Nabi Port: stap 13, afbeelding 1 van 1
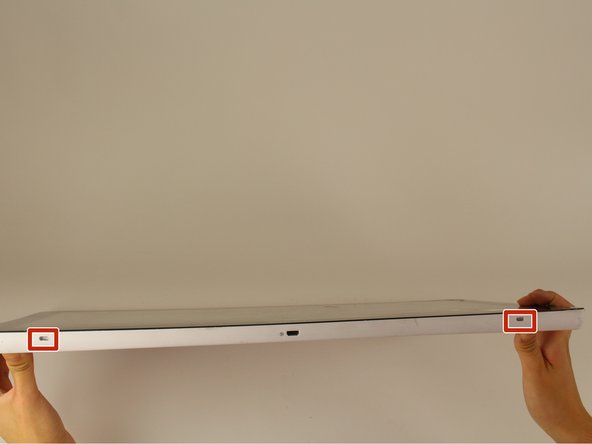
    • Locate the nonfunctional Nabi port; there should be one on each side of the tablet.

    • The circuit board of the Nabi Port has a ribbon connector attached to it and there should be a blue strip of tape at the end of the ribbon connecting to the board.

  14. Nabi Big Tab HD24 Nabi Port Replacement: stap 14, afbeelding 1 van 2 Nabi Big Tab HD24 Nabi Port Replacement: stap 14, afbeelding 2 van 2
    • Locate the black tab which secures the blue end of the ribbon cable to the Nabi port.

    • Lift up the black tab to release the ribbon cable.

  15. Nabi Big Tab HD24 Nabi Port Replacement: stap 15, afbeelding 1 van 2 Nabi Big Tab HD24 Nabi Port Replacement: stap 15, afbeelding 2 van 2
    • Pull the ribbon connector away from the circuit board to disconnect it.

  16. Nabi Big Tab HD24 Nabi Port Replacement: stap 16, afbeelding 1 van 1
    • Unscrew the 4.5 mm silver screw holding the Nabi Port in place.

    • Lift out the Nabi Port and replace it with your new one.

Conclusie

To reassemble your device, follow these instructions in reverse order.

Één andere persoon heeft deze handleiding voltooid.

Kelvin Cao

Lid sinds: 10/06/16

437 Reputatie

3 handleidingen geschreven

Team

Cal Poly, Team 4-1, Livingston Fall 2016 Lid van Cal Poly, Team 4-1, Livingston Fall 2016

CPSU-LIVINGSTON-F16S4G1

4 Leden

14 handleidingen geschreven

0 opmerkingen

Voeg opmerking toe

Weergavestatistieken:

Afgelopen 24 uren: 0

Afgelopen 7 dagen: 1

Afgelopen 30 dagen: 4

Altijd: 1,256