Ga door naar hoofdinhoud

Motorola V551 Circuit Board Replacement

Wat je nodig hebt

  1. Motorola V551 Circuit Board Replacement, Battery: stap 1, afbeelding 1 van 2 Motorola V551 Circuit Board Replacement, Battery: stap 1, afbeelding 2 van 2
    • Press down on the chrome button on the bottom of the chassis. Simultaneously slide the back cover down, away from the phone.

  2. Motorola V551 Circuit Board Replacement: stap 2, afbeelding 1 van 1
    • Lever the battery out by pressing upwards on the bottom corners of the battery.

  3. Motorola V551 Circuit Board Replacement, Circuit Board: stap 3, afbeelding 1 van 3 Motorola V551 Circuit Board Replacement, Circuit Board: stap 3, afbeelding 2 van 3 Motorola V551 Circuit Board Replacement, Circuit Board: stap 3, afbeelding 3 van 3
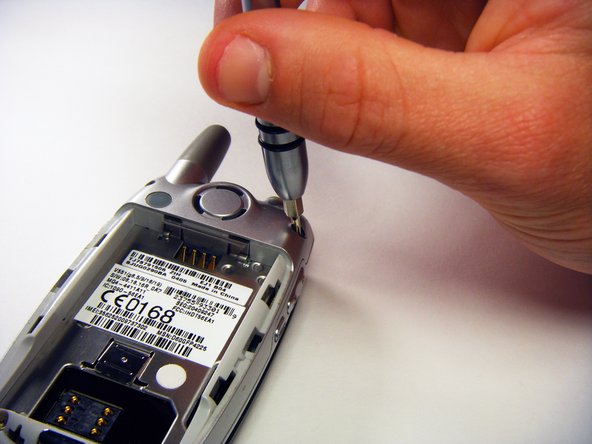
    • Remove the rubber screw covers using a plastic spudger.

    • Use a T6 Torx screwdriver to remove the screws underneath the rubber screw covers.

  4. Motorola V551 Circuit Board Replacement: stap 4, afbeelding 1 van 1
    • Unscrew the antenna.

  5. Motorola V551 Circuit Board Replacement: stap 5, afbeelding 1 van 3 Motorola V551 Circuit Board Replacement: stap 5, afbeelding 2 van 3 Motorola V551 Circuit Board Replacement: stap 5, afbeelding 3 van 3
    • Gently release the two latches using an opening tool.

    • The plastic latches are very fragile. Don’t use excessive force or they might break.

    • Pry off the back panel by wedging an opening tool into the crevice between the back panel and the circuit board.

    • Lift the back panel off of the phone.

  6. Motorola V551 Circuit Board Replacement: stap 6, afbeelding 1 van 2 Motorola V551 Circuit Board Replacement: stap 6, afbeelding 2 van 2
    • Loosen the copper circuit board connection with an opening tool.

    • Gently lift the copper connection.

  7. Motorola V551 Circuit Board Replacement: stap 7, afbeelding 1 van 3 Motorola V551 Circuit Board Replacement: stap 7, afbeelding 2 van 3 Motorola V551 Circuit Board Replacement: stap 7, afbeelding 3 van 3
    • Lift up and pull out the pressure pad from under the buttons on the side of the chassis.

    • Gently lift the motherboard off of the front panel.

Conclusie

To reassemble your device, follow these instructions in reverse order.

3 andere personen hebben deze handleiding voltooid.

gregatron

Lid sinds: 10/29/09

105 Reputatie

6 handleidingen geschreven

Team

Cal Poly, Team 6-6, Maness Fall 2009 Lid van Cal Poly, Team 6-6, Maness Fall 2009

CPSU-MANESS-F09S6G6

4 Leden

12 handleidingen geschreven

0 opmerkingen

Voeg opmerking toe

Weergavestatistieken:

Afgelopen 24 uren: 1

Afgelopen 7 dagen: 2

Afgelopen 30 dagen: 4

Altijd: 3,142